This document is for HP Deskjet F4580 and F4583 All-in-One printers.
HP Deskjet F4580 Printers - Blinking Lights
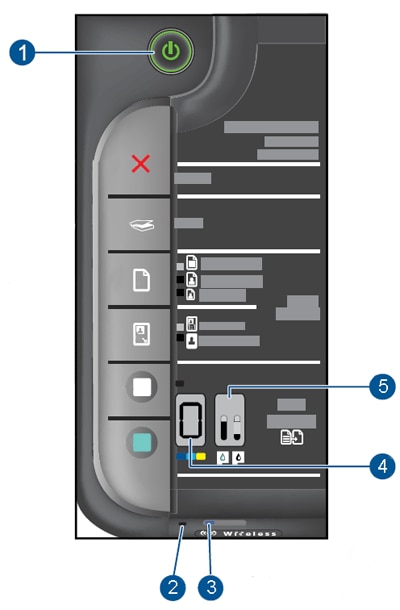
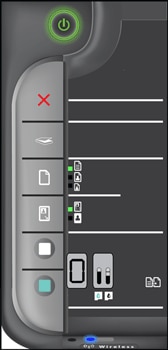
The following sections describe the most common combinations of blinking (flashing) lights displayed on the product control panel, followed by solutions for each combination. Find the blinking lights pattern you are experiencing, and then follow the steps to resolve the issue.
observação:An E might also appear in the Number of Copies display. This is an additional indication that there is an issue with the product that needs to be resolved. The presence of an E, however, does not affect the meaning of the blinking lights, and can be disregarded for troubleshooting purposes.
-
Power light
-
Attention light
-
Wireless button indicator light
-
Number of Copies display (where an E or ! might appear)
-
Ink Level indicator lights
Figura : HP Deskjet F4580 and F4583 control panel with the lights indicated
observação:There might be more than one solution for some blinking lights patterns. After you find the pattern that matches your blinking lights pattern, try each solution in the order presented until you resolve the issue.
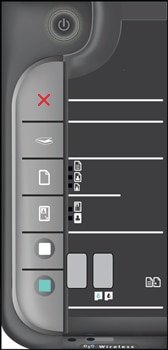
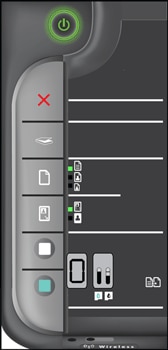
Issue: All the lights are off
In this normal condition, the following blinking lights pattern displays on the control panel:
-
Power light: Off
-
Attention light: Off
-
Ink Level indicator lights: Off
-
Number of Copies display: Off
-
Wireless button indicator light: Off
Figura : All the lights are off
Solutions
Solution one: Turn on the All-in-One
Press the Power button ( ) to turn on the product.
) to turn on the product.
Figura : Press the Power button
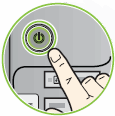
If the product does not turn on, continue to the next solution.
Solution two: Make sure that the All-in-One is plugged in
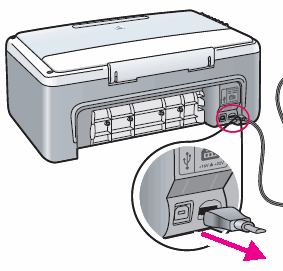
Follow these steps to make sure that the power cord is connected to the rear of the product and plugged into an electrical outlet.
-
Check the rear of the product to make sure that the cord from the power supply is inserted securely into the power connection.
-
Check the power supply to make sure that the power cord is securely plugged into it.
-
Check the electrical outlet to make sure that the power cord is securely plugged into it.
-
Power connection
-
Power cord and adaptor
-
Electrical outlet
Figura : Check the electrical connections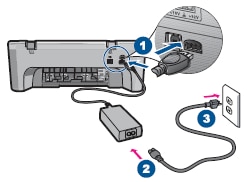
-
-
Press the Power button () to turn on the product.
-
If the product does not turn on, follow the same steps and try a different wall outlet.
-
If these steps resolved the issue, you do not need to continue troubleshooting.
-
If the issue persists, continue to the next solution.
Solution three: Press the Power button more slowly
The product might not respond if you press the Power button () too quickly.
) too quickly.
Press the Power button () once slowly to turn on the product.
) once slowly to turn on the product.
observação:It might take a few minutes for the product to turn on. If you press the Power button (
-
If these steps resolved the issue, you do not need to continue troubleshooting.
-
If the issue persists, continue to the next solution.
Solution four: Reset the power module, and then test the power
Follow these steps to reset the power module on the power cord, and then test the power on the product.
Step one: Reset the power module
The power module has a safety feature inside that protects the product during a power surge. If you experienced a recent power surge, the power module might need to be reset. Use the following steps to reset the power module.
-
Disconnect the power supply from the rear of the product.Figura : Disconnect the power cord
-
Unplug the power cord from the electrical outlet, power strip, or surge protector.
-
If the product uses a power module with a detachable power cord, disconnect the cord from the power module.
-
Wait 15 seconds.
-
Reconnect the power cord to the power module.
-
Plug the power cord back into a wall outlet. Do not use a power strip or surge protector.
-
Check to see if the power module has an LED.
-
If the power module does not have an LED, continue to the next step.
-
If the power module has an LED, check to see if the LED lights up.
-
If the LED does not light up, contact HP to replace the power module. To buy a compatible power module, right-click the following link, How to Buy HP, and then click Open in New Window.
-
If the LED lights up, continue to the next step.
-
-
Step two: Test the power on the All-in-One
Follow these steps to test the power on the product.
-
Reconnect the power supply to the rear of the product.
-
Press and then quickly release the Power button () to start a power on/off cycle. Do not hold the button down.
Figura : Press and then quickly release the Power button
 If you press and hold the Power button too long, the product might turn on and then off without restarting. If this happens, press and quickly release the Power button () again.
-
If these steps resolved the issue, you do not need to continue troubleshooting.
-
If the issue persists, continue to the next solution.
Solution five: Test the power with a compatible power cord from a different All-in-One
If you have another available power cord that is compatible with the product, use the alternate cord to test the power.
-
Press the Power button () to turn off the product.
-
Disconnect the power cord from the rear of the product.Figura : Disconnect the power cord
-
Unplug the power cord from the wall outlet.
-
Connect the alternate power cord to the rear of the product.
-
Plug the alternate power cord into the wall outlet.
-
Press the Power button () to turn on the product.
-
If the product turns on with the alternate power cord, the original power cord caused the issue. Contact HP to replace the power cord. Right-click the following link, How to Buy HP, to buy a compatible power cord.
-
If the product does not turn on with the alternate power cord, continue to the next solution.
Solution six: Service the All-in-One
If you have completed all the steps and are still experiencing a problem, continue to the Service the All-in-One section at the end of this document.
Issue: The Power light blinks slowly, and all the other lights are off
In this normal condition, the following blinking lights pattern displays on the control panel:
-
Power light: Blinks
-
Attention light: Off
-
Ink Level indicator lights: Off
-
Number of Copies display: Off
-
Wireless button indicator light: Normal operation
Figura : The Power light blinks slowly
Solutions
Solution one: Wait for the All-in-One to start up
Wait for the product to start up.
-
If the product starts up normally, there is no need to continue troubleshooting.
-
If the product is unresponsive for more than 60 seconds, continue to the next solution.
Solution two: Turn the All-in-One off and then on again
Follow these steps to turn the product off and then on again.
-
Press the Power button () to turn off the product.
-
Wait 20 seconds.
-
Press the Power button () to turn on the product.
-
Check the Power light () on the control panel to make sure that it is no longer blinking.
-
If these steps resolved the issue, you do not need to continue troubleshooting.
-
If the issue persists, continue to the next solution.
Solution three: Reset the All-in-One
Follow these steps to reset the product.
Step one: Perform a power reset
-
With the printer turned on, disconnect the power cord from the rear of the printer.
-
Unplug the power cord from the wall outlet.
-
Wait at least 15 seconds.
-
Plug the power cord back into the wall outlet.
-
Reconnect the power cord to the printer.
-
Turn the printer on.
Step two: Print a self-test page
Printing a self-test page verifies if the hardware functions correctly.
-
Load U.S. letter or A4, unused, plain white paper into the input tray.
-
On the control panel, press and hold the Paper Type button and Resize to Fit button at the same time.
-
Paper Type button
-
Resize to Fit button
Figura : Press these buttons to print a self-test report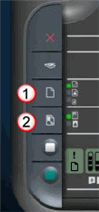
-
-
Release both buttons at the same time. The product prints a self-test report.
-
If these steps resolved the issue, you do not need to continue troubleshooting.
-
If the issue persists, continue to the next solution.
Solution four: Service the All-in-One
If you have completed all the steps and are still experiencing a problem, continue to the Service the All-in-One section at the end of this document.
Issue: The Power light blinks, and the Ink Level indicator lights and the Number of Copies display are on
In this normal condition, the following blinking lights pattern displays on the control panel:
-
Power light: Blinks
-
Attention light: Off
-
Ink Level indicator lights: Current levels
-
Number of Copies display: On
-
Wireless button indicator light: Normal operation
Figura : The Power light blinks
Solutions
Solution one: Wait for the All-in-One to complete the job
Wait for the product to finish processing a copying, scanning, printing, or photo or maintenance job.
-
If the product completes the job normally, there is no need to continue troubleshooting.
-
If the product is unresponsive for more than 60 seconds, continue to the next solution.
Solution two: Cancel and then retry the task
Follow these steps to cancel and then retry the current task.
-
Press the Cancel button (
 ) on the control panel.
-
If you cannot cancel the task, press and hold the Power button () for three seconds to turn off the product.
-
If the product successfully turns off, press the Power button () to turn on the product, and then press the appropriate button(s) on the product again to perform the intended task.
-
If the product does not turn off, continue to the next solution.
-
Solution three: Reset the All-in-One
Follow these steps to reset the product.
Step one: Perform a power reset
-
With the printer turned on, disconnect the power cord from the rear of the printer.
-
Unplug the power cord from the wall outlet.
-
Wait at least 15 seconds.
-
Plug the power cord back into the wall outlet.
-
Reconnect the power cord to the printer.
-
Turn the printer on.
Step two: Print a self-test page
Printing a self-test page verifies if the hardware functions correctly.
-
Load U.S. letter or A4, unused, plain white paper into the input tray.
-
On the control panel, press and hold the Paper Type button and Resize to Fit button at the same time.
-
Paper Type button
-
Resize to Fit button
Figura : Press these buttons to print a self-test report
-
-
Release both buttons at the same time. The product prints a self-test report.
-
If these steps resolved the issue, you do not need to continue troubleshooting.
-
If the issue persists, continue to the next solution.
Solution four: Service the All-in-One
If you have completed all the steps and are still experiencing a problem, continue to the Service the All-in-One section at the end of this document.
Issue: The Power light blinks fast for 3 seconds, and then remains on
In this normal condition, the following blinking lights pattern displays on the control panel:
-
Power light: Blinks fast for 3 seconds, and then remains on
-
Attention light: Off
-
Ink Level indicator lights: Current levels
-
Number of Copies display: On
-
Wireless button indicator light: Normal operation
Figura : The Power light blinks fast for 3 seconds, and then remains on

Solutions
Solution one: Wait for the All-in-One to complete the job
Wait for the product to finish processing a copying, scanning, printing, or photo or maintenance job.
-
If the product completes the job normally, there is no need to continue troubleshooting.
-
If the product is unresponsive for more than 60 seconds, continue to the next solution.
Solution two: Cancel and then retry the task
Follow these steps to cancel and then retry the current task.
-
Press the Cancel button () on the control panel.
-
If you cannot cancel the task, press and hold the Power button () for three seconds to turn off the product.
-
If the product successfully turns off, press the Power button () to turn on the product, and then press the appropriate button(s) on the product again to perform the intended task.
-
If the product does not turn off, continue to the next solution.
-
Solution three: Reset the All-in-One
Follow these steps to reset the product.
Step one: Perform a power reset
-
With the printer turned on, disconnect the power cord from the rear of the printer.
-
Unplug the power cord from the wall outlet.
-
Wait at least 15 seconds.
-
Plug the power cord back into the wall outlet.
-
Reconnect the power cord to the printer.
-
Turn the printer on.
Step two: Print a self-test page
Printing a self-test page verifies if the hardware functions correctly.
-
Load U.S. letter or A4, unused, plain white paper into the input tray.
-
On the control panel, press and hold the Paper Type button and Resize to Fit button at the same time.
-
Paper Type button
-
Resize to Fit button
Figura : Press these buttons to print a self-test report
-
-
Release both buttons at the same time. The product prints a self-test report.
-
If these steps resolved the issue, you do not need to continue troubleshooting.
-
If the issue persists, continue to the next solution.
Solution four: Service the All-in-One
If you have completed all the steps and are still experiencing a problem, continue to the Service the All-in-One section at the end of this document.
Issue: The Power light and the Attention light blink fast for 10 seconds, and then remain on
In this error condition, the following blinking lights pattern displays on the control panel:
-
Power light: Blinks fast for 10 seconds, and then remains on
-
Attention light: Blinks fast for 10 seconds, and then remains on
-
Ink Level indicator lights: Current levels
-
Number of Copies display: On
-
Wireless button indicator light: Normal operation
Figura : The Power light and the Attention light blink fast for 10 seconds, and then remain on
Solutions
Solution one: Make sure that your computer is turned on
Follow these steps to make sure that your computer is turned on.
-
If the computer is turned off, press the power button on the computer to turn it on.
-
Try the intended task again.
-
If these steps resolved the issue, you do not need to continue troubleshooting.
-
If the issue persists, continue to the next solution.
Solution two: Check the connection between the All-in-One and the computer
Follow these steps to make sure that the USB cable is securely connected to the product and the computer.
Step one: Disconnect and then reconnect the USB cable
-
Disconnect the USB cable from the rear of the product.
cuidado:
Do not disconnect the power cord during this step.Figura : Disconnect the USB cable from the rear of the product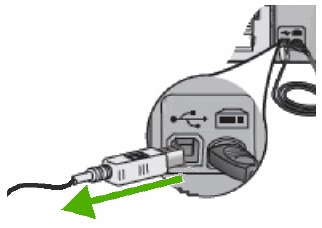
-
Disconnect the USB cable from the rear of the computer.
-
Wait five seconds.
-
Securely reconnect the USB cable to the rear of the computer.
-
Securely reconnect the USB cable to the rear of the product.Figura : Secure the USB cable
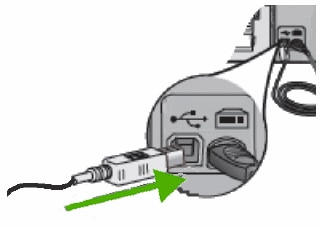
observação:
Make sure that the USB cable is connected correctly. The icon on the USB cable ( ) generally faces up when the cable is correctly connected.
Step two: Test the connection
Press the appropriate button(s) on the product control panel again to perform the intended task.
-
If the product operates normally, there is no need to continue troubleshooting.
-
If the lights on the control panel still blink, continue to the next step.
Step three: Replace the USB cable
-
Securely connect an alternate USB cable to the product.
-
Securely connect the alternate USB cable to the computer.
observação:
HP supports USB cables less than 3 meters (9 feet 10 inches) in length. -
Try the intended task again.
-
If these steps resolved the issue, you do not need to continue troubleshooting.
-
If the issue persists, continue to the next solution.
Solution three: Install the HP software
You must download and then install the HP product software in order for your computer to detect the product.
Step one: Install the HP software
-
Turn on the printer.
-
Disconnect the USB cable from the printer, if necessary. The software installation prompts you to connect the cable if needed.
-
If a Let's identify your product to get started page displays, click Printer, type your printer model number, and then click Submit.
-
If you need to change the operating system, click Change, select your version, and then click Change.
-
Under the Driver heading, click Download for the full software package, or click Basic Drivers for other driver options.
Step two: Print a self-test page
Printing a self-test page verifies if the hardware functions correctly.
-
Load U.S. letter or A4, unused, plain white paper into the input tray.
-
On the control panel, press and hold the Paper Type button and Resize to Fit button at the same time.
-
Paper Type button
-
Resize to Fit button
Figura : Press these buttons to print a self-test report
-
-
Release both buttons at the same time. The product prints a self-test report.
-
If these steps resolved the issue, you do not need to continue troubleshooting.
-
If the issue persists, continue to the next solution.
Solution four: Service the All-in-One
If you have completed all the steps and are still experiencing a problem, continue to the Service the All-in-One section at the end of this document.
Issue: The Attention light blinks, and an E appears in the Number of Copies display
In this error condition, the following blinking lights pattern displays on the control panel:
-
Power light: On
-
Attention light: Blinks fast
-
Ink Level indicator lights: Current levels
-
Number of Copies display: E
-
Wireless button indicator light: Normal operation
Figura : The Attention light blinks, and an E appears

Solutions
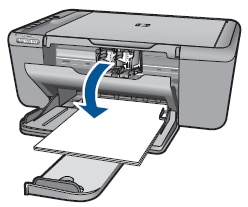
Solution one: Open the paper tray
Follow these steps to open the paper tray.
-
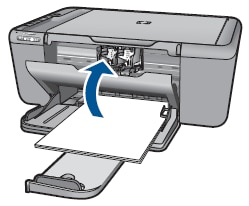
Pull on the top of the closed tray to open it, and then gently lower the tray until it is horizontal and stops.
-
Slide out the tray extender, and then flip up the paper stop at the end.Figura : Lower the paper tray, slide out the tray extender, and then flip up the paper stop
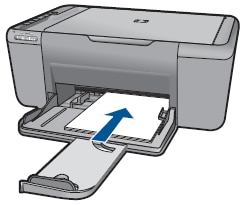
observação:
For best results when loading legal-size paper, fold in the paper tray extender before loading the paper to avoid a paper jam. -
Try the intended task again.
-
If these steps resolved the issue, you do not need to continue troubleshooting.
-
If the issue persists, continue to the next solution.
Solution two: Cancel and then retry the task
Follow these steps to cancel and then retry the current task.
-
Press the Cancel button () on the control panel.
-
If you cannot cancel the task, press and hold the Power button (
 ) for three seconds to turn off the product.
-
If the product successfully turns off, press the Power button (
 ) to turn on the product, and then press the appropriate button(s) on the product again to perform the intended task.
-
If the product does not turn off, continue to the next solution.
-
-
If these steps resolved the issue, you do not need to continue troubleshooting.
-
If the issue persists, continue to the next solution.
Solution three: Reset the All-in-One
Follow these steps to reset the product.
Step one: Perform a power reset
-
With the printer turned on, disconnect the power cord from the rear of the printer.
-
Unplug the power cord from the wall outlet.
-
Wait at least 15 seconds.
-
Plug the power cord back into the wall outlet.
-
Reconnect the power cord to the printer.
-
Turn the printer on.
Step two: Print a self-test page
Printing a self-test page verifies if the hardware functions correctly.
-
Load U.S. letter or A4, unused, plain white paper into the input tray.
-
On the control panel, press and hold the Paper Type button and Resize to Fit button at the same time.
-
Paper Type button
-
Resize to Fit button
Figura : Press these buttons to print a self-test report
-
-
Release both buttons at the same time. The product prints a self-test report.
-
If these steps resolved the issue, you do not need to continue troubleshooting.
-
If the issue persists, continue to the next solution.
Solution four: Service the All-in-One
If you have completed all the steps and are still experiencing a problem, continue to the Service the All-in-One section at the end of this document.
Issue: The Attention light blinks, and an ! appears in the Number of Copies display
In this error condition, the following blinking lights pattern displays on the control panel:
-
Power light: On
-
Attention light: Blinks fast
-
Ink Level indicator lights: Current levels
-
Number of Copies display: ! blinks fast
-
Wireless button indicator light: Normal operation
Figura : The Attention light blinks, and an ! appears

Solutions
Solution one: Close the cartridge access door
-
Make sure that the cartridge access door is completely closed.Figura : Close the cartridge access door
-
Try the intended task again.
-
If these steps resolved the issue, you do not need to continue troubleshooting.
-
If the issue persists, continue to the next solution.
Solution two: Load paper
Follow these steps to load letter or A4 paper into the product.
-
Lower the paper tray, slide out the tray extender toward you, and then flip up the paper stop at the end to catch paper as it exits the product.
observação:
For best results when loading legal-size paper, slide in the paper tray extender before loading the paper to avoid a paper jam. -
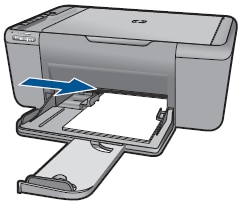
Slide the paper width guide to its outermost positionFigura : Slide the paper width guide to its outermost position
-
Tap the stack of paper on a flat surface to align the edges.
-
Make sure that the paper is free of rips, dust, wrinkles, and curled or bent edges, and that all the paper in the stack is the same size and type.
-
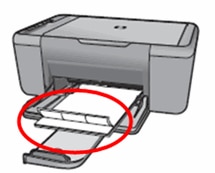
Insert the paper into the paper tray print side down until it stops. To avoid bending the paper, make sure that you do not push the paper in too far, or push too hard. If you are using letterhead, insert the top of the page first.Do not use too much paper. Make sure that the stack of paper is no higher than the top of the paper width guide.
observação:
Forcing the paper too far into the product might cause multiple sheets of paper to be fed through the print mechanism, or cause a paper jam.Figura : Load paper into the product
-
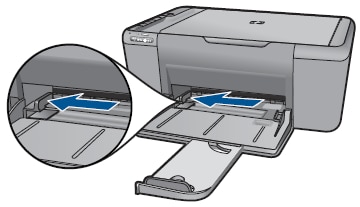
Slide the paper width guide inward until it stops at the edge of the paper.Figura : Slide the paper width guide against the edge of the paper
-
Try the intended task again.
-
If these steps resolved the issue, you do not need to continue troubleshooting.
-
If the issue persists, continue to the next solution.
Solution three: Match the paper settings to the print job
Use one of the following methods to change the paper size settings in the print driver to match the print job. Create a custom paper size only if the correct paper size is not an option.
-
If these steps resolved the issue, you do not need to continue troubleshooting.
-
If the issue persists, continue to the next solution.
Solution four: Clear any jammed paper
Follow these steps to clear a paper jam from the product.
Step one: Remove any loose paper
Remove any loose sheets of paper from the input tray and the output tray.
cuidado:Do not remove jammed paper at this stage. Trying to clear jammed paper from the front of the product can damage theprint mechanism.
|
Remove any loose paper
|
Do not pull jammed paper
|
|

|
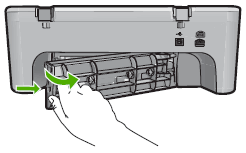
Step two: Clear the paper jam from the rear of the All-in-One
cuidado:Always try to pull jammed paper from the rear of the product or the paper tray. Pulling paper from inside the front cover can cause mechanical damage to the product.
-
Press the Power button () to turn off the product.
-
Disconnect the USB cable from the rear of the product.
-
Disconnect the power cord from the rear of the product.Figura : Disconnect the power cord
-
Remove the rear access door. Press in the tab on the left side of the door, and then pull the door away from the product to remove it.Figura : Remove the rear access door
-
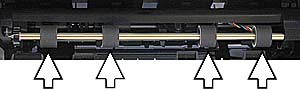
Gently remove any jammed paper or bits of torn paper from the rollers inside the product. Use both hands to pull any whole sheets of paper to avoid tearing them.Figura : Gently remove the jammed paper
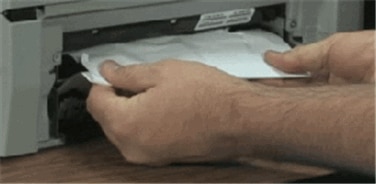
cuidado:
Use a flashlight to thoroughly check the rollers and wheels for torn pieces of paper that might remain inside the product. If any torn pieces of paper remain inside the product, more jams are likely to occur.Figura : Remove scraps of paper
-
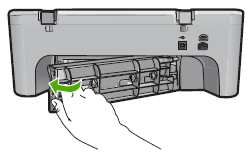
Reattach the rear access door. Gently push the door forward until it snaps into place.Figura : Reattach the rear access door
Step three: Clear the paper jam from the front of the All-in-One
If you cannot remove the paper jam from the rear of the product, follow these steps to remove the paper jam from the front.
-
Open the cartridge access door. The carriage might move to the center of the product. Wait until the carriage is idle and silent before continuing.Figura : Open the cartridge access door
-
Carefully remove any jammed paper from the front of the product.
observação:
Remove paper from the front of the product as carefully as possible. If any torn pieces of paper remain inside the product, more paper jams are likely to occur, and this could damage the print mechanism. -
Close the cartridge access door.Figura : Close the cartridge access door
-
Reconnect the power cord to the rear of the product.
-
Press the Power button () to turn on the product.
Step four: Print a self-test page
Printing a self-test page verifies if the hardware functions correctly.
-
Load U.S. letter or A4, unused, plain white paper into the input tray.
-
On the control panel, press and hold the Paper Type button and Resize to Fit button at the same time.
-
Paper Type button
-
Resize to Fit button
Figura : Press these buttons to print a self-test report
-
-
Release both buttons at the same time. The product prints a self-test report.
-
If these steps resolved the issue, you do not need to continue troubleshooting.
-
If the issue persists, continue to the next solution.
Solution five: Check for carriage obstructions
Follow these steps to make sure that the carriage can move freely.
Step one: Make sure that the carriage can move freely
-
Press the Power button () to turn on the product.
-
Open the cartridge access door. The carriage might move to the center of the product. Wait until the carriage is idle and silent before continuing.Figura : Open the cartridge access door
-
Without turning off the product, disconnect the power cord from the rear of the product.
cuidado:
You must disconnect the power cord to move parts by hand without the risk of an electrical shock. -
Unplug the power cord from the wall outlet.
-
Look inside the product to see where the carriage is stuck, and then check for any torn paper or objects that might be restricting the carriage.
observação:
You might need a flashlight to illuminate areas for proper viewing. -
Reach inside the product through the cartridge access door, and then manually move the carriage.
-
If the carriage is stuck on the right side of the product, move the carriage to the left side of the product.
-
If the carriage is stuck on the left side of the product, move the carriage to the right side of the product.
-
If the carriage is stuck in the middle of the product, move the carriage to the right side of the product.
-
-
Remove any loose paper or obstructions found.
-
Make sure that the carriage can move freely across the width of the product by gently pushing the carriage to the left and then to the right.
-
Close the cartridge access door.Figura : Close the cartridge access door
-
Reconnect the power cord to the rear of the product.
-
Plug the power cord back into the wall outlet.
-
Press the Power button () to turn on the product.
-
Check the control panel to make sure that the lights are no longer blinking.
Step two: Print a self-test page
Printing a self-test page verifies if the hardware functions correctly.
-
Load U.S. letter or A4, unused, plain white paper into the input tray.
-
On the control panel, press and hold the Paper Type button and Resize to Fit button at the same time.
-
Paper Type button
-
Resize to Fit button
Figura : Press these buttons to print a self-test report
-
-
Release both buttons at the same time. The product prints a self-test report.
-
If these steps resolved the issue, you do not need to continue troubleshooting.
-
If the issue persists, continue to the next solution.
Solution six: Clean the paper feed rollers
Dust, paper fiber, and other debris might accumulate on the paper feed rollers and cause paper jams and paper feed issues. Follow these steps to clean the paper feed rollers.
Step one: Clean the paper feed rollers
-
Gather the following materials:
-
A clean, lint-free cloth, or any cloth that will not come apart or leave fibers
-
Distilled, filtered, or bottled water (tap water might damage the product)
-
-
Press the Power button () to turn off the product.
-
Disconnect the power cord from the rear of the product.
-
Remove the rear access door. Press in the tab on the left side of the door, and then pull the door away from the product to remove it.Figura : Remove the rear access door
-
Lightly dampen a clean, lint-free cloth with bottled or distilled water, and then squeeze any excess liquid from the cloth.
-
Press the cloth against the paper feed rollers, and then rotate them upwards with your fingers. Apply a moderate amount of pressure to remove any dust or dirt buildup.Figura : Clean the paper feed rollers
-
Allow the rollers to dry for 10 or 15 minutes.
-
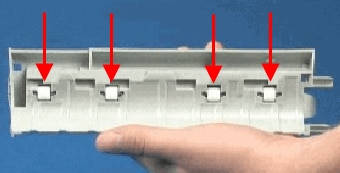
Check the paper feed rollers on the rear access door to make sure that they are clean, free of paper bits, and rotate freely.Figura : The rollers in the rear access door
-
Reattach the rear access door. Gently push the door forward until it snaps into place.Figura : Reattach the rear access door
-
Reconnect the power cord to the rear of the product.
-
If the product does not turn on automatically, press the Power button () to turn it on.
Step two: Print a self-test page
Printing a self-test page verifies if the hardware functions correctly.
-
Load U.S. letter or A4, unused, plain white paper into the input tray.
-
On the control panel, press and hold the Paper Type button and Resize to Fit button at the same time.
-
Paper Type button
-
Resize to Fit button
Figura : Press these buttons to print a self-test report
-
-
Release both buttons at the same time. The product prints a self-test report.
-
If these steps resolved the issue, you do not need to continue troubleshooting.
-
If the issue persists, continue to the next solution.
Solution seven: Reset the All-in-One
Follow these steps to reset the product.
Step one: Perform a power reset
-
With the printer turned on, disconnect the power cord from the rear of the printer.
-
Unplug the power cord from the wall outlet.
-
Wait at least 15 seconds.
-
Plug the power cord back into the wall outlet.
-
Reconnect the power cord to the printer.
-
Turn the printer on.
Step two: Print a self-test page
Printing a self-test page verifies if the hardware functions correctly.
-
Load U.S. letter or A4, unused, plain white paper into the input tray.
-
On the control panel, press and hold the Paper Type button and Resize to Fit button at the same time.
-
Paper Type button
-
Resize to Fit button
Figura : Press these buttons to print a self-test report
-
-
Release both buttons at the same time. The product prints a self-test report.
-
If these steps resolved the issue, you do not need to continue troubleshooting.
-
If the issue persists, continue to the next solution.
Solution eight: Service the All-in-One
If you have completed all the steps and are still experiencing a problem, continue to the Service the All-in-One section at the end of this document.
Issue: The Attention light and one or both of the Ink Level indicator lights blink
In this error condition, the following blinking lights pattern displays on the control panel:
-
Power light: On
-
Attention light: Blinks fast
-
Ink Level indicator lights: An ! blinks fast (the ! might be above the Color Ink Level indicator, the Black Ink Level indicator, or both)
-
Number of Copies display: E
-
Wireless button indicator light: Normal operation
|
Figura : The Attention light and both Ink Level lights blink fast, and an E displays

|
Figura : The Attention light and the Color Ink Level light blink fast, and an E displays

|
Figura : The Attention light and the Black Ink Level light blink fast, and an E displays
|
-
CauseA problem exists with the cartridges.
Solutions
Solution one: Install the cartridges
Follow these steps to install the cartridges in the product. If you have already installed the cartridges, proceed to the next solution to check cartridge compatibility.
-
Press the Power button () to turn on the product.
-
Load plain white paper in the paper tray.Figura : Load paper into the product
-
Adjust the paper width guide inward until it rests against the side of the paper.Figura : Slide the paper width guide against the edge of the paper
-
Open the cartridge access door. The carriage might move to the center of the product. Wait until the carriage is idle and silent before continuing.Figura : Open the cartridge access door
-
Remove the new cartridge from its packaging.Figura : Remove the cartridge from its packaging
-
Pull the pink pull tab to remove the protective tape from the nozzles.Figura : Remove the protective tape with the pink pull tab
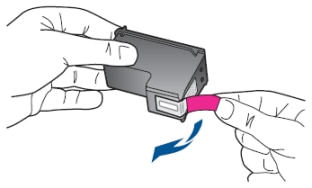
cuidado:
Do not touch the copper-colored electrical contacts or the ink nozzles on the cartridge. Doing so can cause bad electrical connections, clogged ink nozzles, or poor print quality.Figura : Do not touch the copper-colored electrical contacts or the ink nozzles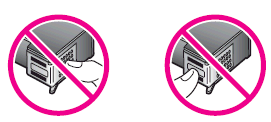
-
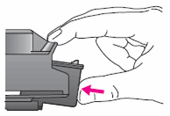
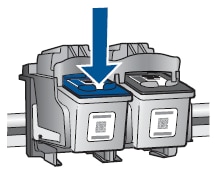
Hold the cartridge by its sides, and then slide the cartridge forward into its slot at a slightly upward angle.Figura : Insert the cartridge

-
Firmly push the cartridge in until it snaps into place.Figura : Snap the cartridge into place
-
Repeat these steps to insert the other cartridge into its designated slot.
-
Close the cartridge access door.Figura : Close the cartridge access door
-
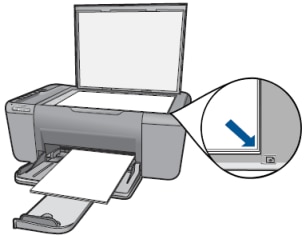
Wait for the product to print an alignment page.
-
Load the alignment page print side down on the right front corner of the scanner glass.Figura : Load the alignment page
-
Lower the scanner lid, and then press the Start Copy Black button (
 ) or the Start Copy Color button (
 ) to complete the alignment.
When the Power button () stops blinking, the alignment is complete.
) to complete the alignment.
When the Power button () stops blinking, the alignment is complete.
-
Make sure that the USB cable is securely connected to the rear of the product and to the computer.
-
Try the intended task again.
-
If these steps resolved the issue, you do not need to continue troubleshooting.
-
If the issue persists, continue to the next solution.
Solution two: Check cartridge compatibility
Purchase replacement cartridges and other supplies from the HP Store or local retailers.
-
Locate the cartridge selection number on the cartridge label.
-
Cartridge selection number
Figura : Locate the cartridge selection number on the cartridge label
-
-
Compare the cartridge selection number on the cartridge with the cartridge number on the HP SureSupply Web site.
-
If your cartridges are not compatible, replace them with compatible HP cartridges, and then follow the instructions for installing new cartridges in this document.
observação:
HP cannot guarantee the quality of refilled or remanufactured cartridges.
-
If these steps resolved the issue, you do not need to continue troubleshooting.
-
If the issue persists, continue to the next solution.
Solution three: Remove and then reinstall the cartridges
Follow these steps to make sure that both cartridges are installed and seated correctly.
Step one: Remove the cartridges
-
Press the Power button () to turn on the product.
-
Open the cartridge access door. The carriage might move to the center of the product. Wait until the carriage is idle and silent before continuing.Figura : Open the cartridge access door
-
Press lightly on the top of the cartridge that you are removing to release it from its slot.Figura : Remove the cartridge by pressing down to release it
observação:
The black cartridge belongs in the slot on the right, and the color cartridge belongs in the slot on the left. -
Pull the cartridge toward you out of its slot.
-
If the cartridge has protective tape covering its nozzles, use the pink pull tab to remove it.Figura : Remove the protective tape with the pink pull tab
cuidado:
Do not touch the copper-colored electrical contacts or the ink nozzles on the cartridge. Doing so can cause bad electrical connections, clogged ink nozzles, or poor print quality.Figura : Do not touch the copper-colored electrical contacts or the ink nozzles
-
Repeat these steps to remove the other cartridge.
Step two: Reinstall the cartridges
-
Hold the cartridge by its sides, and then slide the cartridge forward into its slot at a slightly upward angle.Figura : Insert the cartridge
-
Firmly push the cartridge in until it snaps into place.Figura : Snap the cartridge into place
-
Repeat these steps to reinsert the other cartridge into its designated slot.
-
Close the cartridge access door.Figura : Close the cartridge access door
-
Wait for the product to print an alignment page.
-
Load the alignment page print side down on the right front corner of the scanner glass.Figura : Load the alignment page
-
Lower the scanner lid, and then press the Start Copy Black button () or the Start Copy Color button () to complete the alignment.
When the Power button () stops blinking, the alignment is complete.
-
Make sure that the USB cable is securely connected to the rear of the product and to the computer.
-
Try the intended task again.
-
If these steps resolved the issue, you do not need to continue troubleshooting.
-
If the issue persists, continue to the next solution.
Solution four: Check for carriage obstructions
Follow these steps to make sure that the carriage can move freely.
Step one: Make sure that the carriage can move freely
-
Press the Power button () to turn on the product.
-
Open the cartridge access door. The carriage might move to the center of the product. Wait until the carriage is idle and silent before continuing.Figura : Open the cartridge access door
-
Without turning off the product, disconnect the power cord from the rear of the product.
cuidado:
You must disconnect the power cord to move parts by hand without the risk of an electrical shock. -
Unplug the power cord from the wall outlet.
-
Look inside the product to see where the carriage is stuck, and then check for any torn paper or objects that might be restricting the carriage.
observação:
You might need a flashlight to illuminate areas for proper viewing. -
Reach inside the product through the cartridge access door, and then manually move the carriage.
-
If the carriage is stuck on the right side of the product, move the carriage to the left side of the product.
-
If the carriage is stuck on the left side of the product, move the carriage to the right side of the product.
-
If the carriage is stuck in the middle of the product, move the carriage to the right side of the product.
-
-
Remove any loose paper or obstructions found.
-
Make sure that the carriage can move freely across the width of the product by gently pushing the carriage to the left and then to the right.
-
Close the cartridge access door.Figura : Close the cartridge access door
-
Reconnect the power cord to the rear of the product.
-
Plug the power cord back into the wall outlet.
-
Press the Power button () to turn on the product.
-
Check the control panel to make sure that the lights are no longer blinking.
Step two: Print a self-test page
Printing a self-test page verifies if the hardware functions correctly.
-
Load U.S. letter or A4, unused, plain white paper into the input tray.
-
On the control panel, press and hold the Paper Type button and Resize to Fit button at the same time.
-
Paper Type button
-
Resize to Fit button
Figura : Press these buttons to print a self-test report
-
-
Release both buttons at the same time. The product prints a self-test report.
-
If these steps resolved the issue, you do not need to continue troubleshooting.
-
If the issue persists, continue to the next solution.
Solution five: Clean the cartridges and inside the All-in-One
Follow these steps to clean the electrical contacts on the cartridges and inside the product.
-
Gather the following materials:
-
Dry foam rubber swabs, a lint-free cloth, or any soft material that will not come apart or leave fibers (coffee filters work well)
-
Distilled, filtered, or bottled water (tap water might contain contaminants that can damage the cartridges)
cuidado:
Do not use platen cleaners or alcohol to clean the cartridge contacts. These can damage the cartridge or the product.
-
-
Press the Power button () to turn on the product.
-
Open the cartridge access door. The carriage might move to the center of the product. Wait until the carriage is idle and silent before continuing.Figura : Open the cartridge access door
-
Disconnect the power cord from the rear of the product.
-
Press lightly on the top of the cartridge that you are removing to release it from its slot.Figura : Remove the cartridge by pressing down to release it
observação:
The black cartridge belongs in the slot on the right, and the color cartridge belongs in the slot on the left. -
Hold the cartridge by its sides.
-
Dip a clean foam rubber swab or lint-free cloth into distilled water, and then squeeze any excess water from it.
-
Clean the copper-colored electrical contacts.
-
Clean the copper-colored electrical contacts
-
Do not clean the ink nozzles
Figura : Clean the copper-colored electrical contacts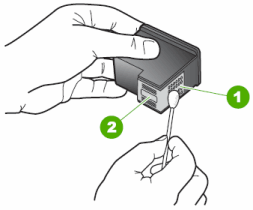
-
-
Allow the contacts to dry for about 10 minutes.
-
Use a second moistened foam rubber swab or lint-free cloth to clean the gold-colored electrical contacts in the carriage, inside the product.Figura : The location of the carriage contacts
 Figura : The gold-colored electrical contacts inside the carriage
-
Wait about 10 minutes to allow the electrical contacts to dry, or use a new swab or dry, clean cloth to dry them.
-
To reinsert the cartridge, hold it by its sides, and then slide it forward into its slot at a slightly upward angle.Figura : Insert the cartridge
-
Firmly push the cartridge in until it snaps into place.Figura : Snap the cartridge into place
-
Repeat these steps to clean the contacts on the other cartridge and in the other side of the carriage.
-
Close the cartridge access door.Figura : Close the cartridge access door
-
Reconnect the power cord to the rear of the product.
-
Press the Power button () to turn on the product.
-
Wait for the product to print an alignment page.
-
Load the alignment page print side down on the right front corner of the scanner glass.Figura : Load the alignment page
-
Lower the scanner lid, and then press the Start Copy Black button () or the Start Copy Color button () to complete the alignment.
When the Power button () stops blinking, the alignment is complete.
-
Make sure that the USB cable is securely connected to the rear of the product and to the computer.
-
Try the intended task again.
-
If these steps resolved the issue, you do not need to continue troubleshooting.
-
If the issue persists, continue to the next solution.
Solution six: Replace a defective cartridge
One or both of the cartridges might be defective. Before performing these steps, make sure that the replacement cartridge is compatible with your product. Follow these steps in the order presented to remove and replace the old or defective cartridge.
observação:If the ! blinks above the Color Ink Level indicator, replace the color cartridge. If the ! blinks above the Black Ink Level indicator, replace the black cartridge. If the ! blinks above both indicators, replace both cartridges.
Step one: Make sure that the replacement cartridge is compatible with the All-in-One
Purchase replacement cartridges and other supplies from the HP Store or local retailers.
observação:HP cannot guarantee the quality of refilled or remanufactured cartridges.
Step two: Remove the old cartridge
-
Press the Power button () to turn on the product.
-
Open the cartridge access door. The carriage might move to the center of the product. Wait until the carriage is idle and silent before continuing.Figura : Open the cartridge access door
-
Press lightly on the top of the cartridge that you are removing to release it from its slot.Figura : Remove the cartridge by pressing down to release it
observação:
The black cartridge belongs in the slot on the right, and the color cartridge belongs in the slot on the left. -
Pull the cartridge toward you out of its slot.
observação:
If you are removing the cartridge because it is low or out of ink, recycle it. The HP Inkjet Supplies Recycling Program is available in many regions, and is free of charge.cuidado:
Do not remove both cartridges at the same time. Remove each cartridge one at a time.
Step three: Install the new cartridges
-
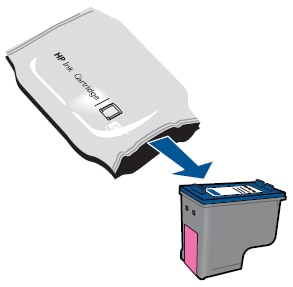
Remove the new cartridge from its packaging.Figura : Remove the cartridge from its packaging
-
Pull the pink pull tab to remove the protective tape from the nozzles.Figura : Remove the protective tape with the pink pull tab
cuidado:
Do not touch the copper-colored electrical contacts or the ink nozzles on the cartridge. Doing so can cause bad electrical connections, clogged ink nozzles, or poor print quality.Figura : Do not touch the copper-colored electrical contacts or the ink nozzles
-
Hold the cartridge by its sides, and then slide the cartridge forward into its slot at a slightly upward angle.Figura : Insert the cartridge
-
Firmly push the cartridge in until it snaps into place.Figura : Snap the cartridge into place
-
Close the cartridge access door.Figura : Close the cartridge access door
-
Wait for the product to print an alignment page.
-
Load the alignment page print side down on the right front corner of the scanner glass.Figura : Load the alignment page
-
Lower the scanner lid, and then press the Start Copy Black button () or the Start Copy Color button () to complete the alignment.
When the Power light () stops blinking, the alignment is complete.
-
Make sure that the USB cable is securely connected to the rear of the product and to the computer.
-
Try the intended task again.
Workaround: Print in ink-backup mode (single-cartridge mode)
You can print with only one cartridge installed (ink-backup mode, also called single-cartridge mode). The
ink-backup mode initiates when you remove a cartridge from the carriage. During ink-backup mode, the product can only print jobs from the computer.
You cannot initiate a print job from the control panel (such as copying or scanning an
original).
The product prints more slowly in this mode, and printouts might be of lesser quality. If you print with only the black cartridge, no color will print. If you print with only the color cartridge, no black ink will print.
observação:When the product operates in ink-backup mode, a message displays on the computer screen. If the message displays when the product contains two cartridges, make sure that you have removed the protective piece of plastic tape from each cartridge. When plastic tape covers the cartridge electrical contacts, the product cannot detect an installed cartridge.
-
Press the Power button () to turn on the product.
-
Open the cartridge access door. The carriage might move to the center of the product. Wait until the carriage is idle and silent before continuing.Figura : Open the cartridge access door
-
Disconnect the power cord from the rear of the product.
-
Press lightly on the top of the cartridge that you are removing to release it from its slot.Figura : Remove the cartridge by pressing down to release it
observação:
The black cartridge belongs in the slot on the right, and the color cartridge belongs in the slot on the left. -
Pull the cartridge out to remove it from its slot.
-
Close the cartridge access door.Figura : Close the cartridge access door
-
Continue to use the product as normal.
observação:
You might see a recurring message on your computer that tells you that the product is in single-cartridge mode. The Attention light also continuously blinks in ink-backup mode. These symptoms recur until you install two working cartridges.
-
If these steps resolved the issue, you do not need to continue troubleshooting.
-
If the issue persists, continue to the next solution.
Solution seven: Service the All-in-One
If you have completed all the steps and are still experiencing a problem, continue to the Service the All-in-One section at the end of this document.
Issue: The bottom segment of one or both of the Ink Level indicator lights blinks, and a fast blinking ! might display
In this error condition, the following blinking lights pattern displays on the control panel:
-
Power light: On
-
Attention light: On
-
Ink Level indicator lights: The bottom segment of one or both of the lights blinks, and a fast blinking ! might display above the Color Ink Level indicator, the Black Ink Level indicator, or both
-
Number of Copies display: On
-
Wireless button indicator light: Normal operation
|
Figura : The bottom segment of Color Ink Level indicator light blinks

|
Figura : The bottom segment of Black Ink Level indicator light blinks

|
-
CauseOne or both of the cartridges are low on ink.
Solutions
Solution one: Replace the old cartridge
The indicated cartridge or cartridges are low on ink. Before performing these steps, make sure that the replacement cartridge is compatible with your product. Follow these steps in the order presented to remove and replace the old cartridge.
observação:Ink level warnings and indicators provide estimates for planning purposes only. When you receive a low-ink warning message, consider having a replacement cartridge available to avoid possible printing delays. You do not have to replace the cartridges until the print quality is unacceptable.
Step one: Make sure that your replacement cartridges are compatible with the All-in-One
Purchase replacement cartridges and other supplies from the HP Store or local retailers.
When the ! begins blinking above an ink level indicator, print quality might drop until you replace the cartridge. Follow these steps to replace the indicated cartridges.
observação:If the ! blinks above the Color Ink Level indicator, replace the color cartridge. If the ! blinks above the Black Ink Level indicator, replace the black cartridge. If the ! blinks above both indicators, replace both cartridges.
Step two: Remove the old cartridge
-
Press the Power button () to turn on the product.
-
Open the cartridge access door. The carriage might move to the center of the product. Wait until the carriage is idle and silent before continuing.Figura : Open the cartridge access door
-
Press lightly on the top of the cartridge that you are removing to release it from its slot.Figura : Remove the cartridge by pressing down to release it
observação:
The black cartridge belongs in the slot on the right, and the color cartridge belongs in the slot on the left. -
Pull the cartridge toward you out of its slot.
observação:
If you are removing the cartridge because it is low or out of ink, recycle it. The HP Inkjet Supplies Recycling Program is available in many regions, and is free of charge.cuidado:
Do not remove both cartridges at the same time. Remove each cartridge one at a time.
Step three: Install the new cartridge
-
Remove the new cartridge from its packaging.Figura : Remove the cartridge from its packaging
-
Pull the pink pull tab to remove the protective tape from the nozzles.Figura : Remove the protective tape with the pink pull tab
cuidado:
Do not touch the copper-colored electrical contacts or the ink nozzles on the cartridge. Doing so can cause bad electrical connections, clogged ink nozzles, or poor print quality.Figura : Do not touch the copper-colored electrical contacts or the ink nozzles
-
Hold the cartridge by its sides, and then slide the cartridge forward into its slot at a slightly upward angle.Figura : Insert the cartridge
-
Firmly push the cartridge in until it snaps into place.Figura : Snap the cartridge into place
-
Close the cartridge access door.Figura : Close the cartridge access door
-
Wait for the product to print an alignment page.
-
Load the alignment page print side down on the right front corner of the scanner glass.Figura : Load the alignment page
-
Lower the scanner lid, and then press the Start Copy Black button () or the Start Copy Color button () to complete the alignment.
When the Power light () stops blinking, the alignment is complete.
Workaround: Print in ink-backup mode (single-cartridge mode)
You can print with only one cartridge installed (ink-backup mode, also called single-cartridge mode). The
ink-backup mode initiates when you remove a cartridge from the carriage. During ink-backup mode, the product can only print jobs from the computer.
You cannot initiate a print job from the control panel (such as copying or scanning an
original).
The product prints more slowly in this mode, and printouts might be of lesser quality. If you print with only the black cartridge, no color will print. If you print with only the color cartridge, no black ink will print.
observação:When the product operates in ink-backup mode, a message displays on the computer screen. If the message displays when the product contains two cartridges, make sure that you have removed the protective piece of plastic tape from each cartridge. When plastic tape covers the cartridge electrical contacts, the product cannot detect an installed cartridge.
-
Press the Power button () to turn on the product.
-
Open the cartridge access door. The carriage might move to the center of the product. Wait until the carriage is idle and silent before continuing.Figura : Open the cartridge access door
-
Disconnect the power cord from the rear of the product.
-
Press lightly on the top of the cartridge that you are removing to release it from its slot.Figura : Remove the cartridge by pressing down to release it
observação:
The black cartridge belongs in the slot on the right, and the color cartridge belongs in the slot on the left. -
Pull the cartridge out to remove it from its slot.
-
Close the cartridge access door.Figura : Close the cartridge access door
-
Continue to use the product as normal.
observação:
You might see a recurring message on your computer that tells you that the product is in single-cartridge mode. The Attention light also continuously blinks in ink-backup mode. These symptoms recur until you install two working cartridges.
Issue: The Power light and the Attention light blink fast
In this error condition, the following blinking lights pattern displays on the control panel:
-
Power light: Blinks fast
-
Attention light: Blinks fast
-
Ink Level indicator lights: Current levels
-
Number of Copies display: On or E
-
Wireless button indicator light: Normal operation
Figura : The Power light and the Attention light blink fast
-
CauseThe scanner has failed.
Solutions
Solution one: Turn the All-in-One off and then on again
Follow these steps to turn the product off and then on again.
-
Press the Power button () to turn off the product.
-
Wait 15 seconds.
-
Press the Power button () to turn on the product.
-
Check the lights on the control panel to make sure that they are no longer blinking.
-
Try the intended task again.
-
If these steps resolved the issue, you do not need to continue troubleshooting.
-
If the issue persists, continue to the next solution.
Solution two: Reset the All-in-One
Follow these steps to reset the product.
Step one: Perform a power reset
-
With the printer turned on, disconnect the power cord from the rear of the printer.
-
Unplug the power cord from the wall outlet.
-
Wait at least 15 seconds.
-
Plug the power cord back into the wall outlet.
-
Reconnect the power cord to the printer.
-
Turn the printer on.
Step two: Print a self-test page
Printing a self-test page verifies if the hardware functions correctly.
-
Load U.S. letter or A4, unused, plain white paper into the input tray.
-
On the control panel, press and hold the Paper Type button and Resize to Fit button at the same time.
-
Paper Type button
-
Resize to Fit button
Figura : Press these buttons to print a self-test report
-
-
Release both buttons at the same time. The product prints a self-test report.
-
If these steps resolved the issue, you do not need to continue troubleshooting.
-
If the issue persists, continue to the next solution.
Solution three: Plug the All-in-One directly into a wall outlet
The power source your product is plugged into might not function properly. Follow these steps to plug your product directly into a wall outlet.
-
Disconnect the power cord from the rear of the product.
-
Disconnect the product cord from any power strip or surge suppressor, and then plug it directly into a wall outlet.
-
Reconnect the power cord to the rear of the product.
-
Press the Power button () to turn on the product.
-
Check the control panel to make sure that the lights are no longer blinking.
-
Try the intended task again.
-
If these steps resolved the issue, you do not need to continue troubleshooting.
-
If the issue persists, continue to the next solution.
Solution four: Service the All-in-One
If you have completed all the steps and are still experiencing a problem, continue to the Service the All-in-One section at the end of this document.
Issue: The Power light blinks slowly for 15 seconds, and then blinks fast, and the Attention light is off for 15 seconds, and then blinks fast
In this error condition, the following blinking lights pattern displays on the control panel:
-
Power light: Blinks slowly for 15 seconds, and then blinks fast
-
Attention light: Off for 15 seconds, and then blinks fast
-
Ink Level indicator lights: Current levels
-
Number of Copies display: E
-
Wireless button indicator light: Normal operation
Figura : The Power light blinks slowly for 15 seconds, and then blinks fast, and the Attention light is off for 15 seconds, and then blinks fast
-
CauseThe scanner software has failed.
Solutions
Solution one: Turn the All-in-One off and then on again
Follow these steps to turn the product off and then on again.
-
Press the Power button () to turn off the product.
-
Wait 15 seconds.
-
Press the Power button () to turn on the product.
-
Check the lights on the control panel to make sure that they are no longer blinking.
-
Try the intended task again.
-
If these steps resolved the issue, you do not need to continue troubleshooting.
-
If the issue persists, continue to the next solution.
Solution two: Reset the All-in-One
Follow these steps to reset the product.
Step one: Perform a power reset
-
With the printer turned on, disconnect the power cord from the rear of the printer.
-
Unplug the power cord from the wall outlet.
-
Wait at least 15 seconds.
-
Plug the power cord back into the wall outlet.
-
Reconnect the power cord to the printer.
-
Turn the printer on.
Step two: Print a self-test page
Printing a self-test page verifies if the hardware functions correctly.
-
Load U.S. letter or A4, unused, plain white paper into the input tray.
-
On the control panel, press and hold the Paper Type button and Resize to Fit button at the same time.
-
Paper Type button
-
Resize to Fit button
Figura : Press these buttons to print a self-test report
-
-
Release both buttons at the same time. The product prints a self-test report.
-
If these steps resolved the issue, you do not need to continue troubleshooting.
-
If the issue persists, continue to the next solution.
Solution three: Download and install a tool to resolve issues automatically (for Windows only)
Download and run HP Print and Scan Doctor  to automatically diagnose and resolve printer hardware and connection issues.
to automatically diagnose and resolve printer hardware and connection issues.

|
HP designed a quick and easy tool that diagnoses and resolves many printing, scanning, and connectivity problems: HP Print and Scan Doctor.
HP recommends that you download and install the Print and Scan Doctor any time you need to troubleshoot a problem with your HP product.
|
|
Following are some common problems that the Print and Scan Doctor can resolve easily:
|
|
The Print and Scan Doctor diagnoses and helps resolve common printing, scanning, and connectivity problems, including:
-
Connectivity:
-
USB: Verifies that the USB connection from your computer to the HP product is working correctly.
-
Network: Verifies that the network connection between your computer and your network is working correctly.
-
-
Device Status Test: Checks for device errors such as out of paper, paper jams, carriage stalls, and paper feed issues, and then provides instructions for fixing the error.
-
Driver Check: Checks for missing or corrupt driver files.
-
Device Manager: Checks for problems in Device Manager that would prevent printing.
-
Device Online: Checks if the product has been paused or set to offline, and then sets the status back to online if necessary.
-
Print Queue: Checks for and clears pending print jobs in the print queue (a log of print jobs waiting to print).
-
Port Match: Checks the port settings for the HP product.
-
Device Conflicts: Checks for conflicts with other drivers, such as other printer brands.
-
Ink Issues: Checks the cartridges and ink levels for issues that affect print quality.
-
Print Settings: Checks and adjusts the print quality settings.
-
Test Print: Prints a test page for print quality evaluation, and provides options for cleaning and aligning the printhead if necessary.
-
Scan Tests: Checks the scan mechanism, drivers, and registry entries.
You can also click the Printer menu to find the additional features such as cleaning printheads, aligning printheads, checking ink levels, and viewing advanced printer data for your selected printer.
Step one: Run the tool
-
Turn on the printer and load plain paper in the main tray.
-
On the Print and Scan Doctor welcome screen, click Start to locate your printer.
observação:
If your printer is not found, click My product is not listed, and then follow the instructions to troubleshoot the connection. -
Select your printer, click Next, and then follow the instructions to begin the troubleshooter.
Step two: Resolve diagnosed scanning problems
-
Review the status of each test result.
-
 : The printer passed the test.
-
 : An issue was discovered and automatically repaired.
-
 : The test failed and required user action, but the step was skipped.
-
 : An issue was found. Follow the instructions to resolve the issue.
-
-
Load an item on the scanner glass, and then click Test Scan to confirm the scanner is working.
-
If these steps resolved the issue, you do not need to continue troubleshooting.
-
If the issue persists, continue to the next solution.
Solution four: Service the All-in-One
If you have completed all the steps and are still experiencing a problem, continue to the Service the All-in-One section at the end of this document.
Issue: All the lights blink
In this error condition, the following blinking lights pattern displays on the control panel:
-
Power light: Blinks fast
-
Attention light: Blinks fast
-
Ink Level indicator lights: An ! over both indicator lights blinks fast
-
Number of Copies display: E
-
Wireless button indicator light: Blinks fast
Figura : All the lights blink
-
CauseA fatal error has occurred.
Solutions
Solution one: Turn the All-in-One off and then on again
Follow these steps to turn the product off and then on again.
-
Press the Power button () to turn off the product.
-
Wait 15 seconds.
-
Press the Power button () to turn on the product.
-
Check the lights on the control panel to make sure that they are no longer blinking.
-
Try the intended task again.
-
If these steps resolved the issue, you do not need to continue troubleshooting.
-
If the issue persists, continue to the next solution.
Solution two: Reset the All-in-One
Follow these steps to reset the product.
Step one: Perform a power reset
-
With the printer turned on, disconnect the power cord from the rear of the printer.
-
Unplug the power cord from the wall outlet.
-
Wait at least 15 seconds.
-
Plug the power cord back into the wall outlet.
-
Reconnect the power cord to the printer.
-
Turn the printer on.
Step two: Print a self-test page
Printing a self-test page verifies if the hardware functions correctly.
-
Load U.S. letter or A4, unused, plain white paper into the input tray.
-
On the control panel, press and hold the Paper Type button and Resize to Fit button at the same time.
-
Paper Type button
-
Resize to Fit button
Figura : Press these buttons to print a self-test report
-
-
Release both buttons at the same time. The product prints a self-test report.
-
If these steps resolved the issue, you do not need to continue troubleshooting.
-
If the issue persists, continue to the next solution.
Solution three: Check for software and firmware updates
There might be software and/or firmware updates available that will help resolve this issue. The easiest way to check for updates is to use HP Update. However, if you did a custom install when you set up your computer, there is a chance that you did not install HP Update. Follow these steps to check for the applicable updates.
Step one: Check for software and firmware updates with HP Update
-
Select your operating system, and then follow the steps to open HP Update. If you are not sure whether you have HP Update on your computer, you can check by following these steps to open HP Update:
-
Windows VistaClick the Windows icon (
 ), click All Programs, click HP, and then click HP Update.
-
Windows 7Click the Windows icon (), click All Programs, click HP, and then click HP Update.
The HP Update window opens, and the 'Checking for new updates' message displays in the window.-
If the HP Update is installed, follow the on-screen instructions to download and then install any relevant updates, and then continue to the last step to print a self-test page.
-
If HP Update is not installed, continue to the next step.
-
Step two: Check for software and firmware updates online
If you do not have HP Update on your computer, follow these steps to check online for software and/or firmware updates to help resolve your issue.
observação:If there are no online updates available, skip to the next solution.
-
Open a new window to browse to the Get Software and Drivers page:
-
If prompted, type your product number, and then click Next. You might also need to click your model in a list of similar products.
-
Select your operating system from the drop-down list, and then click Next.
-
Click the Plus sign (
 ) next to Update and review the list of available updates.
-
Click More Info, and then read through the minimum system requirements and additional instructions. You can also click View directions (
 ) for complete download instructions.
-
Click Download. This option allows you to install the software at any time after the download completes.
-
Click Save, and then browse to the location on your computer where you want to save the file.
-
Click Save. The software downloads to your computer.Hint: Make a note of the place that you saved the file, in case you want to install it at a later time.
-
Browse to where you saved the file, and then double-click the file to start the installation.
-
Follow the on-screen instructions to complete the installation.
Step three: Print a self-test page
Printing a self-test page verifies if the hardware functions correctly.
-
Load U.S. letter or A4, unused, plain white paper into the input tray.
-
On the control panel, press and hold the Paper Type button and Resize to Fit button at the same time.
-
Paper Type button
-
Resize to Fit button
Figura : Press these buttons to print a self-test report
-
-
Release both buttons at the same time. The product prints a self-test report.
-
If these steps resolved the issue, you do not need to continue troubleshooting.
-
If the issue persists, continue to the next solution.
Solution four: Service the All-in-One
If you have completed all the steps and are still experiencing a problem, continue to the Service the All-in-One section at the end of this document.
Issue: The Wireless button indicator light is on
In this normal condition, the following blinking lights pattern displays on the control panel:
-
Power light: On
-
Attention light: Off
-
Ink Level indicator lights: Current levels
-
Number of Copies display: On
-
Wireless button indicator light: On
Figura : The Wireless button indicator light is on
-
CauseThe wireless radio is on, and the product is connected to a wireless network.
Issue: The Wireless button indicator light is off
In this normal condition, the following blinking lights pattern displays on the control panel:
-
Power light: On
-
Attention light: Off
-
Ink Level indicator lights: Current levels
-
Number of Copies display: On
-
Wireless button indicator light: Off
Figura : The Wireless button indicator light is off
-
CauseThe wireless radio is off, or the Wireless Protected Setup (WPS) configuration is not complete.
Solutions
Solution one: Turn on the wireless radio
The wireless radio allows the product to operate wirelessly. Press the Wireless button on the product control panel to turn on the wireless radio.
-
If the Wireless button indicator light turns on, try your intended wireless task again.
-
If your wireless task completes successfully, you do not need to continue troubleshooting.
-
If the Wireless button indicator light does not turn on, continue to the next solution.
Solution two: Allow the automatic Wireless Protected Setup (WPS) configuration to complete
The automatic WPS configuration is in progress. Wait 20 minutes for the configuration to complete.
-
If the Wireless button indicator light turns on, try your intended wireless task again.
-
If your wireless task completes successfully, you do not need to continue troubleshooting.
-
If the Wireless button indicator light does not turn on, continue to the next solution.
Solution three: Turn the All-in-One off and then on again
The automatic WPS configuration timed out. Follow these steps to turn the product off and then on again in order to restart the auto WPS configuration process.
-
Press the Power button () to turn off the product.
-
Wait 15 seconds.
-
Press the Power button () to turn on the product.
-
If the Wireless button indicator light turns on, try your intended wireless task again.
-
If your wireless task completes successfully, you do not need to continue troubleshooting.
-
If the Wireless button indicator light does not turn on, continue to the next solution.
Solution four: Service the All-in-One
If you have completed all the steps and are still experiencing a problem, continue to the Service the All-in-One section at the end of this document.
Issue: The Wireless button indicator light is on for 6 seconds, and then blinks slowly
In this error condition, the following blinking lights pattern displays on the control panel:
-
Power light: On
-
Attention light: Off
-
Ink Level indicator lights: Current levels
-
Number of Copies display: On
-
Wireless button indicator light: On for 6 seconds, and then blinks slowly
Figura : The Wireless button indicator light is on for 6 seconds, and then blinks slowly
-
CauseThe product is searching for a wireless connection, or does not detect a wireless access point (router).
Issue: The Wireless button indicator light blinks slowly
In this error condition, the following blinking lights pattern displays on the control panel:
-
Power light: On
-
Attention light: Off
-
Ink Level indicator lights: Current levels
-
Number of Copies display: On
-
Wireless button indicator light: Blinks slowly
Figura : The Wireless button indicator light blinks slowly
-
CauseThe product is searching for a wireless connection, or the Wireless Protected Setup (WPS) configuration is not complete.
Solutions
Solution one: Wait for the All-in-One to connect to the wireless access point
The product is searching for a wireless connection. Wait at least five minutes for the product to detect and connect to the wireless access point (router).
-
If the Wireless button indicator light stops blinking and remains on, try your intended wireless task again.
-
If your wireless task completes successfully, you do not need to continue troubleshooting.
-
If the Wireless button indicator light continues to blink, continue to the next solution.
Solution two: Turn on the wireless access point
The product does not detect the wireless access point (router). Make sure that the router is turned on.
-
If the Wireless button indicator light stops blinking and remains on, try your intended wireless task again.
-
If your wireless task completes successfully, you do not need to continue troubleshooting.
-
If the Wireless button indicator light continues to blink, continue to the next solution.
Solution three: Move the wireless access point closer to the All-in-One
There is interference in the wireless signal between the product and the wireless access point (router), or the signal is too weak. Move the router and the product closer together, or clear away any obstructions in the path between them.
-
If the Wireless button indicator light stops blinking and remains on, try your intended wireless task again.
-
If your wireless task completes successfully, you do not need to continue troubleshooting.
-
If the Wireless button indicator light continues to blink, continue to the next solution.
Solution four: Turn the All-in-One off and then on again
The automatic Wireless Protected Setup (WPS) configuration timed out. Follow these steps to turn the product off and then on again in order to restart the auto WPS configuration process.
-
Press the Power button () to turn off the product.
-
Wait 15 seconds.
-
Press the Power button () to turn on the product.
-
If the Wireless button indicator light stops blinking and remains on, try your intended wireless task again.
-
If your wireless task completes successfully, you do not need to continue troubleshooting.
-
If the Wireless button indicator light continues to blink, continue to the next solution.
Solution five: Allow the automatic WPS configuration to complete
The automatic WPS configuration is in progress. Wait 20 minutes for the configuration to complete.
-
If the Wireless button indicator light stops blinking and remains on, try your intended wireless task again.
-
If your wireless task completes successfully, you do not need to continue troubleshooting.
-
If the Wireless button indicator light continues to blink, continue to the next solution.
Solution six: Service the All-in-One
If you have completed all the steps and are still experiencing a problem, continue to the Service the All-in-One section at the end of this document.
Issue: The Wireless button indicator light and the Attention light blink fast
In this error condition, the following blinking lights pattern displays on the control panel:
-
Power light: On
-
Attention light: Blinks fast
-
Ink Level indicator lights: Current levels
-
Number of Copies display: On
-
Wireless button indicator light: Blinks fast
Figura : The Wireless button indicator light and the Attention light blink fast
-
CauseThe Wireless Protected Setup (WPS) configuration encountered an error or timed out, or there is an error with the wireless radio.
Solutions
Solution one: Wait for the Wireless Protected Setup (WPS) configuration error to automatically clear
The automatic WPS configuration encountered an error. Wait at least five minutes for the error to automatically clear.
-
If the Wireless button indicator light stops blinking and remains on, and the Attention light turns off, try your intended wireless task again.
-
If your wireless task completes successfully, you do not need to continue troubleshooting.
-
If the Wireless button indicator light and the Attention light continue to blink, continue to the next solution.
Solution two: Manually clear the error state
The wireless radio on the product or the automatic WPS configuration has encountered an error. Press any button on the product control panel to clear the error.
-
If the Wireless button indicator light stops blinking and remains on, and the Attention light turns off, try your intended wireless task again.
-
If your wireless task completes successfully, you do not need to continue troubleshooting.
-
If the Wireless button indicator light and the Attention light continue to blink, continue to the next solution.
Solution three: Turn the All-in-One off and then on again
The automatic WPS configuration timed out. Follow these steps to turn the product off and then on again in order to restart the auto WPS configuration process.
-
Press the Power button () to turn off the product.
-
Wait 15 seconds.
-
Press the Power button () to turn on the product.
-
If the Wireless button indicator light stops blinking and remains on, try your intended wireless task again.
-
If your wireless task completes successfully, you do not need to continue troubleshooting.
-
If the Wireless button indicator light continues to blink, continue to the next solution.
Solution four: Service the All-in-One
If you have completed all the steps and are still experiencing a problem, continue to the Service the All-in-One section at the end of this document.
Digite um tópico para pesquisar em nossa biblioteca de conhecimento
Como podemos ajudar?

Precisa de ajuda?