Use Martha Stewart Craft Studio to create, print, and share cards, using digital Martha Stewart craft tools.
Sprout by HP - Using Martha Stewart CraftStudio with your Sprout by HP
Opening the software
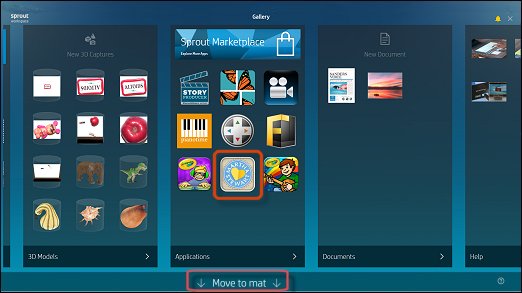
To start the Martha Stewart CraftStudio software, touch the icon in the Applications section of the Gallery to select it. Then either flick the icon down to the mat or touch Move to mat.
番号 : Selecting the CraftStudio icon
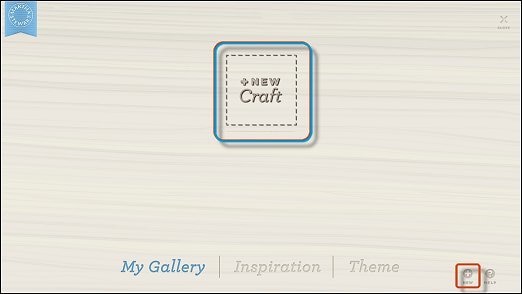
On the mat, touch the Craft Studio icon. The application opens.
番号 : CraftStudio icon on the mat

Creating a craft
-
Tap new or new craft on the monitor.番号 : Starting a new craft
-
On the horizontal mat, select and touch one of the following project sizes.
-
Vertical - prints to 5" x 7"
-
Horizontal - prints to 5" x 7"
-
Square - prints to 5" x 5"
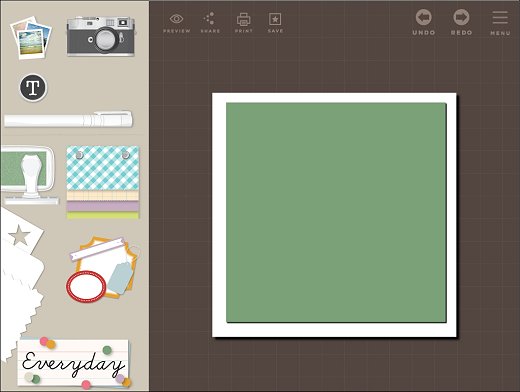
番号 : Selecting a project size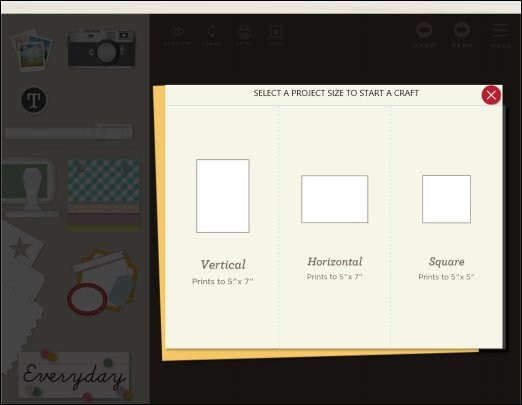 Your project appears on the mat.番号 : Horizontal project on the mat
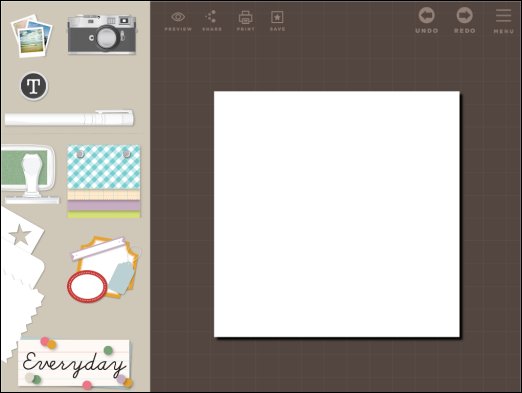
-
-
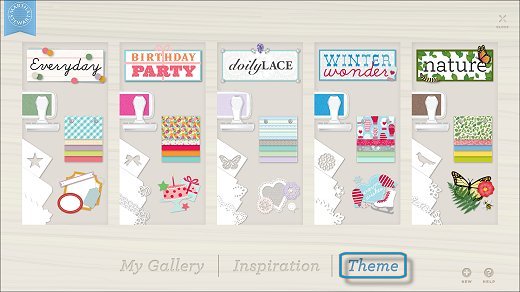
Select a theme from the monitor by flicking your chosen theme downward onto the mat or tapping to select a theme and then tapping Move To Mat.番号 : Selecting a theme
-
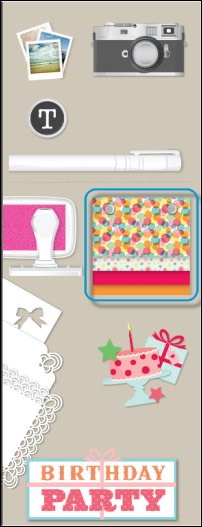
The tool drawer on the left side of the mat fills with stickers, stamps, paper, and more that match your chosen theme.
-
Photo stack - select a photo from the photo library on your computer
-
Camera - take a new photo
-
Type - add text to your craft
-
Pen - draw on your craft
-
Stamp - stamp on your craft
-
Paper swatch - choose paper for your craft
-
Punch - punch shapes out of photos or papers
-
Corner punch - punch the corner of papers or photos
-
Punch around the page - punch a border around the paper
-
Stickers - add stickers to your craft
-
Theme title
番号 : Tool drawer for Everyday theme
-
-
Tap on each tool to create your craft, adding paper, stickers, type, and other items until your craft is completed.
-
To see your craft on the monitor, tap Preview.番号 : Preview icon

-
Tap Share to share your craft on Evernote Touch, Fresh Paint, HP Connected Photo, Email, or your social networks. If your favorite social network is not available, you can install it.番号 : Share icon

-
Tap Print to send the project to a printer.番号 : Print icon

-
When done, tap Save to save your craft in My Gallery.番号 : Save icon

Adding paper to your craft
-
To select paper for your craft, tap the paper swatch icon.番号 : Selecting the paper swatch icon
-
Colored and patterned papers appear on the monitor. Swipe right for more paper options and left to go back to previous options.Tap the paper you want to use.番号 : Selecting paper from the Everyday theme

-
Drag your finger to reposition your paper, pinch to make it larger or smaller, or rotate it with two fingers.番号 : Adding the base paper
-
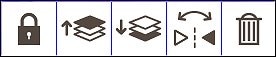
For more options, tap the paper. A popup menu gives you options to lock the paper in place, send backward or forward, flip the paper horizontally (mirror image), or trash.番号 : Paper Options menu
Adding photos to your craft
You can add photos from your photo library or take a new picture using one of the following methods:
-
Adding a photo from your Pictures Library
-
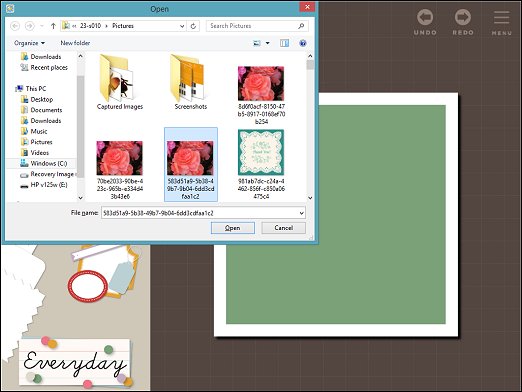
To add photos from your Pictures Library, tap the photo stack icon.番号 : Photo stack icon
-
Choose a photo, tap to select it, and then tap Open.番号 : Adding a photo from the picture library
-
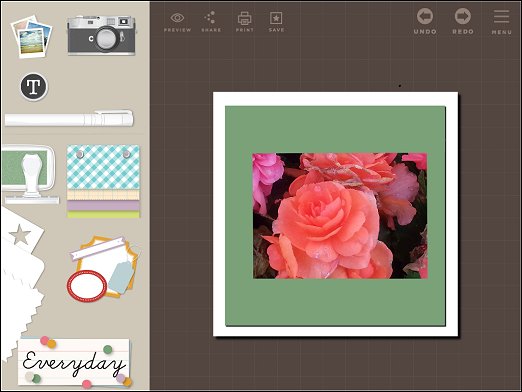
The picture is added to your project.番号 : Photo added to project
-
You can perform the following actions with your photo:
-
Tap and drag your photo to reposition it
-
Pinch it to make it larger or smaller
-
Rotate it by using two fingers
-
Tap the photo. A menu appears with options to lock the drawing in place, send it forward or backward, flip it horizontally, or send it to the trash.番号 : Photo Options menu
-
-
-
Capturing an object on the mat
-
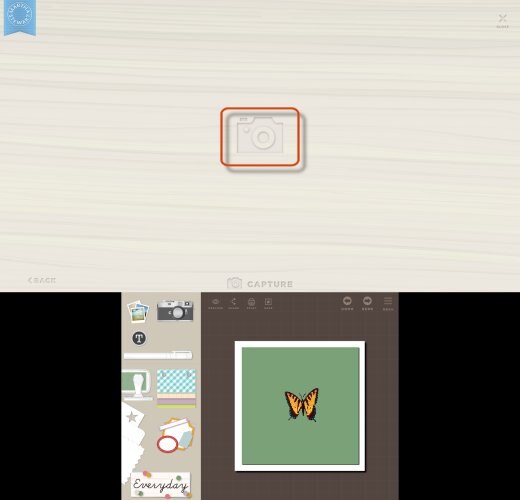
To capture an object on the mat, tap the Camera icon. The Capture screen displays on the monitor.番号 : Camera icon
-
Place the object for capture on the mat, and then touch the Camera icon. Sprout captures the object and adds it to the project.番号 : Capturing an object
-
You can perform the following actions with your captured object:
-
Tap and drag to reposition it
-
Pinch it to make it larger or smaller
-
Rotate it by using two fingers
-
Tap the object. A menu appears with options to lock the drawing in place, send it forward or backward, flip it horizontally, or send it to the trash.番号 : Photo Options menu
-
-
Adding type to your craft
To write your own message, use the following steps.
-
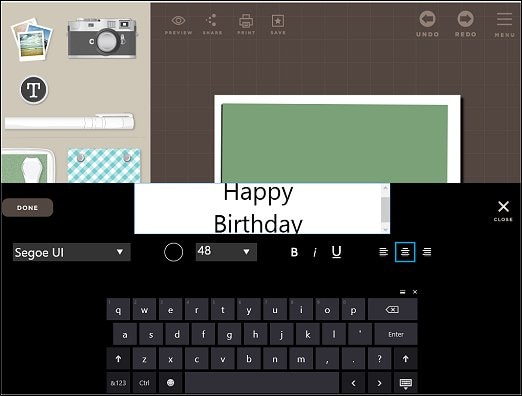
Tap the type icon in the tool drawer.番号 : Type icon

-
Use the keyboard to enter text. Tap return to start a new line.番号 : Adding text with the keyboard
-
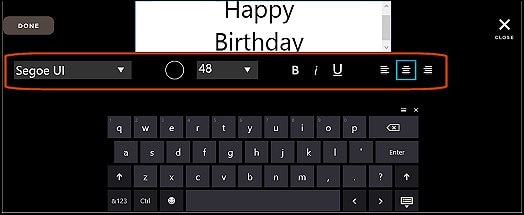
Select a font and size, choose a color, and set the type alignment. When you are finished, tap Done.番号 : Formatting the text
-
Your message appears at the center of the project.番号 : Message added to the project

-
You can perform the following actions with your drawing or message:
-
You can perform the following actions with your drawing or message:
-
Tap and drag your message to reposition it
-
Pinch it to make it larger or smaller
-
Rotate it by using two fingers
-
Tap the message. A menu appears with options to lock it in place, send it forward or backward, flip it horizontally, send it to the trash, or edit the message (T).番号 : Type Options menu

-
-
Adding ink to your craft
To add ink to your craft, use the following steps.
-
To draw on your craft, tap the pen icon in the tool drawer.番号 : Pen icon
-
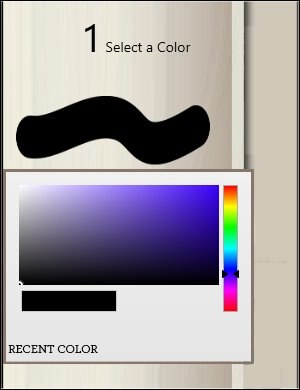
Tap the ink swatch to select your color. Tap and drag your finger on the color palette. Or choose one of your recent color swatches below.番号 : Selecting a color
-
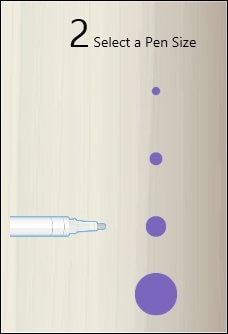
Select the pen size.番号 : Selecting a pen size
-
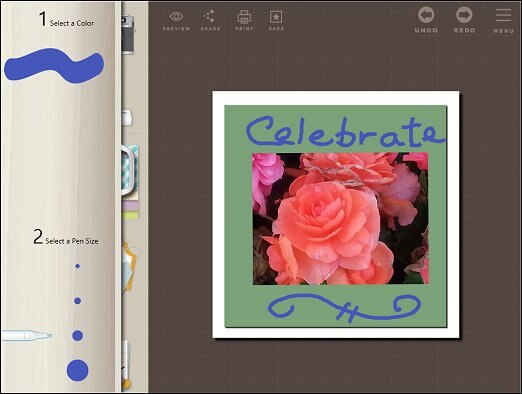
Draw with your finger on your craft. To erase part of your drawing, select the eraser tool.番号 : Adding ink to your craft
-
When you are finished drawing, tap the handle to close the pen drawer.
-
You can perform the following actions with your drawing or message:
-
Tap and drag your drawing or message to reposition it
-
Pinch it to make it larger or smaller
-
Rotate it by using two fingers
-
Tap the drawing. A menu appears with options to lock the drawing in place, duplicate it, send it backward or forward, or send it to the trash.番号 : Ink Options menu
-
Adding stamps to your craft
To add stamps to your craft, use the following steps.
-
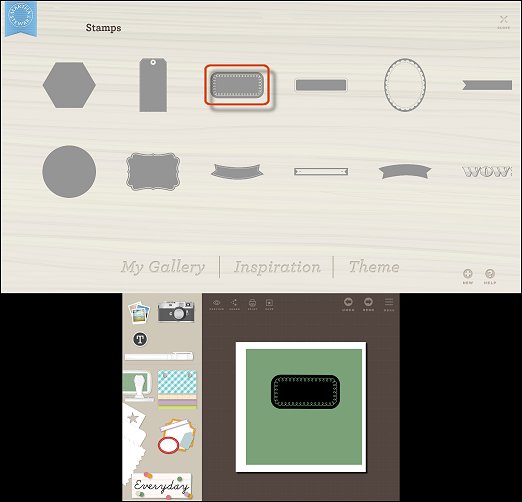
To use the stamp tool, tap the stamp icon in the tool drawer. Stamp options appear on the monitor.番号 : Stamp icon
-
Swipe right or left through the stamp options. When you find a stamp, tap it to add it to your craft.番号 : Selecting a stamp from the Everyday theme
-
You can perform the following actions with your stamp:
-
Tap and drag your stamp to reposition it.
-
Pinch it to make it larger or smaller.
-
Rotate it by using two fingers.
-
-
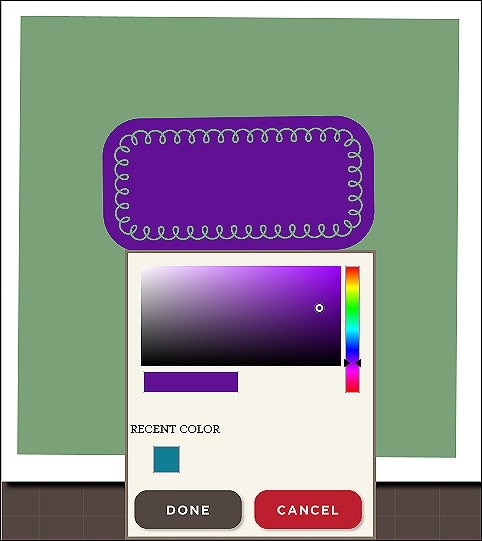
To change the color, tap the stamp to open the Options menu. Then tap the color options icon.番号 : Color options icon

-
Tap and drag your finger on the color palette or choose one of your recent colors below.番号 : Choosing a color
-
The Stamp options menu also has options to lock the stamp in place, send it forward or backward, flip it horizontally, or send it to the trash.番号 : Stamp Options menu

Using the Punch tool
The punch tool allows you to punch custom shapes, corners, and borders out of photos and papers. Use the following steps.
-
Select one of the punches in the tool drawer: punch, corner punch, border punch.
-
Punch
-
Corner punch
-
Border punch
番号 : Punch tool icons for Everyday theme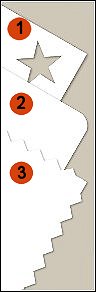
-
-
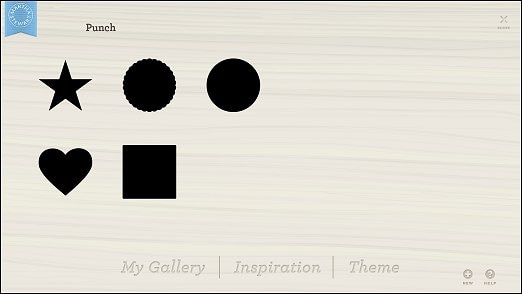
Your punch options appear on the monitor. Tap the punch you want to add.番号 : Punch options for Everyday theme
-
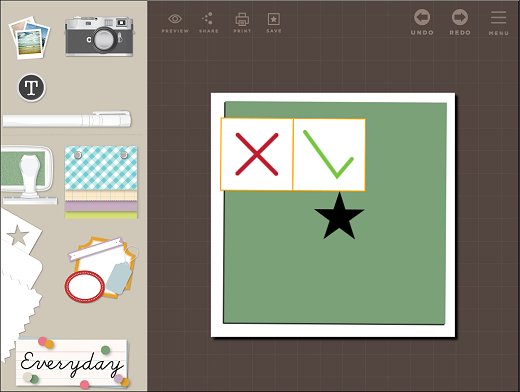
When you have positioned the punch, select the green checkmark to confirm or the red X to cancel.番号 : Confirming the punch
補足:
If you cannot see the punch, select the red X to cancel. Then tap the paper you are punching to open the options menu. Move the paper backward so that the punch will be in the top layer.番号 : Move backward icon
-
After the object has been punched, you can move both the cutout or the punched object independently.You can also perform the following actions with the cutout or the punched object:
-
Tap and drag your stamp to reposition it.
-
Pinch it to make it larger or smaller.
-
Rotate it by using two fingers.
-
-
For more options, tap the punched object or the cutout. A menu appears with options to lock the object in place, send it forward or backward, flip it horizontally, or send it to the trash.番号 : Punch Options menu
Adding stickers to your craft
Use the following steps to add stickers to your craft.
-
Tap the Sticker icon in the tool drawer.番号 : Sticker icon
-
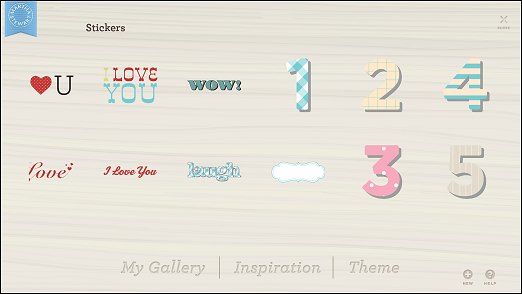
Your sticker options appear on the monitor. Swipe through the sticker options and tap the sticker you want to add.番号 : Sticker options for Everyday theme
-
Drag your finger to reposition the sticker, pinch it to make larger or smaller, or rotate it using two fingers.番号 : Adding stickers

-
For more options, tap the sticker. A menu appears with options to lock the stamp in place, send forward or backward, flip it horizontally, or send it to the trash.番号 : Sticker Options menu
追加のサポートオプション
トピックを入力して、ナレッジライブラリを検索してください
検索キーワードを入力してください

サポートが必要ですか?