To verify that the printer prints, find your control-panel type in the options below and then follow the steps provided.
note:
The steps vary according to the control panel.
Figure : FutureSmart 3 control panels

Figure : FutureSmart 4 control panels

FutureSmart 3
-
From the Home screen on the printer control panel, scroll to and touch the Administration menu.
-
Open the following menus:
-
Reports
-
Configuration/Status Pages
-
Select Configuration Page.
-
Select Print to print the configuration and Jetdirect pages.
-
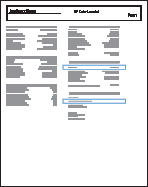
If the printer is connected to a network, find the IP address on the Jetdirect page.
-
IPv4: If the IP address is 0.0.0.0, or 192.0.0.192, or 169.254.x.x, manually configure the IP address. Otherwise, the network configuration was successful.
-
IPv6: If the IP address begins with "fe80:", the printer should be able to print. If not, manually configure the IP address.
Figure : Jetdirect page
FutureSmart 4
-
From the Home screen on the printer control panel, select Reports.
-
Select Configuration/Status Pages.
-
Select Configuration Page.
-
Select Print to print the configuration and Jetdirect pages.
-
If the printer is connected to a network, find the IP address on the Jetdirect page.
-
IPv4: If the IP address is 0.0.0.0, or 192.0.0.192, or 169.254.x.x, manually configure the IP address. Otherwise, the network configuration was successful.
-
IPv6: If the IP address begins with "fe80:", the printer should be able to print. If not, manually configure the IP address.
Figure : Jetdirect page


 , and then select


 on the printer control panel to access Help topics.


