HP LaserJet 1018, 1020, and 1022 Series Printers - Printer Does Not Pull Paper From Input Tray
問題:
The product does not pull paper from the input tray.
解決策
Try the following solutions in the order presented to resolve the issue. When one of the solutions resolves the issue, there is no need to continue troubleshooting.
Solution one: Turn off manual feed mode
Follow these steps to make sure manual feed mode is Off.
-
Press the Power button (
 ) to make sure the product is on. The green power light is lit when the product is on.
-
Open the Properties window for the product:
-
Windows XP: Click Start, click Printer and Faxes, right-click HP LaserJet 10xx series, and then select Properties.
-
Windows Vista: Click the Windows icon (
 ), click Control Panel, click Hardware and Sound, click Printer, right-click HP LaserJet 10xx series, and then select Properties.
-
Windows 2000: Click Start, click Printer and Faxes, right-click HP LaserJet 10xx series, and then select Preferences.
-
-
In the Properties window, select the Paper/Quality tab, select Automatic or the appropriate tray from the Source is: drop-down list, and then click Apply.
補足:
Do not select Manual Feed from the drop-down list. -
Click Apply to accept the settings, and then click OK to exit the Properties window.
-
Try the print job again.
-
If these steps resolved the issue, you do not need to continue troubleshooting.
-
If the issue persists, continue to the next solution.
Solution two: Check the paper guides on the input tray
Follow these steps to check for the proper adjustment of the paper guides on the input tray. If the paper guides are too tight, then the paper might be held in the tray and not allowed to feed into the product.
-
Remove all paper from the input tray.
-
Fan the sheets of paper, and then tap the edges of the stack on a flat surface to align the edges.
-
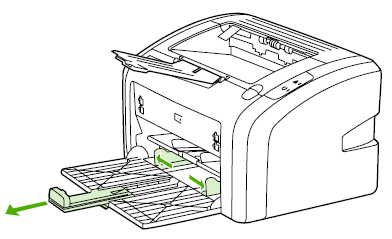
Pull the paper guides to their outermost position.番号 : Pull out the paper guides
-
Load the paper stack into the input tray with the top forward and the print-side face up.
-
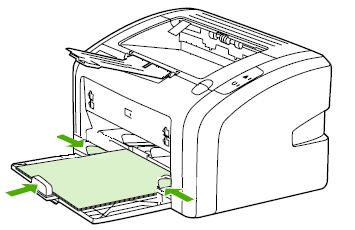
Push the paper guides inward until they rest firmly against the edges of the stack.番号 : Adjust paper guides
-
Try the print job again.
-
If these steps resolved the issue, you do not need to continue troubleshooting.
-
If the issue persists, continue to the next solution.
Solution three: Clean the pickup roller
Dirt or grime build up on the pickup roller can cause the paper to feed into the product incorrectly or not at all. Follow these steps to clean the pickup roller.
注意:Failure to complete this procedure correctly might damage the product.
-
Press the Power button () to turn off the product.
-
Disconnect the power cord from the back of the product.番号 : Disconnect the power cord

-
Wait for the product to cool down.
-
Open the print cartridge door, and then remove the print cartridge.
注意:
To prevent damage to the print cartridge, minimize its exposure to direct light. Cover the print cartridge with a sheet of paper.番号 : Remove the print cartridge
-
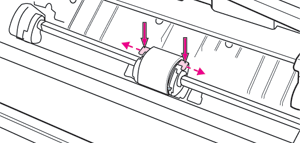
Find the pickup roller.
-
Pickup roller
番号 : Pickup roller
-
-
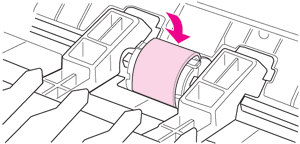
Release the small, white tabs on either side of the pickup roller, and then rotate the pickup roller toward the front of the product.番号 : Release the pickup roller tabs
-
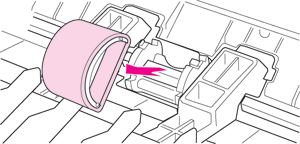
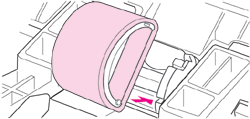
Gently pull the pickup roller up, and then out.番号 : Remove the pickup roller
-
Dab a lint-free cloth in rubbing alcohol (isopropyl alcohol), and then scrub the pickup roller.番号 : Rubbing alcohol and clean cloth

警告:
Rubbing alcohol is flammable. Keep the rubbing alcohol and cloth away from any open flame or heat source. Before you close the product, allow the rubbing alcohol to dry completely.補足:
In certain areas of California, air pollution control regulations restrict the use of liquid Isopropyl Alcohol (IPA) as a cleaning agent. In those areas of California, please disregard the previous recommendations and use a dry, lint-free cloth. The cloth may be moistened with water if desired. -
Using a dry, lint-free cloth, wipe the pickup roller to remove loosened dirt.番号 : Wipe the pickup roller with a dry cloth

-
Allow the pickup roller to dry completely before you reinstall it in the product.
-
Position the pickup roller in the slot. The circular and rectangular slots on each side will prevent you from installing the roller incorrectly.番号 : Position the pickup roller
-
Rotate the top of the pickup roller away from you until both sides snap into place.番号 : Snap the roller into place
-
Reinstall the print cartridge, and then close the print cartridge door.番号 : Reinstall the print cartridge

-
Reconnect the power cord to the back of the product.番号 : Reconnect the power cord

-
Press the Power button () to turn on the product.
-
Try the print job again.
追加のサポートオプション
トピックを入力して、ナレッジライブラリを検索してください
検索キーワードを入力してください

サポートが必要ですか?