The objective when loading substrate is to get a uniform tension across its width and along the substrate path to minimize the risk of skew, wrinkles and telescoping.
HP Scitex LX Printer Family - Load a roll into the printer
Load a roll (roll-to-roll configuration)

The substrate roll is mounted on the rear spindle and will be collected on the front spindle. The substrate goes from the rear spindle (1) over the main roller (2), over the platen (3), over the front roller (4) and then to the front spindle (5).

nota:The above illustration shows the substrate loaded with the printed face outwards on both input and output rolls. You can also load substrate with the printed face inwards on either or both rolls, in which case the spindle will turn in the opposite direction. The printer asks you for the winding direction if it cannot detect it automatically.
Each of the spindles has its own motor. The motors maintain tension on the substrate. Some vacuum is applied at the level of the platen to keep the substrate flat. The substrate is moved forwards by the drive roller motor, on which there is a pinch mechanism to stop the substrate from slipping. The pinches must be up when moving the carriage beam, and down when printing or checking the substrate, otherwise a message is displayed. The accuracy of the advance is controlled by the substrate-advance sensor, or, for substrates that the sensor cannot see, by tracking the main roller movement.
Before loading a roll into the printer, you must have a roll loaded onto a spindle (the input roll) and an empty core loaded onto another spindle (the output roll). See Load a roll onto the spindle.
nota:For the output roll, use a single empty core the same length as the input core. Do not place two or more shorter cores on the same spindle, which could cause substrate-advance problems.
nota:The spindle by itself is quite heavy, and a roll of substrate can be much heavier. You are recommended to use a forklift or some other equipment to move it into position; otherwise, lift one end into the printer, and then the other end.
-
Go to the HP Internal Print Server and select Substrate > Load/Unload, then select the correct configuration.
-
Remove the substrate edge holders in the print platen, or move them aside, so that they do not get in the way while loading the substrate.
atención:
Loading the substrate on top of the edge holders could severely damage the printheads and carriage. -
Lift the substrate pressure handles at the rear of the printer.

-
Go to the front panel and select Carriage beam position > Move to highest position.
 The printer raises the carriage beam, making it easy to insert the substrate. This process takes about two minutes to complete. During this period, you can load the input and output rolls.
nota:
While the carriage beam is rising, you can stop it by pressing the Cancel key. -
Bring the new roll on its spindle to the rear of the printer, with the geared end of the spindle on the left.
-
Rest the ends of the spindle on the platforms provided at the rear of the printer; plastic pads are provided to absorb the impacts.
-
Open the latches at both ends of the spindle (if they were closed) and push the roll on its spindle into the printer.

-
Close the latches to secure the spindle in place.
nota:
If you cannot close the gear side latch, try sliding the spindle towards the side plate to make sure the end flange is not sitting on the bearings.
-
In the same way, load the spindle with the empty core into the front of the printer. In this case, the geared end of the spindle should be on the right.
-
Check that the printer has finished raising the carriage beam.
-
Check that the curing plates are in the correct position for the substrate you are loading (see The curing plates (LX800 only)).
-
Pass the leading edge of the substrate through the printer to the output roll.

-
Once in front of the printer, if you find that you haven't unrolled enough substrate, select Start main roller motion from the front panel to unroll some more. The substrate unrolls only when you pull it.
-
If you are loading a vinyl substrate on an LX800 printer, you are recommended to use the output diverter from the ink collector kit, to minimize wrinkles.
-
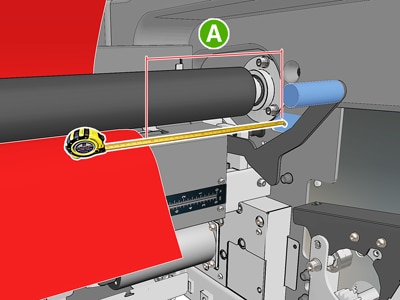
At the rear of the printer, measure the distance between the printer's left side plate and the left edge of the substrate. This distance should be at least 145 mm, otherwise the edge of the substrate may go out of the print zone and start touching the printer covers.
-
At the front of the printer, the right edge of the substrate on the empty core should be at the same distance (A) from the right side plate as the distance measured on the input side.
nota:
When loading non-elastic substrates, a difference of 2-3 mm between the measurements from the rear side plate and front side plate may be acceptable without problems of skew or wrinkles.RearFront

nota:
It is important that tension is uniform across the width of the substrate. One way of achieving this is to take the front substrate edge by its center and shake it alternately to right and left several times while at the same time pulling the substrate until it reaches the core on the output spindle. -
When the substrate is evenly tensioned, attach it to the empty core with adhesive tape. Tape it first in the center, and then at the left and right sides, making sure not to pull the substrate excessively or leave it wrinkled.

-
Go to the front panel and select Carriage beam position > Move to printing (normal) to lower the carriage beam into its normal position, close to the substrate. This process takes about two minutes to complete.
nota:
The Move to printing (custom) position allows you to set the printhead-to-substrate distance for thick substrates or substrates that may wrinkle in the print zone, to avoid ink smearing. Be aware that raising the printhead from the substrate may give poorer print quality.advertencia:
Do not insert your hands or anything else into the printer while the carriage beam is descending. -
Lower the substrate pressure handles at the rear of the printer. If you forget to do this, an alert will remind you.

-
If you intend to use full bleed, do not use the substrate edge holders, but use Move to printing (custom) to raise the carriage. Do not remove the edge holders; just move them aside at each end of the platen.
-
If you do not intend to use full bleed, use the substrate edge holders to prevent the substrate edges from lifting up and jamming while printing. See The substrate edge holders.
-
Go to the HP Internal Print Server and press the Load button. The printer rotates both rolls to check their diameters, and it also checks the width of the roll, the winding direction, the vacuum and the substrate advance calibration (this takes 1–2 min).
nota:
Some substrates (such as transparent substrates) cannot be measured by the printer in this way. In such cases, you will be asked to enter the required information manually. Use the scale on the curing module to see the value for the right-hand edge that must be entered manually in the HP Internal Print Server. -
In the HP Internal Print Server, choose from the list of substrate types the type that you have loaded.
 The contents of the Loaded Substrate window are determined automatically when the substrate is loaded and checked. However, if the printer is unable to detect the edges of the substrate (for instance, in the case of a transparent substrate), you will have to measure the distance of the left edge from the printer's side plate, and complete the Left Edge and Width fields yourself.For more information on when you might want to change the carriage beam position, see Substrate tips.An alert regarding substrate advance tracking may appear at this point. For more information on when you might want to turn off automatic tracking, see Fine-tune the settings in your new preset and the Maintenance and troubleshooting guide.
The printer is now ready to print.
Load a roll (dual roll-to-roll configuration)
The two substrate rolls are mounted on the rear dual-roll spindle and will be collected on the front dual-roll spindle. The substrate goes from the rear spindle over the main roller, over the platen, over the front roller and then to the front spindle.

nota:You can load substrate with the printed face inwards or outwards on the spindle, in which case the spindle will turn in the opposite direction. The printer asks you for the winding direction if it cannot detect it automatically.
Before loading two rolls into the printer, you must have both rolls loaded on the rear dual-roll spindle and two empty cores loaded on the front dual-roll spindle. See Load a roll onto the spindle.
-
Go to the HP Internal Print Server and select Substrate > Load/Unload, then select the correct configuration.
-
Remove the substrate edge holders in the print platen, or move them aside, so that they do not get in the way while loading the substrate.
atención:
Loading the substrate on top of the edge holders could severely damage the printheads and carriage. -
Lift the substrate pressure handles at the rear of the printer.
-
If you need to raise the carriage beam, go to the front panel and select Carriage beam position > Move to highest position. This process takes about 2 minutes to complete.
The printer raises the carriage beam, making it easy to insert the substrate. This process takes about 2 minutes to complete. During this period, you can load the input and output rolls.
nota:
While the carriage beam is rising, you can stop it by pressing the Cancel key. -
You may find it helpful to lock the differentials on the input and output spindles while loading.

-
Bring the new rolls on their spindle to the rear of the printer, with the geared end of the spindle on the left.
-
If the two rolls are of unequal lengths, the longer roll should be on the right as seen from the front of the printer; on the left as seen from the rear.

-
Rest the ends of the spindle on the platforms provided at the rear of the printer; plastic pads are provided to absorb the impacts.
-
Open the latches at both ends of the spindle (if they were closed) and push the roll on its spindle into the printer.
-
Close the latches to secure the spindle in place.
nota:
If you cannot close the gear side latch, try sliding the spindle towards the side plate to make sure the end flange is not sitting on the bearings.
-
In the same way, load the spindle with the empty cores into the front of the printer. In this case, the geared end of the spindle should be on the right.
-
Check that the printer has finished raising the carriage beam.
-
Pass the leading edges of both rolls through the printer to the output spindle.
nota:
Two people are recommended for this operation (one per roll).
-
Once in front of the printer, if you find that you haven't unrolled enough substrate, select Start main roller motion from the front panel's Substrate menu
 to unroll some more. The substrate unrolls only when you pull it.
-
Before taping the leading edges of the two substrate rolls to the empty cores on the output spindle, check by measurement that they are in the same positions on the output spindle as on the input spindle.


-
Tape the leading edges of both rolls to the empty cores on the output spindle.
-
Install the four edge holders. See The substrate edge holders.

-
Unlock the differentials on the input and output spindles.

-
Go to the front panel and select Carriage beam position > Move to printing (normal) to lower the carriage beam into its normal position, close to the substrate. This process takes about 2 minutes to complete.
nota:
The Move to printing (custom) position allows you to set the printhead-to-substrate distance for thick substrates or substrates that may wrinkle in the print zone, to avoid ink smearing. Be aware that raising the printhead from the substrate may give poorer print quality.advertencia:
Do not insert your hands or anything else into the printer while the carriage beam is descending. -
Go to the HP Internal Print Server and press the Load button. The printer rotates the rolls to check their diameters, and it also checks the width of the roll, the winding direction, the vacuum and the substrate advance calibration (this takes 1–2 min).
nota:
Some substrates (such as transparent substrates) cannot be measured by the printer in this way. In such cases, you will be asked to enter the required information manually. Use the scale on the curing module to see the value for the right-hand edge that must be entered manually in the HP Internal Print Server. -
In the HP Internal Print Server, choose from the list of substrate types the type that you have loaded.
 The contents of the Loaded Substrate window are determined automatically when the substrate is loaded and checked. However, if the printer is unable to detect the edges of the substrate (for instance, in the case of a transparent substrate), you will have to measure the distance of the left edge from the printer's side plate, and complete the Left Edge and Width fields yourself.For more information on when you might want to change the carriage beam position, see Substrate tips.An alert regarding substrate advance tracking may appear at this point. For more information on when you might want to turn off automatic tracking, see Fine-tune the settings in your new preset and the Maintenance and troubleshooting guide.
The printer is now ready to print.
Load a roll (roll-to-free-fall configuration) (LX800 only)

The substrate roll is mounted on the rear spindle; the printed substrate will be deposited on the floor in front of the printer. The substrate goes from the rear spindle (1) over the main roller (3), over the platen, over the front roller (5) and then to the tension roller (7), after which it continues to the floor. The diverter rollers (2 and 6) and the ink collectors (4) are installed when printing on porous substrates.

nota:You can load substrate with the printed face inwards or outwards on the spindle, in which case the spindle will turn in the opposite direction. The printer asks you for the winding direction if it cannot detect it automatically.
Before loading a roll into the printer, you must have a roll loaded onto the input spindle. See Load a roll onto the spindle.
nota:The spindle by itself is quite heavy, and a roll of substrate can be much heavier. You are recommended to use a forklift or some other equipment to move it into position; otherwise, lift one end into the printer, and then the other end.
-
Go to the HP Internal Print Server and select Substrate > Load/Unload, then select the correct configuration.
-
Remove the substrate edge holders in the print platen, or move them aside, so that they do not get in the way while loading the substrate.
atención:
Loading the substrate on top of the edge holders could severely damage the printheads and carriage. -
Lift the substrate pressure handles at the rear of the printer.
-
Go to the front panel and select Carriage beam position > Move to highest position.
The printer raises the carriage beam, making it easy to insert the substrate. This process takes about 2 minutes to complete. During this period, you can load the input roll.
nota:
While the carriage beam is rising, you can stop it by pressing the Cancel key. -
Bring the new roll on its spindle to the rear of the printer, with the geared end of the spindle on the left.
-
Rest the ends of the spindle on the platforms provided at the rear of the printer; plastic pads are provided to absorb the impacts.
-
Open the latches at both ends of the spindle (if they were closed) and push the roll on its spindle into the printer.
-
Close the latches to secure the spindle in place.
nota:
If you cannot close the gear side latch, try sliding the spindle towards the side plate to make sure the end flange is not sitting on the bearings.
-
Check that the printer has finished raising the carriage beam.
-
Go to the rear of the printer and ensure that the tension roller lever is raised.

nota:
The tension roller lever should always be raised unless the tension roller is in use. -
Pass the leading edge of the substrate through the printer, over the main roller and the front roller to the tension roller.
-
Once in front of the printer, if you find that you haven't unrolled enough substrate, select Start main roller motion to unroll some more. The substrate unrolls only when you pull it.
nota:
When passing the substrate's leading edge behind the tension roller, it is important to have no excess substrate between the front roller and the tension roller, although you can leave excess substrate before the front roller at this stage. Once the leading edge has been passed behind the tension roller, you can roll a stiff substrate downwards at the front roller or pull a flexible substrate from under the tension roller through the holes provided in the substrate guide around the roller.
-
At the rear of the printer, measure the distance between the printer's left side plate and the left edge of the substrate. This distance should be at least 145 mm, otherwise the edge of the substrate may go out of the print zone and start touching the printer covers.
-
At the front of the printer, the right edge of the substrate on the tension roller should be at the same distance (A) from the right side plate as the distance measured on the input side.
nota:
There is a square indentation in the right side plate in front of the tension roller. You should measure the distance between the substrate edge and the inside of this indentation.nota:
When loading non-elastic substrates, a difference of 2-3 mm between the measurements from the rear side plate and front side plate may be acceptable without problems of skew or wrinkles.RearFront
-
When the substrate edge is correctly positioned and the substrate is evenly tensioned, lower the tension roller lever.

-
Go to the front panel and select Carriage beam position > Move to printing (normal) to lower the carriage beam into its normal position, close to the substrate. This process takes about 2 minutes to complete.
nota:
The Move to printing (custom) position allows you to set the printhead-to-substrate distance for thick substrates or substrates that may wrinkle in the print zone, to avoid ink smearing. Be aware that raising the printhead from the substrate may give poorer print quality.advertencia:
Do not insert your hands or anything else into the printer while the carriage beam is descending. -
Lower the substrate pressure handles at the rear of the printer. If you forget to do this, an alert will remind you.
-
If you intend to use full bleed, do not use the substrate edge holders, but use Move to printing (custom) to raise the carriage. Do not remove the edge holders; just move them aside at each end of the platen.
-
If you do not intend to use full bleed, use the substrate edge holders to prevent the substrate edges from lifting up and jamming while printing. See The substrate edge holders.
-
Go to the HP Internal Print Server and press the Load button. The printer rotates the input roll to check its diameter, and it also checks the width of the roll, the winding direction, the vacuum and the substrate advance calibration (this takes 1–2 min).
nota:
Some substrates (such as transparent substrates) cannot be measured by the printer in this way. In such cases, you will be asked to enter the required information manually. Use the scale on the curing module to see the value for the right-hand edge that must be entered manually in the HP Internal Print Server. -
In the HP Internal Print Server, choose from the list of substrate types the type that you have loaded.
The contents of the Loaded Substrate window are determined automatically when the substrate is loaded and checked. However, if the printer is unable to detect the edges of the substrate (for instance, in the case of a transparent substrate), you will have to measure the distance of the left edge from the printer's side plate, and complete the Left Edge and Width fields yourself.For more information on when you might want to change the carriage beam position, see Substrate tips.An alert regarding substrate advance tracking may appear at this point. For more information on when you might want to turn off automatic tracking, see Fine-tune the settings in your new preset and the Maintenance and troubleshooting guide.
The printer is now ready to print.
Load a roll (roll-to-free-fall with collector configuration) (LX800 only)

This configuration is similar to the roll-to-free-fall configuration, but with the addition of a collector roller and loop shaper.
The following illustration shows a completed configuration with a single roll of porous substrate, so the ink collector kit has been installed.

nota:Do not try to load or unload the collector while printing.
Before starting to load the substrate, select a loop shaper of the correct length to match the substrate width. The following tubes are supplied so that you can make up loop shapers of many different lengths.
-
One 152-mm tube
-
Two 203-mm tubes
-
One 305-mm tube
-
One 610-mm tube
-
Two 1067-mm tubes
-
Two end flanges, to be placed at each end to avoid lateral displacement of the loop shaper during printing
For example, you can make up the following loop shapers.
-
914 mm: 610-mm and 305-mm tubes
-
1016 mm: 610-mm and two 203-mm tubes
-
1270 mm: 1067-mm and 203-mm tubes
-
1372 mm: 1067-mm and 305-mm tubes
-
1524 mm: 1067-mm, 305-mm and 152-mm tubes
-
1829 mm: 1067-mm, 610-mm and 152-mm tubes
-
1981 mm: 1067-mm, 610-mm and two 152-mm tubes
-
2032 mm: 1067-mm, 610-mm, 203-mm and 152-mm tubes
-
2489 mm: two 1067-mm, 203-mm and 152-mm tubes
-
2642 mm: two 1067-mm, 305-mm and 203-mm tubes
-
3200 mm: two 1067-mm, 610-mm, 305-mm and 152-mm tubes
-
Follow the whole loading procedure for the roll-to-free-fall configuration.
-
Load an empty substrate core onto the collector spindle. For dual-roll printing, load two cores of the same diameter onto a single spindle (it is not recommended to use a dual-roll spindle as the collector).
-
Use the buttons on the front panel to advance the substrate's leading edge until it reaches the core on the collector.
-
Tighten the substrate so that it is evenly tensioned, then attach the leading edge to the core with tape, first at the center and then at the sides. There should be no wrinkles or slackness across the substrate.

-
Use the buttons on the front panel again to advance the substrate so that a substrate loop is produced between the tension roller and the collector.
-
Place the loop shaper into the substrate loop.

nota:
Loop detection is done on the right-hand side of the printer; so avoid putting your foot or any other object under the collector on the right-hand side. -
Go to the HP Internal Print Server and press the Enable collector button.
-
Select the winding direction: Outwards is recommended, as it permits an output roll up to 230 mm in diameter. If you select Inwards, the diameter of the output roll is limited to 150 mm.
nota:
The winding direction cannot be changed on the fly: the collector has to be deactivated and reactivated.
Ingrese un tema para buscar en nuestra biblioteca de conocimientos
¿Con qué podemos ayudarle?

¿Necesita ayuda?