-
Turn off the lamps at the printer’s control panel screen, and wait for the lamps to finish their cool down sequence.
advarsel:
Failure to allow the lamps to cool down properly will damage the lamps. If you disconnect the power cable from the back of the printer or disconnect the power cable from the lamp assembly before the cool down sequence has finished, you will damage the lamps. Do not disconnect the power cable until the printer’s control panel screen no longer reads “Cooling”.Figur : Press “Tools” to access lamp power off
-
When the printer’s control panel screen no longer reads “Cooling” (it will change to “Off”), turn off the power to the printer.
-
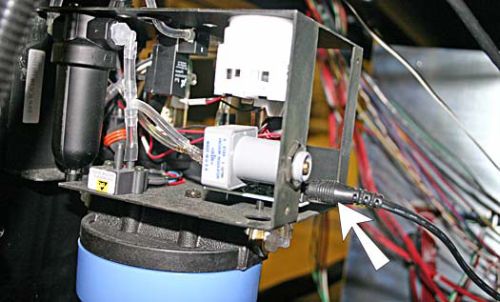
Make sure that the auxiliary power supply for the vacuum/pressure assembly is providing power to the vacuum/pressure assembly.If the auxiliary power supply is not available, restore power to the printer as soon as it is safe. Failure to follow these instructions will result in ink seeping from the printheads during the repair due to lack of vacuum.Figur : Auxiliary power supply assembled correctly
 If auxiliary power to the vacuum/pressure assembly is not available, and you must power down the printer for an extended time, you must plan for ink that will eventually seep from the printheads. Only ink that is currently in the printheads will leak. Placing the carriage assembly over the wipe station should be adequate to handle the seepage.
advarsel:
Allow the printer to complete its shutdown procedure before disconnecting the power cord.If you need to power down the printer to access areas of the printer where high voltage exists, keep in mind that turning off the power switch does not completely remove power from the printer. To be safe, unplug the main power cable to the printer before proceeding with service. Once the main power cable had been unplugged, allow 5 minutes to pass to allow any current to drain from the capacitors.
HP Scitex FB910 Printer Series - Installation Instructions for Lamp Filters
Managing Power Off Scenarios
Filter Installation
This kit includes replacement filters (twelve filters total). The filters cover the air vents above the
lamp bulbs (versus the filters above the lamp’s shutter motor). One filter is placed above each of
the two air vents. The filter will keep debris from entering the lamp bulb area. The filters should be
replaced after 100 hours of printer use or when the filters are clogged with debris.
Printer Orientation
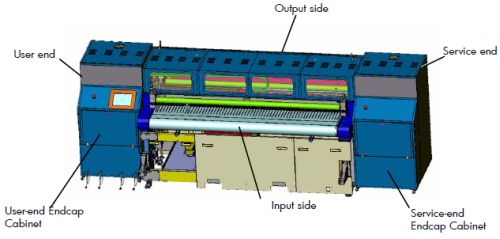
Figur : Pertinent Printer Parts
Removing and Installing the Filter
-
Power off the printer following the steps outlined in the section “Managing Power Off Scenarios.”
-
Open a end door to access the carriage.
-
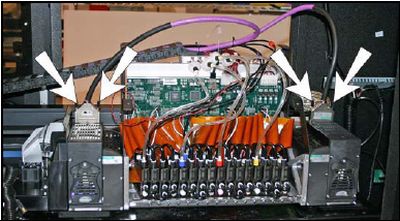
Unscrew the thumb screws to disconnect the power cables from the top of the lamp assemblies.A scewdriver may be needed to loosen the thumb screws.The lamp power cables must be removed because the safety tabs of the filter cover slide beneath the power cable. If the filter cover does not have safety tabs, the power cables do not need to be removed (as long as the printer is powered off).Figur : The arrows indicate the thumb screws to loosen
bemærk:
The photo shows the carriage cover removed; however, it is not necessary to remove the cover for this procedure -
Using a small flat-blade screwdriver, pry the side of the cover up to remove the cover from the lamp.Figur : Technique to pry off lamp cover
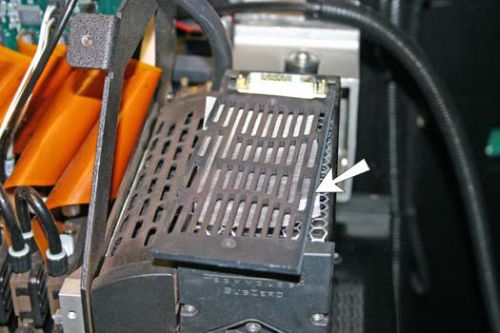
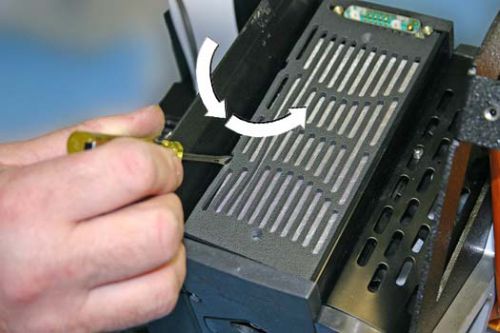 On the side of the lamp air vent cover are two slots that can be used to pry off the cover of the lamp assembly.
 -
Remove the dirty filter.
-
Insert a clean filter over the lamp bulb air vents (A).In the photo shown below, the shutter motor air vents (B) are not covered with a filter but should be. If shutter motor air filters are needed, order kit 0901614.Figur :
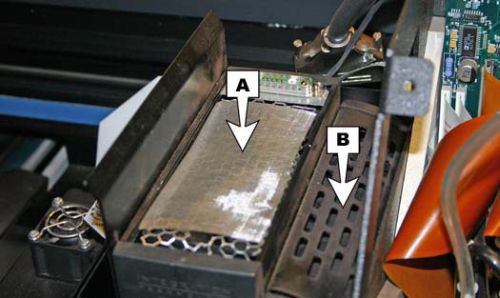 A = Lamp bulb filter
B = Shutter motor air vents -
Clean the lamp cover with head flush.
-
Install the lamp bulb air vent cover in the orientations shown below, making sure the lip around the cover faces upward.Figur : The arrow indicates the cover lip facing upward
-
Reconnect the UV power cables and tighten their thumb screws.
Changing Filters
After 100 hours of use, the printer’s menu will suggest that the filters be inspected and changed if
needed. Press the RESET button in the Warnings and Actions menu to reset the 100-hour count.
To order additional filters, order part number: 0901424 (set of 12 filters).
Yderligere muligheder for support
Indtast et emne for at søge i vores videnbibliotek
Hvad kan vi hjælpe dig med?

Har du brug for hjælp?