You can load different media in the trays and then request media by type or size by using the control panel.
HP Color LaserJet CP3525 Series Printer - Load trays
Paper orientation for loading trays
If you are using paper that requires a specific orientation, load it according to the information in the following tables.
note:The ALTERNATIVE LETTERHEAD MODE setting affects the way you load letterhead or preprinted paper. This setting is turned off by default. For more information, see System setup menu.
Tray 1
|
Paper type
|
Image orientation
|
Duplex mode
|
How to load paper
ALTERNATIVE LETTERHEAD MODE = Off
|
How to load paper
ALTERNATIVE LETTERHEAD MODE = On
|
|
Preprinted or letterhead
|
Portrait
|
1-sided printing
|
Face down
Top edge leading into the product
Figure : Paper orientation

|
Face up
Bottom edge leading into the product
Figure : Paper orientation

|
|
2-sided printing
|
Face up
Bottom edge leading into the product
Figure : Paper orientation
|
Face up
Bottom edge leading into the product
Figure : Paper orientation
|
||
|
Landscape
|
1-sided printing
|
Face down
Top edge toward the back of the product
Figure : Paper orientation

|
Face up
Top edge toward the back of the product
Figure : Paper orientation

|
|
|
2-sided printing
|
Face up
Top edge toward the back of the product
Figure : Paper orientation
|
Face up
Top edge toward the back of the product
Figure : Paper orientation
|
||
|
Prepunched
|
Portrait or landscape
|
1- or 2-sided printing
|
Holes toward the back of the product
Figure : Paper orientation

|
Not applicable
|
|
Envelopes
|
Long edge of the envelope feeding into the product
|
1-sided printing
|
Face down
Top edge leading into the product
Figure : Paper orientation

|
Not applicable
|
|
Short edge of the envelope feeding into the product
|
1-sided printing
|
Face down
Top edge toward the back of the product
Figure : Paper orientation

|
Not applicable
|
Tray 2 or optional Tray 3
|
Paper type
|
Image orientation
|
Duplex mode
|
How to load paper
ALTERNATIVE LETTERHEAD MODE = Off
|
How to load paper
ALTERNATIVE LETTERHEAD MODE = On
|
|
Preprinted or letterhead
|
Portrait
|
1-sided printing
|
Face up
Top edge at the right side of the tray
Figure : Paper orientation

|
Face down
Top edge at the left side of the tray
Figure : Paper orientation

|
|
2-sided printing
|
Face down
Top edge at the left side of the tray
Figure : Paper orientation
|
Face down
Top edge at the left side of the tray
Figure : Paper orientation
|
||
|
Landscape
|
1-sided printing
|
Face up
Top edge toward the back of the product
Figure : Paper orientation

|
Face down
Top edge toward the back of the product
Figure : Paper orientation

|
|
|
2-sided printing
|
Face down
Top edge toward the back of the product
Figure : Paper orientation
|
Face down
Top edge toward the back of the product
Figure : Paper orientation
|
||
|
Prepunched
|
Portrait or landscape
|
1- or 2-sided printing
|
Holes toward the back of the product
Figure : Paper orientation

|
Not applicable
|
Load Tray 1
note:To see an animation of this procedure go to this Web site: www.hp.com/go/cljcp3525-load-tray1.
caution:To avoid jams, never add or remove paper from Tray 1 during printing.
-
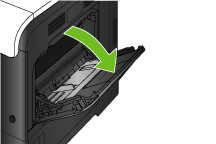
Open Tray 1.Figure : Location of Tray 1
-
Fold out the tray extension to support the paper and set the side guides to the correct width.Figure : Location of the tray extension

-
Load paper in the tray face down and the short, top edge going into the product first.Figure : Load paper

-
Make sure the stack fits under the tabs on the guides and does not exceed the load-level indicators.Figure : Load-level indicators

-
Adjust the side guides so that they lightly touch the paper stack but do not bend it.Figure : Load paper

Print envelopes
If your software does not automatically format an envelope, specify Landscape for page orientation in your software program or printer driver. Use the following guidelines to set margins for return and destination addresses on Commercial #10 or DL envelopes:
|
Address type
|
Left margin
|
Top margin
|
|
Return
|
15 mm
|
15 mm
|
|
Destination
|
102 mm
|
51 mm
|
For envelopes of other sizes, adjust the margin settings accordingly.
Load Tray 2
This tray holds up to 250 sheets of 75 g/m2 paper. If the paper is heavier, the tray does not hold as many sheets. Do not overfill the tray.
caution:Do not print envelopes, labels, postcards, or unsupported sizes of paper from the Tray 2. Print these types of paper only from Tray 1.
note:To see an animation of this procedure go to this Web site: www.hp.com/go/cljcp3525-load-tray2.
-
Slide open the tray.
note:
Do not open the tray while it is in use.Figure : Location of Tray 2
-
Adjust the paper-length and paper-width guides by squeezing the adjustment latch and sliding the guides to the size of the paper being used.Figure : Location of the paper size adjustment

-
Load paper into the tray face up. Check the paper to verify the guides lightly touch the stack, but do not bend it.
note:
To prevent jams, do not overfill the tray. Be sure the top of the stack is below the tray full indicator.Figure : Load the tray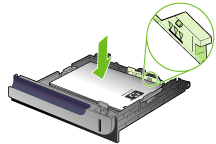
note:
If the tray is not adjusted correctly, an error message might appear during printing or the paper might jam. -
Slide the tray into the product.Figure : Location of Tray 2

-
The control panel shows the tray’s paper type and size. If the configuration is not correct, follow the instructions on the control panel to change the size or type.Figure : Control panel

Load the optional 500-sheet paper and heavy media tray (Tray 3)
Tray 3 holds up to 500 sheets of standard paper.
The product automatically detects the following standard sizes of paper in Tray 3: Letter, Legal, Executive, A4, A5, and B5 (JIS).
caution:Do not print envelopes or unsupported sizes of paper from Tray 3. Print these types of paper only from Tray 1.
Load standard-sized paper into Tray 3
note:To see an animation of this procedure go to this Web site: www.hp.com/go/cljcp3525-load-tray3.
-
Slide open the tray.
note:
Do not open the tray while it is in use.Figure : Location of Tray 3
-
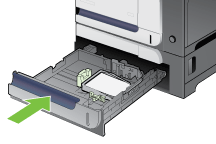
Adjust the paper-length and paper-width guides by squeezing the adjustment latches and sliding the guides to the size of the paper being used.Figure : Location of the paper size adjustment

-
Load paper into the tray face up. Check the paper to verify the guides lightly touch the stack, but do not bend it.
note:
To prevent jams, do not overfill the tray. Be sure the top of the stack is below the tray full indicator.Figure : Load the paper
note:
If the tray is not adjusted correctly, an error message might appear during printing or the paper might jam. -
Slide the tray into the product.Figure : Location of Tray 3

-
The control panel shows the tray’s paper type and size. If the configuration is not correct, follow the instructions on the control panel to change the size or type.Figure : Control panel
Load custom-size paper into Tray 3
To use custom media, change the size setting on the control panel to CUSTOM and set the unit of measure, X DIMENSION and Y DIMENSION.
-
Slide open the tray.Figure : Location of Tray 3
-
Adjust the paper-length and paper-width guides by squeezing the adjustment latches and sliding the guides to the size of the paper being used.Figure : Location of the paper size adjustment
-
Load paper into the tray face up. Check the paper to verify the guides lightly touch the stack, but do not bend it.Figure : Load the paper

-
Slide the tray into the product. The control panel shows the paper type and size.Figure : Location of Tray 3

-
The control panel prompts you to set the paper size and type. Select the CUSTOM setting, and then configure the X and Y dimensions of the custom paper size.Figure : Control panel
note:
See the label in the paper tray, or the following illustration, to determine the X and Y dimensions.Figure : Location of Tray 3
Load 4 x 6 inch (10 x 15 cm) size paper into Tray 3
note:To see an animation of this procedure go to this Web site: www.hp.com/go/cljcp3525-load-tray3-4x6.
Loading paper size 4 x 6 inch (10 x 15 cm) into Tray 3 requires installing the HP postcard media insert.
-
Slide open the tray.Figure : Location of Tray 3
-
Adjust the paper-length and paper-width guides by squeezing the adjustment latches and adjusting the guides to the fully opened position.Figure : Adjustment latches

-
Fit the HP postcard media insert into Tray 3 and then slide the insert to the right until it snaps into place.Figure : Location HP postcard media insert

-
Load 4 x 6 inch (10 x 15 cm) paper into the tray face up.Figure : Postcard paper in Tray 3

-
Adjust the paper-length and paper-width guides by squeezing the adjustment latches and adjusting the guides to the fully closed position.Figure : Adjustment latches

-
Slide the tray into the product.Figure : Location of Tray 3
-
The control panel prompts you to set the paper size and type. Select either 4 x 6 inch or 10 x 15 cm size paper.Figure : Control panel
Remove the HP postcard media insert
-
Adjust the paper-length and paper-width guides by squeezing the adjustment latches and adjusting the guides to the fully opened position.Figure : Adjustment latches

-
To remove the HP postcard media insert, lift the tab, slide the insert toward the center of the tray, and then lift the insert to remove.Figure : Location of HP postcard media insert

Enter a topic to search our knowledge library
What can we help you with?

Need Help?