This document is for HP Photosmart 5510, 5511, 5512, 5514, and 5515 e-All-in-One printers.
HP Photosmart 5510 Printers - Black Ink Not Printing and Other Print Quality Issues
The quality of a printed document or photo is not as expected. The procedures in this document should help with streaked or faded printouts, color or black ink not printing, documents with blurred or fuzzy text, ink streaks or smears, and other print quality problems.
Solution one: Use genuine HP cartridges
HP recommends that you use genuine HP ink or toner supplies. HP cannot guarantee the quality or reliability of non-HP or refilled cartridges. If you do not use genuine HP cartridges, the steps in this document might not resolve the issue. To check the authenticity of your cartridges, go to the HP anti-counterfeit webpage (in English).
Purchase replacement cartridges and other supplies from the HP Store or local retailers.
Solution two: Allow automatic servicing to complete
Many print quality problems with black ink, such as poor black text or issues that occur with a newly installed black cartridge, clear up with the printer's automatic servicing routine. There is nothing you need to do. The print quality should start improving in a few hours.
If you cannot wait for the automatic servicing routine to complete, continue with the following troubleshooting steps.
Solution three: Check the paper
The quality and type of paper can affect the print job. Use the following guidelines to make sure that the paper is appropriate. If it is not, load an appropriate paper type.
-
Load the paper print side down in the input tray. Many papers have printing and nonprinting sides, such as photo paper and envelopes. Usually, the smoother side is the "print side," and sometimes the non-print side has a logo of the paper manufacturer on it.
-
Do not use wrinkled or curled paper. Use only clean, wrinkle-free paper.
-
Use the correct paper type for your project.
-
For everyday text documents, plain paper with ColorLok technology works well. Paper with ColorLok technology is industry-standard paper that works well with HP ink.
-
For documents with dense printing, such as high contrast graphics or photos, use HP Advanced Photo Paper for best results.
-
Some paper might not absorb ink as well as others. If your prints smear easily, make sure you are using a recommended paper.
-
-
Store photo paper in its original packaging inside a resealable plastic bag. Store the paper on a flat surface in a cool, dry place. Load 10-20 sheets of photo paper only when you are ready to print, and then put the unused paper back in the packaging.
-
Try using a different paper. This determines if the problem is related to the paper.
Try printing again after trying the preceding guidelines.
Solution four: Check the print settings
Check the print settings to make sure that they are appropriate for your print job. First, select your operating system.
Solution five: Check ink levels, and then replace any low or empty cartridges
Low ink can contribute to poor print quality. Follow these steps to check the ink levels, and then replace low or empty cartridges according to the results.
Step one: Check the ink levels
note:Ink level warnings and indicators provide estimates for planning purposes only. When an indicator shows low ink levels, consider having a replacement ink cartridge available to avoid possible printing delays. You do not need to replace ink cartridges until print quality becomes unacceptable.
-
From the control panel home screen, touch the Right Arrow (
 ).
).
-
Touch Ink (
 ). The current ink levels display.
Figure : Example of estimated ink levels
). The current ink levels display.
Figure : Example of estimated ink levels
Step two: Replace any depleted cartridges
Watch a video or use the following steps to replace a depleted cartridge.
Video of replacing the cartridges
The following video demonstrates how to replace a cartridge.
note:This video shows an HP Photosmart 5510 (B111a) printer, but the steps are the same for your printer.

If you have trouble viewing the video or to view the video in a different size, click here to play the video on YouTube.
-
If the printer is off, press the Power button
 to turn on the printer.
-
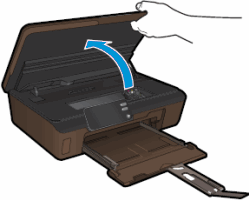
Open the ink cartridge access door. The carriage moves to the access area.
-
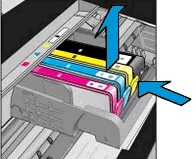
Press the tab on the front of the ink cartridge inward to release it, and then pull up on the ink cartridge to remove it from the slot.
-
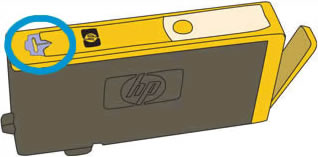
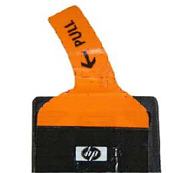
Remove the plastic wrap from a new ink cartridge by pulling the orange tab.
caution:
Make sure that you remove the orange pull-tab and plastic wrap completely before you twist the orange cap in the next step. Otherwise, ink might leak from the ink cartridge. When you remove the plastic wrap, the paper label on the top of the ink cartridge tears slightly, which is necessary to vent the ink cartridge.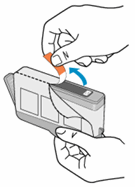
-
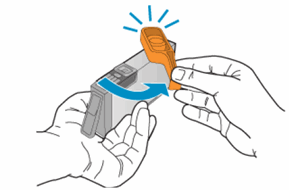
Remove the orange cap from the ink cartridge. Twist the cap counter-clockwise until it snaps off.
-
Slide the ink cartridge into its slot, and then press down on the ink cartridge until it snaps into place.
note:
Make sure that each ink cartridge is installed in the correct slot. Match the shape of the icon and the color of the ink cartridge with the slot that has the same shaped icon and color.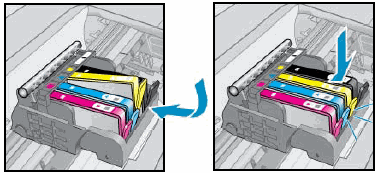
-
Repeat these steps to insert the other ink cartridges.
-
Close the ink cartridge access door.
Solution six: Print and evaluate a Print Quality Diagnostic Report
Follow these steps to print a test page, and then evaluate the results.
Step one: Print a Print Quality Diagnostic Report
Follow these steps to print a test page.
-
Load plain white U.S. letter or A4 size paper in the tray.
-
From the control panel home screen, touch the Right Arrow (), and then touch the Setup icon (
 ).
).
-
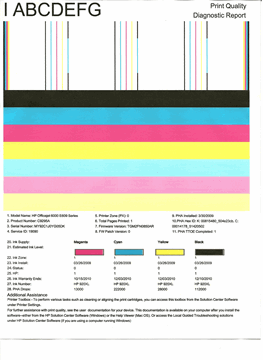
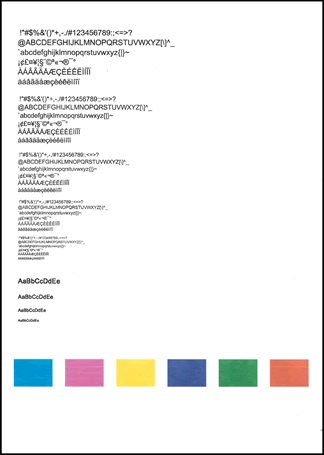
Touch Tools, and then touch Print Quality Report. A Print Quality Diagnostic Report prints.Figure : Example Print Quality Diagnostic Report
Step two: Check the test page for defects
Review the diagnostic areas of the print quality report to check for defects. Defects on the report can help you identify the print quality issue and then troubleshoot it.
-
Sample text
-
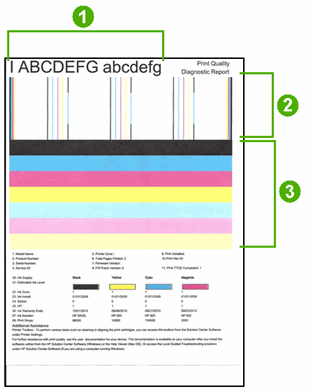
Alignment patterns
-
Color bars
Figure : Diagnostic areas of the print quality report
In general, if the printer and its cartridges work correctly, all the color bars are present, unstreaked, and uniform in color across the width of the page. The black text on the page does not show ink streaks.
Use the following table for examples of defects that can exist on the print quality diagnostic report. The following examples are not all inclusive, but tend to represent the most common issues.
|
Examples of defects on the print quality diagnostic report
|
|
|
Defect
|
Example
|
|
Large font text is ragged on one end (possible cartridge or printhead problem)
|

|
|
Irregularly streaked or faded color bars (possible cartridge or printhead problem)
|

|
|
Ragged color bars (possible cartridge or printhead problem)
|
|
|
The color bars are streaked with another color (possible cartridge or printhead problem)
|
|
|
The color blocks have regular white streaks (possible cartridge or printhead problem)
|
|
|
Completely missing (black) color (possible cartridge or printhead problem)
|
|
|
Page is blank or nearly blank (possible cartridge or printhead problem)
|

|
|
Jagged alignment patterns (possible alignment problem)
|
|
-
If you see one or more defects on the print quality diagnostic report, continue to the next steps.
-
If there are no defects on the print quality diagnostic report, it indicates that the print mechanism and ink supplies work correctly. Therefore, you do not need to continue the troubleshooting steps in the remainder of this document. However, if printouts are still unsatisfactory, try the following general procedures to improve print quality:
-
Make sure that the image you are printing has sufficient resolution. Enlarged images might appear fuzzy or blurry.
-
If the issue is confined to a band near the edge of a printout, use the software you installed with the printer or another software program to rotate the image 180 degrees. The problem might not display on the other end of the printout.
-
Avoid leaving unprotected cartridges out of the printer for an extended period of time.
-
Always use the Power button to turn off the printer. This protects the cartridges from drying out.
-
|
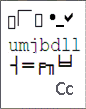
Windows only: If you are experiencing garbled, jumbled or illogical text, incomplete printouts, or missing text or graphics, go to Continuous Pages of Strange or Garbled Characters Print in Windows.
|
Step three: Make sure that the cartridges are properly vented and seated correctly
If the vent on the top of the cartridge is clogged or obstructed, the cartridge might not work properly. Follow these steps to make sure that the cartridges are properly vented and seated correctly.
-
Press the Power button to turn on the printer, if it is not already turned on.
-
Open the ink cartridge access door. The carriage moves to the access area.
-
Press the tab on the front of the ink cartridge inward to release it, and then pull up on the ink cartridge to remove it from the slot.
-
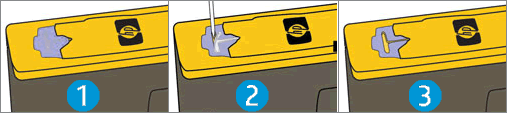
Examine the vent area on each ink cartridge, above the HP logo on the top of the ink cartridge.
-
If the ink cartridge still has the orange pull-tab attached, pull to remove it.
-
If the vent is clogged, use a straight pin to gently remove excess adhesive from the vent.
-
Clogged vent
-
With a straight pin, gently remove excess adhesive from the vent
-
Unclogged vent
-
-
Slide the ink cartridge into its slot, and then press down on the ink cartridge until it snaps into place.
note:
Make sure that each ink cartridge is installed in the correct slot. Match the shape of the icon and the color of the ink cartridge with the slot that has the same shaped icon and color.
-
Repeat these steps to inspect the vents on each of the ink cartridges.
-
Make sure that each ink cartridge is firmly in place in its slot. Run your finger along the top of the ink cartridges to feel for any that are protruding, and if any are, press down firmly until each ink cartridge snaps into place.
-
Close the ink cartridge access door.
-
Try the print job again.
Step four: Use an automated tool to clean the printhead
Follow these steps to clean the printhead.
note:If the printhead is badly clogged, you might need to clean the printhead several times to restore normal print quality.
-
Make sure that plain white U.S. letter or A4 size paper is loaded in the tray.
-
From the control panel home screen, touch the Right Arrow (), and then touch the Setup icon (
 ).
).
-
Touch Tools, and then touch Clean Printhead. The printer cleans the printhead, and then prints a test page.
-
Review the print quality on the test page.Figure : Example of print quality test page
note:If the printhead is badly clogged, you might need to clean the printhead several times to restore normal print quality. If a second cleaning is required, wait 30 minutes before cleaning again.
caution:Never turn off the printer when ink cartridges are not installed. To avoid issues that require cleaning the printhead or that can damage the ink system, always replace ink cartridges as soon as possible, and always turn off the printer using the Power button.
Step five: Use an automated tool to align the printer
If there were defects on the print quality diagnostic report, follow these steps to align the printheads.
note:After you load the cartridges and close the cartridge access door, the product automatically prompts you to print an alignment page.
-
On the product control panel, touch OK. The product prints an alignment page.
-
Open the lid.Figure : Open the lid
-
Place the alignment page on the scanner glass with the printed side down, and then position it on the front right corner of the glass.Figure : Place the alignment page on the scanner glass

-
Close the lid, and then touch OK. The alignment page scans.If the product does not automatically print an alignment page, follow these steps:
-
From the control panel home screen, touch the Right Arrow (), and then touch the Setup icon ().
-
Touch Tools.
-
Touch the Down Arrow (
 ), and then touch Align Printer. The product prints an alignment page.
-
Open the lid.Figure : Open the lid
-
Place the alignment page on the scanner glass with the printed side down, and then position it along the front right corner of the glass.Figure : Place the alignment page on the scanner glass
-
Close the lid, and then touch OK. The alignment page scans.
-
Solution seven: Replace the problem ink cartridge
Replace the problem ink cartridge if you saw defects on the Print Quality Diagnostic Report and the preceding steps did not resolve the issue, even if the ink cartridge is not low on ink. The problem ink cartridge is the one that printed the defects on the Print Quality Diagnostic Report as described earlier in this document.
If you have a defective cartridge or printhead, it might be under warranty. To check the warranty on your ink or toner supplies, go to Printer and Page Yield Overview, and then review the limited warranty information for your supplies.
Solution eight: Service the printer
Service or replace your HP product if the issue persists after completing all the preceding steps.
Go to Contact HP Customer Support to schedule a product repair or replacement. If you are in Asia Pacific, you will be directed to a local service center in your area.
To confirm your warranty status, go to HP Product Warranty Check. Repair fees might apply for out-of-warranty products.
note:Keep a print sample that shows the problem. If the ink cartridges, printhead, or printer is replaced under warranty, the support agent will request the print sample. If the printer is returned to HP, the print sample must be returned with the printer. Place the sample in the output tray when you package your printer for shipping.
Enter a topic to search our knowledge library
What can we help you with?

Need Help?