solution Contentsolution Content

HP EliteBook x360 1030 G3 Notebook PC - Components

Right

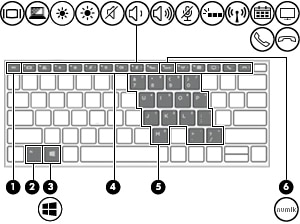
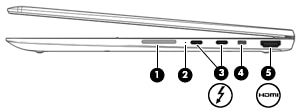
Figure : Identifying the right-side components
Component
Description
(1)
Volume button
Controls speaker volume on the computer.
(2)
Battery light
When AC power is connected:
  • White: The battery charge is greater than 90 percent.
  • Amber: The battery charge is from 0 to 90 percent.
  • Off: The battery is not charging.
When AC power is disconnected (battery not charging):
  • Blinking amber: The battery has reached a low battery level. When the battery has reached a critical battery level, the battery light begins blinking rapidly.
  • Off: The battery is not charging.
(3)
USB Type-C power connector and Thunderbolt ports with HP Sleep and Charge (2)
Connect an AC adapter that has a USB Type-C connector, supplying power to the computer and, if needed, charging the computer battery.
– and –
Connect and charge most USB devices that have a Type-C connector, such as a cell phone, camera, activity tracker, or smartwatch, and provides high-speed data transfer.
– and –
Connect a display device that has a USB Type-C connector, providing DisplayPort output.
note:
Your computer may also support a Thunderbolt docking station.
note:
Cables and/or adapters (purchased separately) may be required.
(4)
Security cable slot
Attaches an optional security cable to the computer.
note:
The security cable is designed to act as a deterrent, but it may not prevent the computer from being mishandled or stolen.
(5)
HDMI port
Connects an optional video or audio device, such as a high-definition television, any compatible digital or audio component, or a high-speed High Definition Multimedia Interface (HDMI) device.

Left

Figure : Identifying the left-side components
Component
Description
(1)
USB SuperSpeed port with HP Sleep and Charge
Connects a USB device, provides high-speed data transfer, and even when the computer is off, charges most products such as a cell phone, camera, activity tracker, or smartwatch.
(2)
Audio-out (headphone)/Audio-in (microphone) combo jack
Connects optional powered stereo speakers, headphones, earbuds, a headset, or a television audio cable. Also connects an optional headset microphone. This jack does not support optional standalone microphones.
  warning:
To reduce the risk of personal injury, adjust the volume before putting on headphones, earbuds, or a headset. For additional safety information, refer to the Regulatory, Safety, and Environmental Notices.
To access this guide:
  1. Select the Start button, select HP Help and Support, and then select HP Documentation.
‒ or –
  1. Select the Start button, select HP, and then select HP Documentation.
note:
When a device is connected to the jack, the computer speakers are disabled.
(3)
Power button
  • When the computer is off, press the button to turn on the computer.
  • When the computer is on, press the button briefly to initiate Sleep.
  • When the computer is in the Sleep state, press the button briefly to exit Sleep.
  • When the computer is in Hibernation, press the button briefly to exit Hibernation.
  caution:
Pressing and holding down the power button results in the loss of unsaved information.
If the computer has stopped responding and shutdown procedures are ineffective, press and hold the power button for at least 5 seconds to turn off the computer.
To learn more about your power settings, see your power options.
  1. Right-click the Power meter icon and then select Power Options.
(4)
Power light
  • On: The computer is on.
  • Blinking: The computer is in the Sleep state, a power-saving state. The computer shuts off power to the display and other unneeded components.
  • Off: The computer is off or in Hibernation. Hibernation is a power-saving state that uses the least amount of power.
(5)
Nano SIM card slot
Supports a wireless subscriber identity module (SIM) card.

Display

Figure : Identifying the display components
Component
Description
(1)
WWAN antennas* (select products only)
Send and receive wireless signals to communicate with wireless wide area networks (WWANs).
(2)
WLAN antennas*
Send and receive wireless signals to communicate with wireless local area networks (WLANs).
(3)
Camera light(s)
On: One or more cameras are in use.
(4)
Internal microphones
Record sound.
(5)
Camera(s)
Allow(s) you to video chat, record video, and record still images. Some cameras also allow a facial recognition logon to Windows, instead of a password logon.
note:
Camera functions vary depending on the camera hardware and software installed on your product.
*The antennas are not visible from the outside of the computer. For optimal transmission, keep the areas immediately around the antennas free from obstructions.
For wireless regulatory notices, see the section of the Regulatory, Safety, and Environmental Notices that applies to your country or region.
To access this guide:
  1. Select the Start button, select HP Help and Support, and then select HP Documentation.
‒ or –
  1. Select the Start button, select HP, and then select HP Documentation.

Keyboard area

TouchPad

Figure : Identifying the TouchPad components
Component
Description
(1)
TouchPad zone
Reads your finger gestures to move the pointer or activate items on the screen.
(2)
Left TouchPad button
Functions like the left button on an external mouse.
(3)
Near Field Communications (NFC) tapping area and antenna* (select products only)
Allows you to wirelessly share information when you tap it with an NFC-enabled device.
(4)
Right TouchPad button
Functions like the right button on an external mouse.
*The antenna is not visible from the outside of the computer. For optimal transmission, keep the area immediately around the antenna free from obstructions.
For wireless regulatory notices, see the section of the Regulatory, Safety, and Environmental Notices that applies to your country or region.
To access this guide:
  1. Select the Start button, select HP Help and Support, and then select HP Documentation.
‒ or –
  1. Select the Start button, select HP, and then select HP Documentation.

Lights

Figure : Identifying the top lights
Component
Description
(1)
Caps lock light
On: Caps lock is on, which switches the key input to all capital letters.
(2)
Mute light
  • On: Computer sound is off.
  • Off: Computer sound is on.
(3)
Microphone mute light
  • On: Microphone is off.
  • Off: Microphone is on.
(4)
Num lk light
On: Num lock is on.
(5)
Wireless light
On: An integrated wireless device, such as a wireless local area network (WLAN) device and/or a Bluetooth® device, is on.
note:
On some models, the wireless light is amber when all wireless devices are off.
(6)
Sharing or presenting light
On: Sharing is on.
(7)
Call answer light
On: Call answer is on.
(8)
Call end light
On: Call end is on.

Speakers and fingerprint reader

Figure : Identifying the top buttons
Component
Description
(1)
Speakers
Produce sound.
(2)
Fingerprint reader
Allows a fingerprint logon to Windows, instead of a password logon.

Special keys

Figure : Identifying the top keys
Component
Description
(1)
esc key
Displays system information when pressed in combination with the fn key.
(2)
fn key
Executes frequently used system functions when pressed in combination with another key. Such key combinations are called hot keys.
(3)
Windows key
Opens the Start menu.
note:
Pressing the Windows key again will close the Start menu.
(4)
Action keys
Execute frequently used system functions.
(5)
Embedded numeric keypad
A numeric keypad superimposed over the keyboard alphabet keys. When fn+num lk is pressed, the keypad can be used like an external numeric keypad. Each key on the keypad performs the function indicated by the icon in the upper-right corner of the key.
note:
If the keypad function is active when the computer is turned off, that function is reinstated when the computer is turned back on.
(6)
num lk key
Turns the embedded numeric keypad on and off.

Action keys

An action key performs the function indicated by the icon on the key. To determine which keys are on your product, see Special keys.
  1. To use an action key, press and hold the key.
Icon
Description
Helps prevent side-angle viewing from onlookers. If needed, decrease or increase brightness for well-lit or darker environments. Press the key again to turn off the privacy screen.
note:
To quickly turn on the highest privacy setting, press fn+p.
Decreases the screen brightness incrementally as long as you hold down the key.
Increases the screen brightness incrementally as long as you hold down the key.
Turns the keyboard backlight off or on.
note:
To conserve battery power, turn off this feature.
Plays the previous track of an audio CD or the previous section of a DVD or a Blu-ray Disc (BD).
Starts, pauses, or resumes playback of an audio CD, a DVD, or a BD.
Plays the next track of an audio CD or the next section of a DVD or a BD.
Stops audio or video playback of a CD, a DVD, or a BD.
Decreases speaker volume incrementally while you hold down the key.
Increases speaker volume incrementally while you hold down the key.
Mutes the microphone.
Mutes or restores speaker sound.
Turns the wireless feature on or off.
note:
A wireless network must be set up before a wireless connection is possible.
Turns the TouchPad and TouchPad light on and off.
Switches the screen image among display devices connected to the system. For example, if a monitor is connected to the computer, repeatedly pressing the key alternates the screen image from computer display to monitor display to simultaneous display on both the computer and the monitor.
Initiates Sleep, which saves your information in system memory. The display and other system components turn off and power is conserved. To exit Sleep, briefly press the power button.
  caution:
To reduce the risk of information loss, save your work before initiating Sleep.
Provides quick access to your Skype for Business calendar.
note:
This feature requires Skype® for Business or Lync® 2013 running on Microsoft Exchange or Office 365® servers.
Turns the screen sharing function on or off.
note:
This feature requires Skype for Business or Lync 2013 running on Microsoft Exchange or Office 365 servers.
  • Answers a call.
  • Starts a call during a 1-on-1 chat.
  • Places a call on hold.
note:
This feature requires Skype for Business or Lync 2013 running on Microsoft Exchange or Office 365 servers.
  • Ends a call.
  • Declines incoming calls.
  • Ends screen sharing.
note:
This feature requires Skype for Business or Lync 2013 running on Microsoft Exchange or Office 365 servers.
note:
The action key feature is enabled at the factory. You can disable this feature by pressing and holding the fn key and the left shift key. The fn lock light will turn on. After you have disabled the action key feature, you can still perform each function by pressing the fn key in combination with the appropriate action key.

Hot keys (select products only)

A hot key is the combination of the fn key and another key.
To use a hot key:
  1. Press the fn key, and then press one of the keys listed in the following table.
Key
Description
E
Turns on the insert function.
W
Pauses the operation.

Bottom

Figure : Identifying the bottom components
Component
Description
(1)
Vents
Enable airflow to cool internal components.
note:
The computer fan starts up automatically to cool internal components and prevent overheating. It is normal for the internal fan to cycle on and off during routine operation.
(2)
Speakers
Produce sound.

Labels

The labels affixed to the computer provide information you may need when you troubleshoot system problems or travel internationally with the computer. Labels may be in paper form or imprinted on the product.
note:
Check the following locations for the labels described in this section: the bottom of the computer, inside the battery bay, under the service door, on the back of the display, or on the bottom of a tablet kickstand.
  • Service label—Provides important information to identify your computer. When contacting support, you may be asked for the serial number, the product number, or the model number. Locate this information before you contact support.
    Your service label will resemble one of the examples shown below. Refer to the illustration that most closely matches the service label on your computer.
    Figure : Identifying the service label
    Component
    (1)
    HP product name
    (2)
    Model number
    (3)
    Product ID
    (4)
    Serial number
    (5)
    Warranty period
    Figure : Identifying the service label
    Component
    (1)
    HP product name
    (2)
    Product ID
    (3)
    Serial number
    (4)
    Warranty period
  • Regulatory label(s)—Provide(s) regulatory information about the computer.
  • Wireless certification label(s)—Provide(s) information about optional wireless devices and the approval markings for the countries or regions in which the devices have been approved for use.