Replace an imaging drum if you receive a message on the printer, or if you have print quality problems.
HP Color LaserJet Enterprise MFP M776 - Replace the imaging drums
Imaging drum information
This printer indicates when an imaging drum level is low and very low. The actual imaging drum life remaining can vary. Consider having a replacement imaging drum available to install when print quality is no longer acceptable.
To purchase imaging drums or check imaging drum compatibility for the printer, go to HP SureSupply at www.hp.com/go/suresupply. Scroll to the bottom of the page and verify that the country/region is correct.
The printer uses four imaging drums installed next to each toner cartridge. One universal imaging drum part fits in all four positions. The imaging drums are inside the front door.
|
Item
|
Description
|
Cartridge number
|
Part number
|
|
HP Imaging Drum
|
Replacement imaging drum
|
660A
|
W2004A
|
Do not remove the imaging drum from its package until it is time to replace it.
caution:To prevent damage to the imaging drum, do not expose it to light for more than a few minutes. Cover the green imaging drum if it must be removed from the printer for an extended period of time. Do not touch the imaging drum. Fingerprints on the imaging drum can cause print-quality problems.
The following illustration shows the imaging drum components.
-
Handle
-
Imaging drum
-
Protective shield
-
Memory chip
Figure : Imaging drum components

caution:If toner gets on clothing, wipe it off by using a dry cloth and wash the clothes in cold water. Hot water sets toner into fabric.
note:Information about recycling used imaging drums is in the imaging drum box.
Remove and replace the imaging drums
Follow these steps to replace an imaging drum.

-
Open the front door.Figure : Open the door

-
Rotate the blue lever in front of the imaging drum to the left.Figure : Rotate imaging drum lock

-
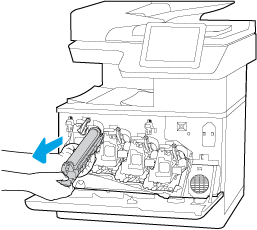
Grasp the handle of the used imaging drum and pull out to remove it.Figure : Remove the imaging drum
-
Remove the new imaging drum from its packaging by removing the end caps (callout 1), removing the imaging drum from the plastic bag (callout 2), and then removing the orange protective shield (callout 3).
note:
Avoid touching the green imaging drum. Fingerprints on the imaging drum can cause print defects.Figure : New imaging drum
-
Support the imaging drum underneath with one hand while holding the handle with the other. Align the imaging drum with its slot on the shelf, and then insert the imaging drum into the printer.
note:
Avoid touching the green imaging drum. Fingerprints on the imaging drum can cause print defects.Figure : Install the imaging drum
-
Rotate the blue lever in front of the imaging drum to the right.Figure : Rotate imaging drum lock

-
Close the front door.Figure : Close the door
 Save all packaging for recycling the used imaging drum. To recycle the used imaging drum, follow the instructions included with the new imaging drum.
Enter a topic to search our knowledge library
What can we help you with?

Need Help?