solution Contentsolution Content

HP PageWide Enterprise, HP PageWide Managed - Replace the service fluid container

Introduction

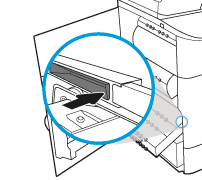
The following information provides details about the service fluid container for the printer, and it includes instructions to replace it.
The printer indicates when the service fluid container is nearly full and when it is completely full. When it is completely full, printing stops until the service fluid container is replaced.
To purchase a service fluid container (part number W1B44A), go to the HP Parts Store at www.hp.com/buy/parts.
note:
The service fluid container is designed for a single use. Do not attempt to empty the service fluid container and reuse it. Doing so could lead to pigment being spilled inside the printer, which could result in reduced print quality. After use, return the service fluid container to HP’s Planet Partners program for recycling.

Remove and replace the service fluid container

  1. Open the left door.
    Figure : Open the left door
  2. Pull the service fluid container away from the printer.
      caution:
    When pulling out the service fluid container, avoid making direct contact with the black cylinder to prevent pigment smear on skin or clothes.
    Figure : Remove the service fluid container
  3. On the left side of the service fluid container, release the latch that holds the unit in the alignment track, and then remove the left side of the unit.
    Figure : Release the service fluid container latch
  4. Remove the right side from the alignment track, and then remove the unit from the printer. Set the unit aside, upright, on a piece of paper to prevent spills.
    Figure : Release the service fluid container right side
  5. Remove the new service fluid container from its packaging.
    Figure : Remove the packing material
  6. Insert the right end of the service fluid container into the alignment track first.
    Figure : Install the right side of the service fluid container
  7. Insert the left end of the service fluid container into the alignment track, and then lock the latch that holds the unit in the track.
    Figure : Install the left side of the service fluid container
  8. Push the service fluid container into the printer.
    Figure : Install the service fluid container
  9. Close the left door.
    Figure : Close the left door