solution Contentsolution Content

HP DeskJet, OfficeJet 5200 Printers - Replacing Ink Cartridges

This document is for HP DeskJet Ink Advantage 5275, 5276 and 5278, and OfficeJet 5212, 5220, 5222, 5230, 5232, 5252, 5255, 5258, and 5264 All-in-One printers.
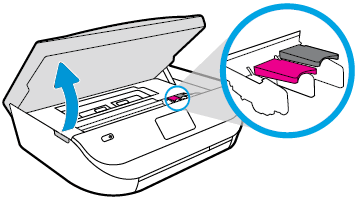
This document contains steps for replacing the ink cartridges.
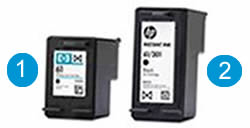
Replace the ink cartridges

Replace any low or empty ink cartridges.
note:
If you are enrolled in the HP Instant Ink program, you receive special HP Instant Ink cartridges. Some HP Instant Ink cartridges are larger than standard ink cartridges, but they fit in the carriage in the same way. HP Instant Ink is not available in all countries/regions or for all printer models. For more information, go to HP Instant Ink.
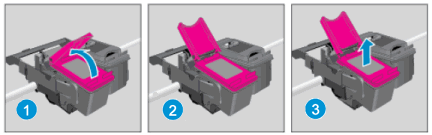
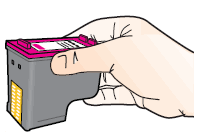
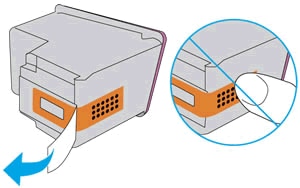
    HP Instant Ink and standard ink cartridges
  1. Standard ink cartridge
  2. HP Instant Ink cartridge
  1. Turn on the printer.
  2. Load plain white paper into the input tray.
  3. Gently grasp the handles on either side of the printer, and then raise the ink cartridge access door until it locks into place.
    The carriage moves slightly to the left.
    Figure : Opening the ink cartridge access door
    Opening the ink cartridge access door.
  4. Wait until the carriage is idle and silent before you continue.
  5. Lift up the lid on the ink cartridge slot, and then pull up on the ink cartridge to remove it from the slot.
      Figure : Removing the ink cartridge
      Removing the ink cartridge.
    1. Lift the lid
    2. Gently push the lid back
    3. Pull up on the ink cartridge
  6. Remove the new ink cartridge from its package. Be careful to only touch the black plastic on the ink cartridge.
    Figure : Holding the ink cartridge by its sides
    Holding the ink cartridge by its sides.
  7. Remove the plastic tape from the ink cartridge.
      caution:
    Do not touch the copper-colored contacts or the ink nozzles. Do not replace the protective tape on the contacts. Handling these parts can result in clogs, ink failure, and bad electrical connections.
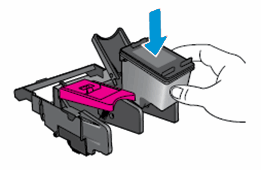
    Figure : Removing the plastic tape
    Removing the plastic tape
  8. With the nozzles toward the printer, insert the ink cartridge into its slot until it snaps into place.
    note:
    Install the color ink cartridge on the left and the black ink cartridge on the right.
    Figure : Inserting the ink cartridge
    Inserting the ink cartridge.
  9. Close the lid on the ink cartridge slot to secure the ink cartridge into place.
  10. Repeat these steps to install the other ink cartridge, if necessary.
  11. Close the ink cartridge access door.
    After you install new ink cartridges, the printer automatically prints an alignment page.
    If the printer does not print an alignment page, see What if the alignment page did not print? in the Frequently asked questions (FAQs) section.
  12. Pull out the output tray, and then lift the output tray extender.
    Figure : Pulling out the output tray and lifting the output tray extender
    Pulling out the output tray and lifting the output tray extender
  13. Wait for the alignment page to fully eject from the printer.
  14. After the alignment page prints, lift the scanner lid, and then place the alignment page with the print side down on the scanner glass. Position it according to the engraved guides around the glass.
    Figure : Placing the alignment page on the scanner glass
    Placing the alignment page on the scanner glass
  15. Close the scanner lid, and then touch OK on the printer control panel.
    The printer aligns the ink cartridges.
  16. After the printer aligns the ink cartridges, touch OK on the control panel.

Frequently asked questions (FAQs)

Review the frequently asked questions about replacing ink cartridges.