solution Contentsolution Content

HP LaserJet MFP M436 - Scanning from a computer

Introduction

The following topics describe several methods for scanning a document from the scanner to a computer.
note:
The maximum resolution that can be achieved depends upon various factors, including computer speed, available disk space, memory, the size of the image being scanned, and bit depth settings. Thus, depending on your system and what you are scanning, you may not be able to scan at certain resolutions, especially using enhanced dpi.

Scanning from the HP Scan application

The HP Scan software application must be installed on a PC to enable the Scan To PC button push to function on the printer's control panel. Follow the steps below to setup the HP Scan application:
note:
The Scan To PC button push functionality is only supported on network-connected products. Scan To PC is not supported over a USB connection.
  1. Install the M436 full software bundle. This software bundle includes the HP Scan software application.
  2. Run the HP M436 Scan to PC Setup utility in the PC's programs/applications group to modify the settings for an existing printer or to add an additional M436 product. This utility configures scan settings and file type/save options for the Scan To PC button push.
  3. Highlight the printer model name on the first screen, and then click the Properties button at the bottom of the screen.
    Figure : Scan to PC setup utility screenshot
  4. Modify the following settings under Scan Profile as desired:
    • Profile Name: Enter the name to display on the control panel.
    • Scan Settings: Select color mode, resolution, original scan size, and duplex scan.
    • Save Settings: Select save location, file format, and action to take after saving the scan.
    Figure : Scan to PC setup utility screenshot
  5. Place a single document face down on the document glass, or load the documents face up into the document feeder.
  6. Select (scan) > Scan To PC on the control panel, and then select the destination PC/location where the scanned file will be saved.

Scanning from image editing program

You can scan and import documents in the image editing software such as Adobe Photoshop, if the software is TWAIN-compliant. Follow the steps below to scan with TWAIN-compliant software:
  1. Make sure that the machine is connected to your computer and powered on.
  2. Place a single document face down on the document glass, or load the documents face up into the document feeder.
  3. Open an application, such as Adobe Photoshop.
  4. Click File > Import, and select the scanner device.
  5. Set the scan options.
  6. Scan and save your scanned image.

Scanning using the WIA driver

Your machine supports the Windows Image Acquisition (WIA) driver for scanning images. WIA is one of the standard components provided by Microsoft Windows 7 and works with digital cameras and scanners. Unlike the TWAIN driver, the WIA driver allows you to scan and easily adjust images without using additional software:
note:
The WIA driver works only on Windows OS with a USB port.
  1. Make sure that the machine is connected to your computer and powered on.
  2. Place a single document face down on the document glass, or load the documents face up into the document feeder.
  3. Click Start > Control Panel > Hardware and Sound > Devices and Printers.
  4. Right-click on device driver icon in Printers and Faxes > Start Scan.
  5. New Scan application appears.
  6. Choose your scanning preferences and click Preview to see how your preferences affect the picture.
  7. Scan and save your scanned image.

Scanning from network connected machine

note:
This feature is not available for the machine that does not support the network interface.
Make sure the printer driver is installed on your computer using the software CD, since the printer driver includes the scan program.
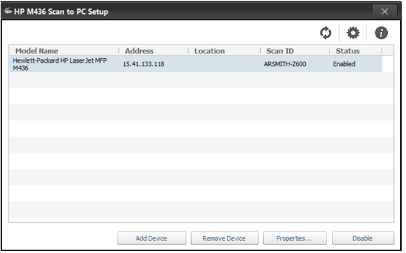
Before the first use, find the application HP M436 Scan to PC Setup and follow these steps.
  1. Select the Windows icon in the lower left portion of the screen.
  2. Select All Programs.
  3. Select the HP or HP Printers folder.
  4. Select the HP LaserJet MFP M436 folder.
  5. Select the HP M436 Scan to PC Setup application.
  6. Select Add Device.
  7. Available network devices will be shown.
  8. Add the device(s) you wish to use.
Follow these steps to scan from a network connected machine.
  1. Place a single document face down on the document glass, or load the documents face up into the document feeder.
  2. Select (Scan) > Scan To PC.
    note:
    If you see Not Available message, check the port connection.
  3. Select your registered computer ID, and enter the Password if necessary.
  4. Select the option you want and press OK.
  5. Scanning begins.
note:
Scanned image is saved in computer’s C:\Users\users name\My Documents. The saved folder may differ, depending on your operating system or the application you are using.