solution Contentsolution Content

HP Latex 800, HP Scitex LX800/LX600, HP Designjet L65500 Series - Resolving Error Code 57:11 Ink System Leakage

This document pertains to HP Latex 800, Scitex LX800/LX600, and Designjet L65500 Printer series.
The Ink System Module (ISM) has two sensors that can detect the present of liquid - usually ink - in the ISM tray. If either of these sensors is activated, the printer displays the message 57:11 on the front panel, and the printer cannot operate.

Identifying and cleaning the leak

The code 57:11 signifies a leak in the printer. If you see this message, immediately disconnect all of the ink cartridges from the printer. Because the ink system is gravity fed, ink leaks at some locations in the ISM could drain an entire ink cartridge. Disconnecting the ink cartridges minimizes the ink loss. Follow these steps to disconnect the ink cartridges and find the leak:
  1. Disconnect the cartridge connector by pressing the tabs on each side of it and pulling it gently. Repeat for all ink cartridges.
    Figure : Disconnecting ink cartridges
    Disconnecting ink cartridges
  2. After disconnecting all the ink cartridges, remove the front and rear ISM panels. A Torx T-30 driver is required to remove the panels.
    note:
    Depending on the location of the leak and the access needed for clean-up and repair, it may be necessary to remove only one panel. For maximum access, the ISM end panel may also be removed.
    Input-side ISM enclosure removal. Remove this panel for access to black, cyan, and yellow components.
      Figure : ISM panel
      Input-side ISM enclosure removal
    1. Torx T30 fastener (six locations)
    2. Enclosure panel
    Input-side ISM enclosure removal. Remove this panel for access to magenta, light magenta, and light cyan components.
      Figure : ISM panel
      Input-side ISM enclosure removal
    1. Torx T30 fastener (six locations)
    2. Enclosure panel
    ISM end panel enclosure removal. Remove this panel for access to all ISM components except for intermediate tanks. At least one of the side panels must be removed for access to the interior fasteners. Left: interior view; right: exterior view.
      Figure : ISM end panel
      ISM end panel enclosure removal
    1. Internal Torx T30 fasteners (two locations)
    2. External Torx T30 fasteners (two locations)
    3. Enclosure panel
    With the panels removed, the affected ink color is easily seen.
  3. Clean up any liquid ink that has accumulated in the ISM tray, taking care to avoid distributing it onto any components that have not already been in contact with the ink. While cleaning, attempt to identify the specific location of the leak. The most common areas of failure are at the ink pressure sensor board, wherever a tube is attached to another component, or where two tube-ends may have been joined in a previous repair.
    note:
    If no ink leak can be found, there may have been a false leak detected. Continue to Cleaning the ink leak sensors.
  4. Once the source of the ink leak has been identified, it must be repaired. Specific repairs and techniques are outside the scope of this document; search the HP Support Center for additional resources, or contact an authorized HP reseller or the HP regional Customer Care Center for additional assistance.

Cleaning the ink sensors

After the ink leak has been repaired, the ink leak sensor must be cleaned and dried.
  1. Power off the printer.
  2. Locate the ink sensor near the outer end of the ISM on the rear side.
      Figure : Ink sensor
    1. Sensor end
    2. Sensor cable quick-disconnect
    3. Ink pressure sensor board (shown for orientation)
  3. Disconnect the ink sensor and remove it from the bracket in the ISM tray.
  4. Clean the sensor end carefully, or replace it with a spare sensor from HP spare part Q6702-60686 ISM Repair Kit, which contains one replacement sensor/cable and various other related ink system components.
    All spare part information is subject to change without notice; visit HP PartSurfer for complete and up-to-date spare part information.

Resetting the 57:11 error

Before the printer can be used, the 57:11 error must be specifically cleared from the printer memory. To clear the error, perform the following steps:
  1. Start the printer in Diagnostic Mode. To start in Diagnostic mode, press and hold the Cancel button and the Down Arrow, then press and hold the Power button. Continue to press all three buttons. The LED indicator on the front panel will be steady-on red, then steady-on green, and then finally start blinking green. When the LED begins blinking green, release all three buttons.
      Figure : Starting in Diagnostic Mode
      Starting in Diagnostic Mode
    1. Cancel button. Press and hold
    2. Down arrow button. Press and hold
    3. Power button. Press and hold
    4. LED. When LED changes from steady-on green to blinking green, release all three buttons
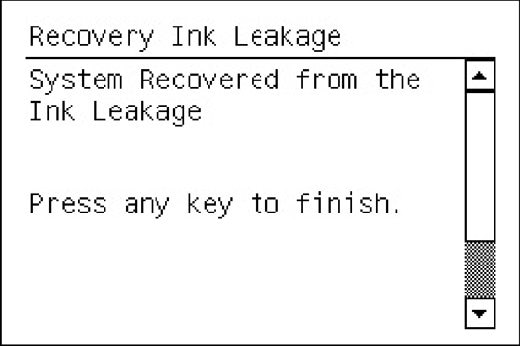
  2. With the printer in Diagnostic mode, use the front panel keys to navigate to 4.7 Recovery Ink Leakage. If the ink leak sensors are dry, the printer will show that the system has recovered from the ink leak.
    Figure : Recovery Ink Leakage message
    Recovery Ink Leakage message
  3. Press any key on the front panel to finish the reset.
  4. Restart the printer to resume normal operation.
If the ink leak sensor cannot be cleaned and no replacement is available, you may leave the sensor cable disconnected and reset the error. This should be done only as a temporary measure until a replacement sensor can be obtained and installed. Operating the printer without the leak sensors connected may result in an undetected ink leak that can lead to additional printer down time and loss of additional ink supplies.
If there are questions or if any additional assistance is needed, contact an authorized HP reseller or the regional HP Customer Care Center.