Temporarily disable Quick Heal Antivirus, uninstall HP scanner software, remove the associated Hewlett-Packard directory from the registry, reinstall HP scanner software, and then re-enable Quick Heal Antivirus.
note:
It is important that you reboot the computer when instructed in the following steps.
Step one: Disable Quick Heal Antivirus
Temporarily disable Autorun Protection prior to installing or uninstalling HP Scanjet Software and Drivers. To do this, follow these steps:
-
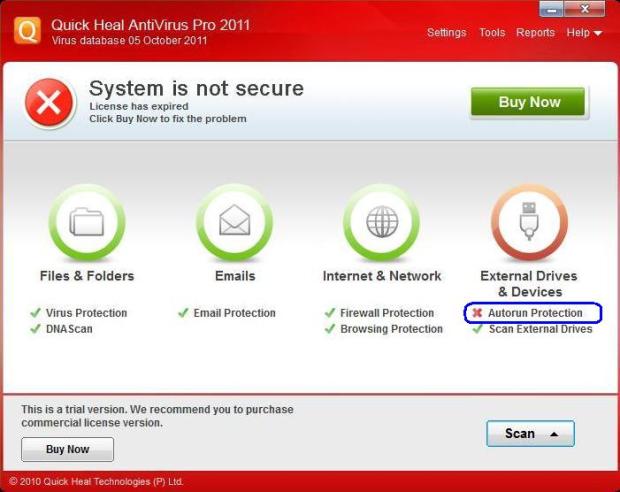
Open Quick Heal Antivirus and click External Drives & Devices.
-
Turn OFF Autorun Protection and click Back to Dashboard to confirm.
-
Make sure Autorun Protection is disabled and then close the Quick Heal AntiVirus window.
-
Reboot the computer.
note:
Without the reboot, Quick Heal AntiVirus functions will remain active and can continue hindering install/uninstall attempts.
Step two: Uninstall HP software
Uninstall all HP software associated with the Scanjet in question.
-
Disconnect the USB cable from the product. For scanners on a network, skip this step.
-
Click Start, click Control Panel, click Programs, and then select Uninstall a program.
-
Uninstall all HP programs associated with the device.
-
Check whether any of the following programs are listed:
note:
Do not remove any HP items other than those mentioned above if the computer is manufactured by HP or Compaq.
-
For each program listed, click the program name and then click Uninstall.
-
Wait while the computer reboots.
note:
Uninstalling HP Photosmart Essentials and/or HP Solution Center will force the system to reboot. If for some reason a reboot does not occur automatically, restart the computer before continuing.
Step three: Remove the Hewlett-Packard directory or key from the registry
-
Clean up the registry.
note:
This step can result in unintended consequences to the scanning system and can destabilize or alter the functionality of the computer, therefore, HP does not recommend manually editing the Windows Registry or manually deleting driver files without assistance. Only individuals with extensive knowledge of the registry and registry modifications should perform the steps below. Novice computer users should seek assistance from an HP technical support agent. If you are not comfortable performing these steps or are not sure, contact HP Support for assistance in performing these steps.
-
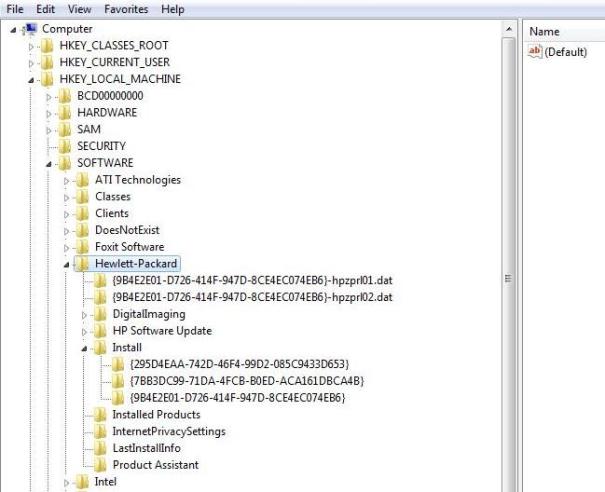
Open the registry folder HKEY_LOCAL_MACHINE, open SOFTWARE, and then locate the Hewlett-Packard folder.
-
Export the HKEY_LOCAL_MACHINE\SOFTWARE\Hewlett-Packard directory to a safe location, and then remove it from registry.
note:
In most cases it is this entry that is not getting cleaned up properly during uninstalls and prevents subsequent installs. Care should be taken when other HP devices are connected to the PC. If, after installing HP Solution Center successfully, another HP device is not working properly, the exported directory key data can be added back to the HKEY_LOCAL_MACHINE\SOFTWARE\Hewlett-Packard directory by double-clicking on the exported directory.
-
Reboot the computer.
Step four: Install the HP scanner software and driver
-
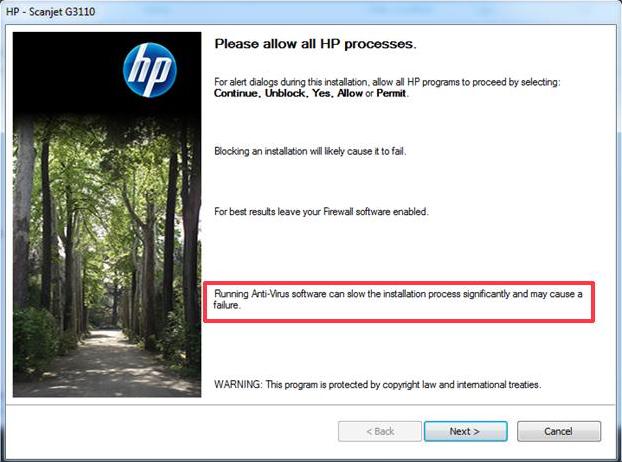
Insert the CD that came with the product or install using the downloaded software and driver.
-
Follow the onscreen wizard prompts to complete the installation.
Step five: Re-enable Quick Heal AntiVirus
-
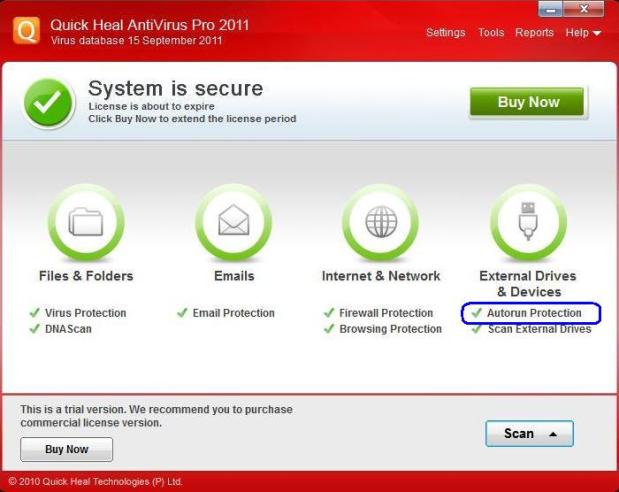
Re-enable Quick Heal AntiVirus.
-
Reboot the computer again.
If after completing the steps above the issue persists, repeat all of the above steps and then, in addition to disabling Autorun Protection, disable ALL of the active functions in Quick Heal AntiVirus.