To view a video demonstrating the procedure for removing the part click here to access the Services Media Library (www.hp.com/go/sml). Select Printers and Multifunction under the Product category, select HP Color LaserJet Printers under the Product family, and then select the printer model under the product series category.
HP Color LaserJet 5550 Series Printer - Replace the Memory
Memory replacement
-
Turn the printer off.

-
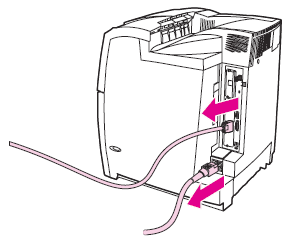
Disconnect all power and interface cables.
-
Locate the formatter board in the rear of the printer.

-
Using a #2 Phillips screwdriver, remove the eight screws holding the board in place, and set them aside.

-
Slide out the formatter board and set it on a clean, flat, grounded surface.

-
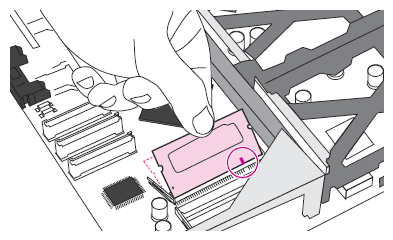
To replace a DDR DIMM that is currently installed, spread the latches apart on each side of the DIMM slot, lift the DDR DIMM up at an angle, and pull it out.

-
Remove the new DIMM from the antistatic package. Locate the alignment notch on the bottom edge of the DIMM.

-
Holding the DIMM by the edges, align the notch on the DIMM with the bar in the DIMM slot at an angle and firmly press the DIMM into the slot until it is fully seated. When installed correctly, the metal contacts are not visible.
-
Push down on the DIMM until both latches engage the DIMM.

note:
If you have difficulty inserting the DIMM, make sure the notch on the bottom of the DIMM is aligned with the bar in the slot. If the DIMM still does not go in, make sure you are using the correct type of DIMM. -
Align the formatter board in the tracks at the top and bottom of the slot, and then slide the board back into the printer. Replace and tighten the eight screws removed in step 4.

-
Reconnect the power cable and interface cables, and turn the printer on.

Enabling Memory
If you installed a memory DIMM, set the printer driver to recognize the newly added memory.
To enable memory for Windows 2000 and XP
-
On the Start menu, point to Settings, and click Printers.
-
Right-click the printer and select Properties.
-
On the Device Settings tab, click Printer Memory in the Installable Options section).
-
Select the total amount of memory that is now installed.
-
Click OK.
Parts return
If your part requires return then click on the appropriate link below:
Enter a topic to search our knowledge library
What can we help you with?

Need Help?