Correctly using, storing, and monitoring the print cartridge can help ensure high-quality output.
HP LaserJet Pro P1566 and P1606dn Printers - Replacing the Cartridge
Manage print cartridges
Print-cartridge storage
Do not remove the print cartridge from its package until you are ready to use it.
caution:To prevent damage to the print cartridge, do not expose it to light for more than a few minutes.
HP policy on non-HP print cartridges
Hewlett-Packard Company cannot recommend the use of non-HP print cartridges, either new or remanufactured.
note:Any damage caused by a non-HP print cartridge is not covered under the HP warranty and service agreements.
To install a new genuine HP print cartridge, see Replace the print cartridge.
HP fraud hotline and Web site
Call the HP fraud hotline (1-877-219-3183, toll-free in North America) or go to www.hp.com/go/anticounterfeit when you install an HP print cartridge and the control-panel message says the cartridge is non-HP. HP will help determine if the cartridge is genuine and take steps to resolve the problem.
Your print cartridge might not be a genuine HP print cartridge if you notice the following:
-
You are experiencing a high number of problems with the print cartridge.
-
The cartridge does not look like it usually does (for example, the orange pull tab is missing, or the packaging differs from HP packaging).
Recycle supplies
To install a new HP print cartridge, follow the instructions that are included in the box that contains the new supply, or see the getting started guide.
To recycle supplies, place the used supply in the box in which the new supply arrived. Use the enclosed return label to send the used supply to HP for recycling. For complete information, see the recycling guide that is included with each new HP supply item.
Replacement instructions
Redistribute toner
When a small amount of toner remains in print cartridge, faded or light areas might appear on the printed page. You might be able to temporarily improve print quality by redistributing the toner.
-
Open the print-cartridge door, and then remove the print cartridge.Figure : Print-cartridge removal
-
To redistribute the toner, gently rock the print cartridge from front to back.Figure : Rocking motion

caution:
If toner gets on your clothing, wipe it off with a dry cloth and wash the clothing in cold water. Hot water sets toner into the fabric. -
Reinsert the print cartridge into the product, and then close the print-cartridge door.Figure : Print-cartridge insertion
If the print is still light, install a new print cartridge.
Replace the print cartridge
-
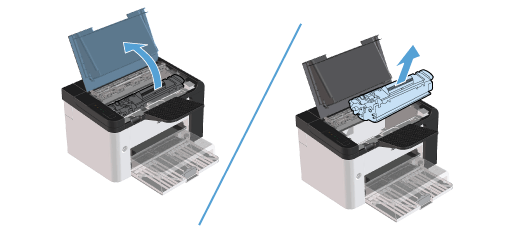
Open the print-cartridge door, and remove the old print cartridge. See the recycling information inside the print-cartridge box.Figure : removing the print cartridge
-
Remove the new print cartridge from the bag.
caution:
To prevent damage to the print cartridge, hold the print cartridge at each end. -
Pull the tab and completely remove the tape from the cartridge. Put the tab in the print-cartridge box to return for recycling.Figure : removing the sealing tape

-
Gently rock the print cartridge from front to back to distribute the toner evenly inside the cartridge.Figure : shaking the print cartridge

-
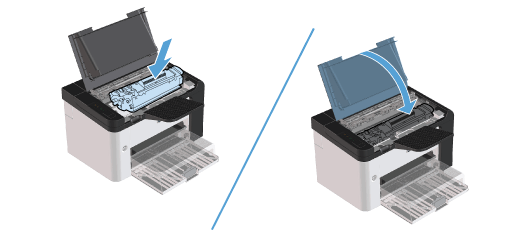
Insert the print cartridge in the product and close the print-cartridge door.Figure : inserting the print cartridge
caution:
If toner gets on your clothing, wipe it off with a dry cloth and wash clothing in cold water. Hot water sets toner into fabric.
note:When toner is low, faded or light areas appear on the printed page. You might be able to temporarily improve print quality by redistributing the toner. To redistribute the toner, remove the cartridge from the product and gently rock it from front to back.
Replace the pickup roller
Normal use with good media causes wear. The use of poor media might require more frequent replacement of the pickup roller.
If the product regularly mispicks (no media feeds through), you might need to change or clean the pickup roller.
warning:Before changing the pickup roller, use the power switch to turn the product off, and wait for the product to cool.
caution:Failure to complete this procedure might damage the product.
-
Open the print-cartridge door, and remove the print cartridge.
caution:
To prevent damage to the print cartridge, minimize its exposure to direct light. Cover the print cartridge with a sheet of paper.Figure : removing the print cartridge
-
Find the pickup roller.Figure : finding the pickup roller

-
Release the small, white tabs on each side of the pickup roller, and rotate the pickup roller toward the front.Figure : releasing the tabs

-
Gently pull the pickup roller up and out.Figure : removing the pickup roller

-
Position the new pickup roller in the slot. The circular and rectangular slots on each side prevents you from installing the roller incorrectly.Figure : positioning the new pickup roller

-
Rotate the top of the new pickup roller away from you until both sides snap into place.Figure : rotating the top

-
Insert the print cartridge in the product and close the print-cartridge door.Figure : inserting the print cartridge
Replace the separation pad
Normal use with good media causes wear. The use of poor media might require more frequent replacement of the separation pad.
If the product regularly pulls multiple sheets of media at a time, you might need to change the separation pad.
warning:Before changing the separation pad, use the power switch to turn the product off, and wait for the product to cool.
note:Before you change the separation pad, clean the pickup roller.
-
Remove the paper and close the main-input tray. Set the product on its front.
-
At the bottom of the product, unscrew the two screws holding the separation pad in place.Figure : removing the screws

-
Remove the separation pad.Figure : removing the separation pad

-
Insert the new separation pad, and screw it into place.Figure : inserting the new separation pad

-
Plug the product into the wall outlet, and turn on the product.Figure : plugging the product in

Enter a topic to search our knowledge library
What can we help you with?

Need Help?