This document is for HP LaserJet Pro M1132 (CE847a), M1132s, M1136 (CE849a), M1139 (CE852a), M1212nf (CE841a), M1213nf (CE845a), M1214nfh (CE842a), M1216nfh (CE843a), M1217nfw (CE844a), M1218nfs (B4K88a), and M1219nf (CE846a) Multifunction printers.
HP LaserJet Pro M1130, M1210 Printers - Fixing Poor Print and Scan Quality
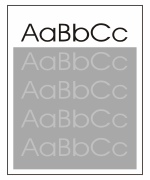
Print-quality examples
General print-quality issues
The following examples depict letter-size paper that has passed through the product short-edge-first. These examples illustrate problems that would affect all of the pages that you print. The topics that follow list the typical cause and solution for each of these examples.
|
Problem
|
Cause
|
Solution
|
|
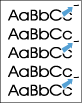
Print is light or faded.

|
The paper might not meet HP specifications.
|
Use paper that meets HP specifications.
|
|
The print cartridge might be defective or low. If you use a non-HP print cartridge, no messages appear on the product control panel.
|
Replace the print cartridge.
If the print cartridge is not low or empty, inspect the toner roller to see if the roller is damaged. If it is, replace the print cartridge.
|
|
|
If the whole page is light, the print density adjustment is too light or EconoMode might be turned on.
|
Adjust the print density, and disable EconoMode in the printer driver.
|
|
|
Toner specks appear.
|
The paper might not meet HP specifications.
|
Use paper that meets HP specifications.
|
|
The paper path might need cleaning.
|
Clean the paper path.
|
|
|
Dropouts appear.
|
A single sheet of paper might be defective.
|
Try reprinting the job.
|
|
The moisture content of the paper is uneven or the paper has moist spots on its surface.
|
Try different paper, such as high-quality paper that is intended for laser printers.
|
|
|
The paper lot is flawed. The manufacturing processes can cause some areas to reject toner.
|
||
|
The print cartridge might be defective or low.
|
Replace the print cartridge.
If the error persists, contact HP. See www.hp.com/support/ljm1130series or www.hp.com/support/ljm1210series or the support flyer that came in the product box.
|
|
|
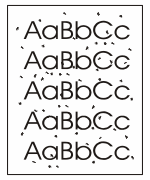
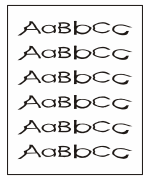
Vertical streaks or bands appear on the page.

|
The print cartridge might be defective.
|
Replace the print cartridge.
|
|
The amount of background toner shading becomes unacceptable.

|
The paper might not meet HP specifications.
|
Use a different paper with a lighter basis weight.
|
|
The print-density setting is too high.
|
Decrease the print-density setting. This decreases the amount of background shading.
|
|
|
Very dry (low humidity) conditions can increase the amount of background shading.
|
Check the product environment.
|
|
|
The print cartridge might be defective or low.
|
Replace the print cartridge.
|
|
|
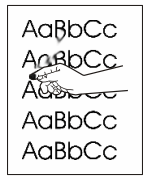
Toner smears appear on the media.
|
The paper might not meet HP specifications.
|
Use paper that meets HP specifications.
|
|
If toner smears appear on the leading edge of the paper, the media guides are dirty, or debris has accumulated in the print path.
|
Clean the media guides and the paper path.
|
|
|
The print cartridge might be defective.
|
Replace the print cartridge.
|
|
|
The fuser temperature might be too low.
|
In the printer driver, make sure the appropriate paper type is selected.
|
|
|
The toner smears easily when touched.
|
The product is not set to print on the type of paper on which you want to print.
|
In the printer driver, select the Paper/Quality tab and set Paper Type to match the type of paper on which you are printing. Print speed might be slower if you are using heavy paper.
|
|
The paper might not meet HP specifications.
|
Use paper that meets HP specifications.
|
|
|
The paper path might need cleaning.
|
Clean the paper path.
|
|
|
The power source might be defective.
|
Plug the product directly into an AC outlet instead of into a power strip.
|
|
|
The fuser temperature might be too low.
|
In the printer driver, make sure the appropriate paper type is selected.
|
|
|
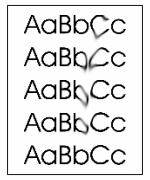
Marks repeatedly appear at even intervals on the page.
|
The product is not set to print on the type of paper on which you want to print.
|
In the printer driver, select the Paper/Quality tab and set Paper Type to match the type of paper on which you are printing. Print speed might be slower if you are using heavy paper.
|
|
Internal parts might have toner on them.
|
The problem typically corrects itself after a few more pages.
|
|
|
The paper path might need cleaning.
|
Clean the paper path.
|
|
|
The print cartridge might be damaged.
|
If a repetitive mark occurs at the same spot on the page, install a new HP print cartridge.
|
|
|
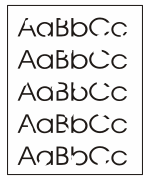
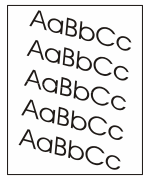
The printed page contains malformed characters.
|
The paper might not meet HP specifications.
|
Use a different paper, such as high-quality paper that is intended for laser printers.
|
|
If characters are incorrectly formed so that they produce a wavy effect, the laser scanner might need service.
|
Verify that the problem also occurs on the configuration page. If so, contact HP. See www.hp.com/support/ljm1130series or www.hp.com/support/ljm1210series or the support flyer that came in the product box.
|
|
|
The printed page is curled or wavy.

|
The product is not set to print on the type of paper on which you want to print.
|
In the printer driver, select the Paper/Quality tab and set Paper Type to match the type of paper on which you are printing. Print speed might be slower if you are using heavy paper.
If the problem persists, select a paper type that uses a lower fuser temperature, such as transparencies or light media.
|
|
The paper might have been in the input tray too long.
|
Turn over the stack of paper in the tray. Also, try rotating the paper 180° in the input tray.
|
|
|
The paper might not meet HP specifications.
|
Use a different paper, such as high-quality paper that is intended for laser printers.
|
|
|
Both high temperature and humidity can cause paper curl.
|
Check the product environment.
|
|
|
The fuser temperature might be curling the paper.
|
M1130 Series Select a paper type that uses a lower fuser temperature, such as transparencies or light media.
M1210 Series At the product control panel, turn on the Less paper curl setting in the Service menu.
|
|
|
Text or graphics are skewed on the printed page.
|
The paper might be loaded incorrectly or the input tray might be too full.
|
Verify that the paper is loaded correctly and that the paper guides are not too tight or too loose against the stack.
|
|
The paper might not meet HP specifications.
|
Use a different paper, such as high-quality paper that is intended for laser printers.
|
|
|
The printed page contains wrinkles or creases.

|
The paper might be loaded incorrectly or the input tray might be too full.
|
Turn over the stack of paper in the input tray, or try rotating the paper 180° in the input tray.
Verify that the paper is loaded correctly and that the paper guides are not too tight or too loose against the stack.
|
|
There might be a jam in the paper path.
|
Clear any jams in the product.
|
|
|
The paper might not meet HP specifications.
|
Use a different paper, such as high-quality paper that is intended for laser printers.
|
|
|
Air pockets inside envelopes can cause them to wrinkle.
|
Remove the envelope, flatten it, and try printing again.
|
|
|
Toner appears around the printed characters.
|
The paper might be loaded incorrectly.
|
Turn over the stack of paper in the tray.
|
|
If large amounts of toner have scattered around the characters, the paper might have high resistivity.
|
Use a different paper, such as high-quality paper that is intended for laser printers.
|
|
|
An image that appears at the top of the page (in solid black) repeats farther down the page (in a gray field).
|
Software settings might affect image printing.
|
In your software program, change the tone (darkness) of the field in which the repeated image appears.
In your software program, rotate the whole page 180° to print the lighter image first.
|
|
The order of images printed might affect printing.
|
Change the order in which the images are printed. For example, have the lighter image at the top of the page, and the darker image farther down the page.
|
|
|
A power surge might have affected the product.
|
If the defect occurs later in a print job, turn the product off for 10 minutes, and then turn on the product to restart the print job.
|
Copy print-quality problems
|
Problem
|
Cause
|
Solution
|
|
Images are missing or faded.
|
The print cartridge might be defective or low.
|
Replace the print cartridge.
|
|
The original might be of poor quality.
|
If your original is too light or damaged, the copy might not be able to compensate, even if you adjust the contrast. If possible, find an original document in better condition.
|
|
|
The contrast settings might be set incorrectly.
|
Use the control-panel to change the contrast setting.
|
|
|
The original might have a colored background.
|
Colored backgrounds might cause images in the foreground to blend into the background, or the background might appear in a different shade. If possible, use an original document without a colored background.
|
|
|
Vertical white or faded stripes appear on the copy.
|
The paper might not meet HP specifications.
|
Use paper that meets HP specifications.
|
|
The print cartridge might be defective or low.
|
Replace the print cartridge.
|
|
|
Unwanted lines appear on the copy.
|
The document feeder scanning strip might be dirty.
|
Clean the document feeder scanning strip.
|
|
The photosensitive drum inside the print cartridge might have been scratched.
|
Replace the print cartridge.
|
|
|
Black dots or streaks appear on the copy.
|
Ink, glue, correction fluid, or an unwanted substance might be on the document feeder.
|
Clean the document feeder scanning strip.
|
|
The power to the product might have fluctuated.
|
Reprint the job.
|
|
|
Copies are too light or dark.
|
The printer driver or product software settings may be incorrect.
|
Verify that the quality settings are correct.
See the product software Help for more information about changing the settings.
|
|
Text is unclear.
|
The printer driver or product software settings may be incorrect.
|
Verify that the quality settings are correct.
Verify that the EconoMode setting is off.
See the product software Help for more information about changing the settings.
|
Scan-quality problems
Prevent scan-quality problems
The following are a few simple steps you can take to improve copy and scan quality.
-
Use high-quality originals.
-
Load the paper correctly. If the paper is loaded incorrectly, it might skew, which causes unclear images.
-
Adjust the software settings according to how you plan to use the scanned page.
-
If your product frequently feeds more than one page at a time, the separation pad might need to be cleaned or replaced.
-
Use or make a carrier sheet to protect your originals.
Solve scan-quality problems
|
Problem
|
Cause
|
Solution
|
|
Blank pages
|
The original might have been loaded upside down.
|
In the document feeder, put the top end of the stack of originals into the document feeder, with the media stack face-down and the first page to be scanned on the bottom of the stack.
|
|
Too light or dark
|
The resolution and color levels may be set incorrectly.
|
Verify that you have the correct resolution and color settings.
|
|
Unwanted lines
|
The document-feeder glass might be dirty.
|
Clean the scanner strip.
|
|
Black dots or streaks
|
The power to the product might have fluctuated.
|
Reprint the job.
|
|
Unclear text
|
The resolution levels might be set incorrectly.
|
Verify that the resolution settings are correct.
|
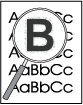
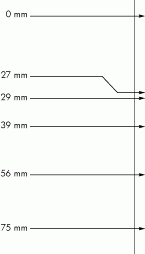
Repetitive defects ruler
If defects repeat at regular intervals on the page, use this ruler to identify the cause of the defect. Place the top of the ruler at the first defect. The marking that is beside the next occurrence of the defect indicates which component needs to be replaced.
If the defect correlates with the print engine or the fuser, the product might require service. Contact HP Customer Support.
Figure :
|
Distance between defects
|
Product components that cause the defect
|
|
27 mm
|
Print engine
|
|
29 mm
|
Print engine
|
|
39 mm
|
Print engine
|
|
56 mm
|
Fuser
|
|
75 mm
|
Print cartridge
|
Optimize and improve image quality
Change print density
-
Use the printer driver to change the default settings. Follow the appropriate procedure, depending on the operating system you are using.Windows 10, Windows 8, Windows 7, Windows Vista, Windows XP, Windows Server 2008, and Windows Server 2003.
-
Search Windows for devices, and click Devices and Printers in the list of results.
-
Right-click the product icon, and click Properties.
-
Click the Device Settings tab.
Mac OS X 10.4-
From the Apple menu
 , click the System Preferences menu and then click the Print & Fax icon.
-
Click the Printer Setup button.
Mac OS X 10.5 and 10.6-
From the Apple menu, click the System Preferences menu and then click the Print & Fax icon.
-
Select the product in the left side of the window.
-
Click the Options & Supplies button.
-
Click the Driver tab.
-
-
Adjust the Print Density slider to change the setting.
Manage and configure printer drivers
The product uses the paper-type setting to establish many internal settings that affect print quality. Always use the correct paper-type setting in the printer driver. Also make sure that the other settings on the Paper/Quality tab in the printer driver are correct.
Enter a topic to search our knowledge library
What can we help you with?

Need Help?