This document describes the procedure recommended for preparing a Color LaserJet CP3525, CP4025/CP4525 or a Color LaserJet CM3530mfp for shipping/moving. It is important to note that these devices were not designed to be moved long distances after initial unpacking. The procedure described in this document represents the precautions to take when preparing the device for moving. Even if these guidelines are followed exactly, HP cannot guarantee that the unit will be damage-free when it arrives at its destination.
HP Color LaserJet CP3525, CP4025, CP4525,CM3530 and M551 MFP Product Series - Moving and Shipping Instructions
Introduction
Background
It may be necessary, during the lifetime of one of these devices, to transport it to another location after the device has been set up initially. There are typically two reasons why this might happen:
-
The device is received and unpackaged by a customer’s IT department or a service provider for staging purposes. In this case, the unit is used very minimally. New firmware may be installed, additional memory added, etc. The unit is then repackaged in its original packaging and shipped to its final destination.
-
The device has been installed in a location for a period of time and now must be moved or shipped to a new location due to office move, relocation, etc. Usually, the original packaging is no longer available.
The following sections provide the procedures that should be followed to prepare the device to be shipped and instructions for setting up the device in the new location.
Moving a Device a Short Distance – Not Requiring a Ride in a Vehicle
If a device is only going to be moved across a room or within a building and will not be placed in a vehicle, follow these instructions:
-
Turn Off the device and allow it to power down.
-
Before unplugging the device from its power source, wait until the control panel goes blank after turning off the power switch and then wait an additional 30 seconds before unplugging the power cord.
caution:
Failure to follow these instructions may result in damage to the fuser and/or intermediate transfer belt. -
Disconnect the power cord and all cables from the device.
-
For the CM3530MFP only, lock the image scanner. (See Appendix A for instructions)
-
Keep the device upright at all times.
-
Always use at least two people to lift and move the device.
Shipping a Device
More preparation is required when shipping a device. Follow these instructions to prepare the device for shipping:
note:Padded van shipment is the recommended method of transport. This typically includes blanket wrapping the product, similar to how household goods are moved. In lieu of blanket wrapping, protection with cardboard corners and wrapping in plastic is also acceptable. Common carrier transport (freight) is not recommended unless the original packaging is available.
-
Ahead of time, purchase a new Toner Collection Unit (TCU).
-
Part Number CE254A for the CP3525, CM3530 and M551
-
Part Number CE265A for the CP4025/CP4525
-
This part may be purchased from any location selling the print cartridges for a minimal cost.
note:
Do not install the new TCU until Step 15 below. -
-
Power on the device.
-
Temporarily remove the four print cartridges. Cover the cartridges with a sheet of paper to avoid excessive light exposure – taking care not to damage the green photosensitive drums.
-
Leave the front door open.
-
Remove the Intermediate Transfer Belt (ITB) from the printer and tap it gently on the end opposite the handles. Follow the instructions in Appendix D.
-
Reinstall the ITB and close the front and right doors.
-
This will activate the Checking Printer sequence (the printer control panel will display Checking Printer). Wait until the printer motor noises stop and the INSTALL SUPPLIES message is displayed on the control panel (about 30-45 seconds).
-
Open and close the front door to activate the Checking Printer sequence again.
-
Wait until the printer motor noises stop and the INSTALL SUPPLIES message is displayed (about 30-45 seconds).
-
Repeat steps 8 -9 one more time – for a total of three Checking Printer sequences.
-
Repeat steps 5 – 10 two more times (total of three times removing/tapping/replacing the ITB).
note:
The entire sequence above will involve removing/tapping/replacing the ITB three times and activating three Checking Printer sequences after each replacement of the ITB (total of nine sequences). This procedure is necessary to ensure that the toner collected in the cleaning unit of the ITB is properly conveyed into the original TCU. -
Turn Off the device and allow it to power down.
-
Before unplugging the device from its power source, wait until the control panel goes blank after turning off the power switch and then wait an additional 30 seconds before unplugging the power cord.
caution:
Failure to follow these instructions may result in damage to the fuser and/or intermediate transfer belt. -
Disconnect the power cord and all cables from the device.
-
Remove the original Toner Collection Unit (TCU) and install the new one. See Appendix B for instructions. Recycle the original TCU following the instructions found at www.hp.com/go/recycle.
note:
Do NOT attempt to empty the old TCU. While toner is non-carcinogenic, it does pose an inhalation hazard and should be disposed of properly. -
Reinstall the four print cartridges.
-
Remove paper from the trays.
-
For the CM3530MFP only, lock the image scanner. (See Appendix A for instructions)
-
Using at least two people, lift the device off the optional input paper tray (500 sheet paper feeder), if installed.
-
Package the printer in its original packaging/box (if available). If the original packaging is not available, see Appendix C for packing instructions. Make sure the bottom of the device is facing down in the packaging.
-
Wrap the optional tray (if applicable) in several layers of bubble wrap and package it in a separate box. Push bubble wrap into the spaces around the tray to provide extra padding and to avoid shifting of the tray inside the package. Note the original package for the CP3525x product includes a place for the optional tray.
-
Gather the documentation (user’s guide, software CD, getting started guide) and add these to the printer package.
-
Seal all boxes with sturdy packing tape.
Setup Instructions When Device is in its New Location
-
Unpack the device and any additional boxes.
-
If an optional tray (500 sheet paper feeder) is being used, place this tray on the surface where the device will be placed.
-
Using at least two people, lift the device and place it on top of the optional tray.
-
For the CM3530MFP only, unlock the image scanner. See Appendix A for instructions.
-
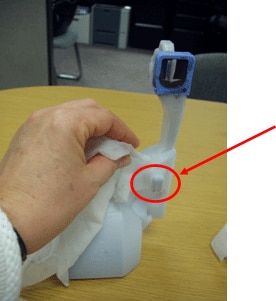
Open the front door and remove the TCU. With a moist paper towel, wipe any toner dust off the outside of the bottle, including the protrusion indicated below:Figure : Wipe up with a moist paper towel
-
Reinstall the TCU and follow the installation instructions in the Getting Started Guide.
Appendix A – Locking and Unlocking the Scanner
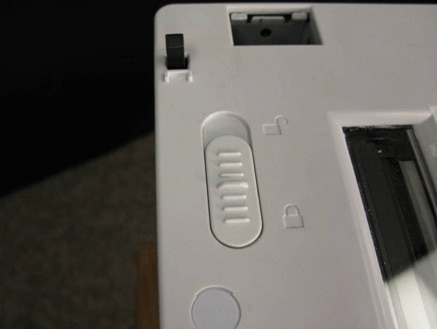
Move the scanner lock switch to the locked or unlocked position:
Figure : Scanner lock switch
Appendix B – Removing and Installing Toner Collection Unit (TCU)
-
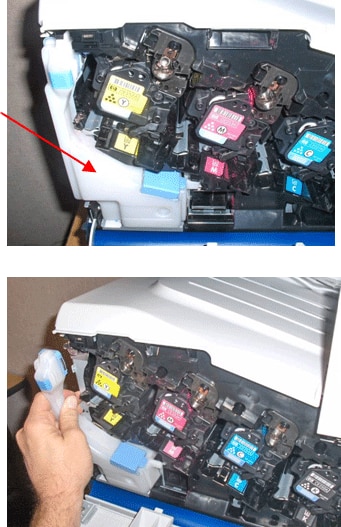
Remove Toner Collection unit (TCU) from printer. Open the front door. The TCU is located on the left side of the printer:Figure : Location of Toner Collection unit
-
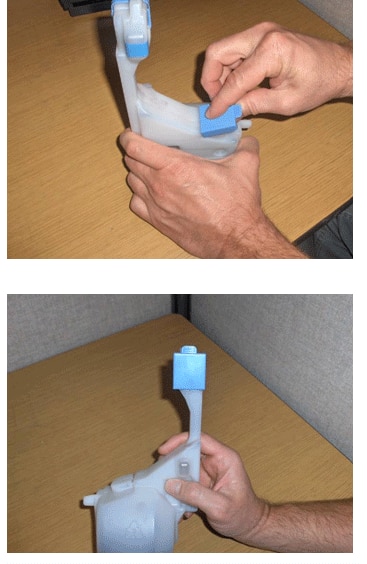
Place cap from lower part of the TCU onto the top opening of the TCU.Figure : Placing the cap
-
Recycle the TCU following the instructions found at www.hp.com/go/recycle.
-
Unpack the new TCU, remove the cap from the top opening of the TCU and place it on the lower part of the TCU as shown above.
-
Install the new TCU in the printer.
Appendix C– Packaging Printer when Original Packaging is Not Available
-
Choose a sturdy box that is approximately 6 inches (15 cm) larger than the printer on all sides.
-
Place 6 inches (15 cm) of bubble wrap (do not use packing peanuts) in the bottom of the box and place the printer on top of the bubble wrap. Make sure the bottom of the printer is facing down in the box.
-
Push bubble wrap into all the spaces between the printer and the box around all sides and top of the printer.
Appendix D – Preparing Intermediate Transfer Belt (ITB) for Shipping
Removing ITB
-
Open the upper right door of the device.
-
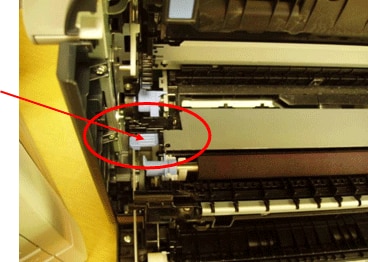
Press the blue lever down on the left side to lower the Secondary Transfer Assembly.Figure : Lower the Secondary Transfer Assembly
-
Grasp the small handles on the ITB and then pull the ITB out of the product until two large handles expand along the right- and left-side of the ITB.Figure : Pulling the ITB out of the product
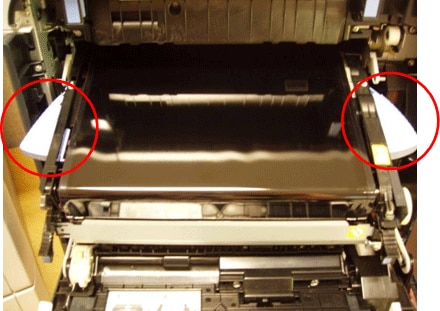
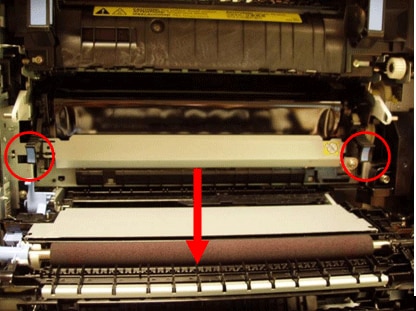 Figure : Expanded handles
-
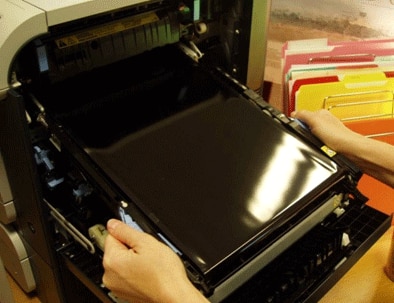
Grasp the large handles on the ITB and then pull the ITB straight out of the product to remove it.Figure : Pulling the ITB out of the product
Preparing ITB for Shipment
Spread out a few sheets of paper on a flat surface to collect the small amount of waste toner that may fall from the ITB.
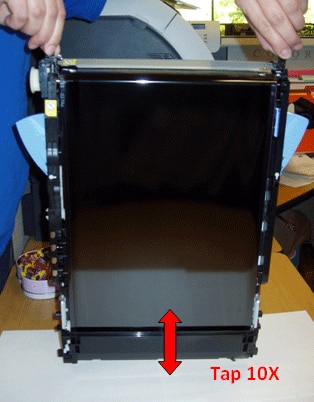
Gently set the ITB vertically on these sheets of paper as shown below (with the handles up). Grasp the ITB by the two blue handles at the top. Lift the ITB and very lightly tap the end opposite the handles (the cleaning section) on the paper about 10 times. This will cause the waste toner to collect around the auger in the cleaning section. This waste toner will be removed when the ITB is reinstalled.
Figure : Set the ITB vertically with the handles up
Reinstalling ITB
-
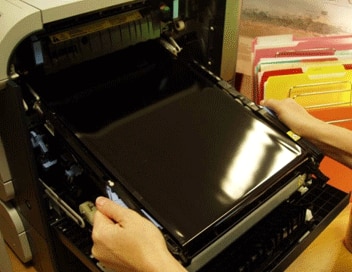
The ITB is reinstalled in a slight upward angle. Grasp the ITB by the large blue handles and aim it upwards into the slot in the device. An easy way to align it is by touching the end of ITB to the top part of the slot and then push it in, using the top of the slot as the guide.Figure : Reinstalling ITB
Enter a topic to search our knowledge library
What can we help you with?
Need Help?
