solution Contentsolution Content

HP Color LaserJet CP2020 and CM2320 - Remove Shipping Lock error message on control panel

Issue

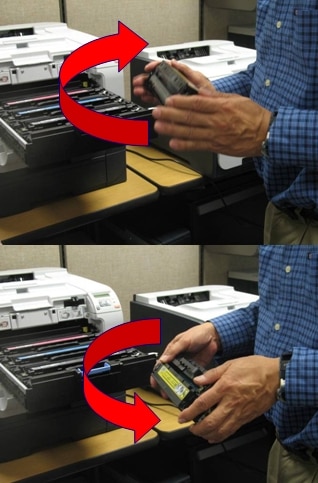
HP Color LaserJet CP2020 and CM2320 printers experience, on rare occasion, a Remove shipping lock from <color> cartridge message displayed on the control panel when the product is powered on for the first time after unpacking or after changing out the toner cartridges (see Figures 1 and 2 below).
note:
Follow the instructions in the device User Guide or included with new toner cartridge(s) to ensure that the shipping lock has been properly removed.
When all shipping locks have been properly removed from all cartridges, the following symptoms may accompany this error message:
  • Turning the product off and then on will not clear the error message.
  • The product will not reach a Ready status.
Products Affected:
  • HP Color LaserJet CP2025 Printer Series
  • HP Color LaserJet CM2320 Multifunction Printer Series
Figure : Control Panel: 'Remove shipping lock from <color cartridge>' message
Figure : Control Panel displays the color of the cartridge that has lock error

Cause

There are several possible causes for the device to incorrectly report that a shipping lock has not been removed. Follow the below troubleshooting steps to resolve the issue.

Solution

To resolve the issue, follow these steps:
  1. Ensure that the locked toner cartridge is not damaged. The cartridge must have a functioning ‘alienation’ mechanism or it may report that the shipping lock has not been removed.
    1. Open the cartridge tray and locate the cartridge causing the message.
      note:
      The color of the locked cartridge is displayed on the control panel after the Remove shipping lock from message (see Figure 2 above).
    2. On the right side of the cartridge, locate the white lever.
    3. Push the white lever towards the back of the printer. The black ‘alienation arm’ should pop as shown below (Figure 3).
    4. Release the white lever and both the white lever and black arm should return to their resting positions (the white lever is ‘spring loaded’).
    5. If any of these pieces are missing from the cartridge or the mechanism does not function as it should, replace the toner cartridge.
    6. If the issue persists, continue to step #2.
    7. If the printer returns to Ready, also check to see that you have the latest firmware version installed:
      1. Print a Configuration Page from the device to see which firmware version is installed.
      2. Visit www.hp.com to see if a newer version of firmware is available.
    Figure : The black ‘alienation arm’ should pop up when the white lever is pushed
  2. The toner cartridge may have other damage not visible from the outside. Try swapping out the locked cartridge for a different one.
    1. If the issue persists, continue to step #3.
      note:
      If you are using non-HP cartridges (remanufactured or refilled) and the remaining troubleshooting steps below do not resolve your issue, try using a genuine HP cartridge before contacting HP Support. Follow the instructions in this document to ensure you have genuine HP toner cartridges installed: HP Color LaserJet and LaserJet Printers - How to Identify HP Original Cartridges.
    2. If the printer returns to Ready, also check to see that you have the latest firmware version installed:
      1. Print a Configuration Page from the device to see what firmware version is installed.
      2. Visit www.hp.com to see if a newer version of firmware is available.
  3. Force the printer to reinitialize all the cartridges by doing the following:
    1. Turn off the printer using the Power button.
    2. Open the cartridge tray and purposely swap two of the cartridges so they are in the wrong positions (it does not matter which cartridges you switch). For example: put the black cartridge where the blue cartridge should go and put the blue cartridge where the black cartridge should go.
    3. Close the tray and turn the printer back On.
    4. The following message should be displayed: Supplies in wrong positions.
    5. Again, power Off the printer, open the cartridge tray and place the cartridges in their correct positions.
    6. Power On the printer. If the issue persists, continue to step #4.
    7. If the printer returns to Ready, also check to see that you have the latest firmware version installed:
      1. Print a Configuration Page from the device to see which firmware version is installed.
      2. Visit www.hp.com to see if a newer version of firmware is available.
  4. The toner may have been packed down into a firm mass inside the cartridge during shipping in such a way that it is not flowing correctly even though the cartridge shipping locks are properly removed.
    1. Open the cartridge tray and remove the locked cartridge.
    2. Shake the cartridge in an up and down rocking motion 5 to 6 times (Figure 4). At the end of each motion, give a little “flick” of the wrist (purpose to get toner to flow into the developer roller area).
      Figure : Shake cartridge in an up and down motion
    3. Rock the cartridge in a side-to-side motion 5 to 6 times.
      Figure : Rock cartridge in a side-to-side rocking motion
    4. Reinstall the cartridge and close the cartridge door.
    5. If the issue persists, continue to step #5.
    6. If the printer returns to Ready, check to see that you have the latest firmware version installed:
      1. Print a Configuration Page from the device to see which firmware version is installed.
      2. Visit www.hp.com to see if a newer version of firmware is available.
  5. It is possible that the toner cartridge tray high voltage contacts have become dusted due to high use or multiple cartridge swaps.
    1. Turn Off the printer. Open the cartridge tray and remove the locked cartridge and set it aside.
    2. Each cartridge slot has 3 high voltage contacts on the left side of the tray. See the red arrows in (Figure 6) below.
    3. Using a dry tissue or cloth wipe all 3 contacts in the cartridge slot.
    4. Now pick up the toner cartridge and note the 3 corresponding contact points on its left side (Figure 7). Also wipe these contact points clean.
    5. Reinstall the toner cartridge, close the tray, close the door, and turn the printer back on.
    6. If the issue persists, continue to step #6.
    7. If the printer returns to Ready, check to see that you have the latest firmware version installed:
      1. Print a Configuration Page from the device to see which firmware version is installed.
      2. Visit www.hp.com to see if a newer version of firmware is available.
      Figure : Red arrows point to the 3 high voltage contacts in the cartridge tray slot
      Figure : Red arrows point to the 3 high voltage contacts on the side of the toner cartridge
  6. If the above steps do not resolve the issue, your printer will require service or replacement. Contact HP Support.