solution Contentsolution Content

HP Designjet Printers - Wireless Network Card Support

Introduction

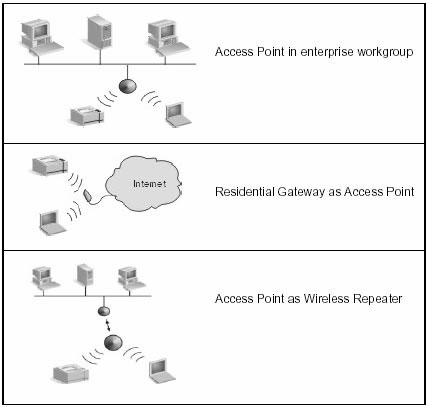
This document is intended to provide an overview of wireless network connections in HP Designjet printers by using HP Jetdirect wireless print servers (Jetdirect 380x and Jetdirect 680n).
note:
The HP Jetdirect 680n wireless print server has been discontinued and is no longer available. There is no replacement at this time that will currently work for the 10ps/20ps/50ps, 500/800 series or the 5500 series. The information for using a wireless Jetdirect 680n is still included in this document, although the 680n has been discontinued.
The following combinations of HP Designjets and wireless Jetdirects are currently supported:
HP Designjet printer
Compatible wireless Jetdirect print servers
10ps/20ps/50ps
500 and 800 series
5500 series
note:
Currently, there is no wireless solution available for the HP Designjet 10ps/20ps/50ps, 500 and 800 series or the 5500 series.
Jetdirect 680n (J6058A)
note:
Discontinued and no longer available.
100, 100plus, 120 series, 30 series and 130 series
Jetdirect 380x (J6061A)

Wireless networking with Jetdirect 802.11b wireless print servers

Introduction
Jetdirect 380x and Jetdirect 680n are print servers that support the IEEE 802.11b standard for wireless Ethernet local area network (WLAN). The 802.11b standard defines the radio frequencies, communication protocols and data formatting required for wireless devices to communicate.
Wireless communication performance depends on a variety of factors, as the number of users, the quality of the physical placement, and the wireless hardware and the sources of external interference. The transmission speed spec of the protocol is 11 Mbit/s, which means that in good transmission conditions it is possible to reach a data throughput to the printer of about 700 Kbytes/s.
Data throughput in HP Designjet printers is very important in terms of print quality when sending data to the printer. If the throughput is lower than the one the writing system needs to feed the carriage with printing data, the carriage will stop between swathes, affecting the print quality.
In HP Designjets 10, 20 and 50ps, 100/120 and 500/800, the throughput provided by the 802.11b protocol is enough to cover the printer's needs and we have not observed any print quality issue during the qualification tests. In HP Designjet 5500, the throughput is enough to print without problems PDLs (Printer Description Languages) like HP-GL/2 and PS, but it can be insufficient to print raster data (coming from an external RIP, for example).
WLAN communication mode topologies
There are two basic wireless networking topologies, infrastructure mode and Ad Hoc (Peer-to-Peer) Mode.
  • In Infrastructure mode, all wireless communications from a network device goes through an Access Point, which is a network component that acts as a network hub, bridge, or gateway to connect wireless devices to wired networks. Infrastructure mode is referred to as a Basic Service Set. An Access Point has a fixed throughput capacity, and therefore, wireless performance will depend on the number of wireless devices connected to an access point and the types of data transfers of each device.
    Figure : Infrastructure mode examples
  • In Ad Hoc (Peer - to - Peer) mode, the wireless devices on a network communicate directly with each other, and Access Points are not user. Ad Hoc mode is referred to as Independent Basic Service Set (IBBS). Although network performance depends on the type of users and devices, Ad Hoc mode is typically used on very small networks (for example, up to six wireless users and devices).
    Figure : Ad Hoc mode example
Channels
The band of radio frequencies used for IEEE 802.11b wireless networking is segmented into 14 channels. Each country or region specifies the channels that are authorized for use, and that's the reason why there are specific models of the Jetdirect wireless cards for each of these countries/regions. In most countries/regions, channels 10 and 11 may be used without restriction.
Channel selection on the Jetdirect wireless print server depends on the Communication Mode (or topology).
  • In Ad Hoc mode, the Jetdirect wireless print server will scan all available channels for the network specified in the Network Name (SSID) field. If the network is detected, the print server will configure itself to work on the same channel as the network. If the network is not detected, the print server will actively transmit and advertise itself in channel 10 (by default). It is possible to configure the print server to do this operation in channel 11.
  • In Infrastructure mode, the channel will be determined by the Access Point to which the print server connect. The print server will adapt its channel to the one required.
Concepts
  • Network name - Wireless devices are configured with the name of the network to which they will connect. The Network name is also called the SSID (Service Set Identifier). The default value is hpsetup.
  • Authentication - Authentication is used to validate the identification of each device or computer that is attempting to communicate. The authentication methods supported by Jetdirect wireless print servers include: Open System, Shared Key, and EAP/802.1x. For details about these authentication methods, see the Jetdirect Administrator's Guide, Appendix B.
  • Encryption - Used to ensure a secure communication. Jetdirect 802.11b Wireless print servers support both static and dynamic encryption protocols. For more information about encryption in wireless Jetdirect print servers, see the Jetdirect Administrator's Guide, Appendix B.

Wireless print server installation for Designjet 10/20/50ps, 100/100plus, 120 30 and 130 series printers

To install and configure a Jetdirect wireless print server in an HP Designjet 10ps, 20ps, 50ps, 100, 100plus, 120, 30 or 130 series printer, follow the next main steps:
  • Install the Jetdirect hardware
  • Print a Jetdirect configuration page
  • Configure the wireless connection
  • Configure the network connection
Install the Jetdirect wireless print server hardware
The hardware installation will depend on the Jetdirect model being used.
In the case of Jetdirect 680n EIO print server, the installation will consist on removing the power cord from the printer, inserting the Jetdirect card in the EIO slot and powering on the printer again.
In the case of Jetdirect 380x External print server, the installation will consist on plugging the Jetdirect card and connecting it to the printer via the USB port.
Print a Jetdirect configuration page
In the case of Jetdirect 680n, while holding the Power button, push four times the Continue (OK) button. This will print the three printer information pages. The third one is the Jetdirect configuration page.
In the case of Jetdirect 380x, push the Configuration Page button on the external print server and it will be printed. This only works in HP Designjet 100/100plus/120/130 series, and it is the main reason why this external card is not supported in HP Designjets 10ps, 20ps, 50ps and 30 series printers.
The Jetdirect configuration page will have the following appearance:
Figure : Jetdirect configuration page example
This configuration page contains the typical information about the card and network protocols that can be found in "traditional" Jetdirects plus a section with the details of the Wireless IEEE 802.11b parameters. These parameters include important information like:
  • The communication mode (network topology)
  • The network name
  • The communication channel
  • The authentication method
  • The encryption type
note:
This information will be very important when configuring the card for the first time.
Configuring the wireless connection
Before establishing a network connection to the printer, it is necessary to configure the wireless connection between the printer and the computer (ad-hoc mode) or the access point (infrastructure mode).
The following table summarizes which are the default settings of the wireless Jetdirect print server before starting the configuration.
Factory default wireless settings
Parameter
Setting
Comments
Communications mode
Ad Hoc
If you want to use it in Infraestructure mode it is necessary to reconfigure it.
Channel
10
Only in Ad Hoc mode.
Network name (SSID)
Hpsetup
You must change the SSID on the print server to match your network.
Authentication
Open System
Initially, the print server is not configured for network authentication.
Encryption (WEP)
Disabled
If your network uses encryption, you must configure the encryption keys on your print server
To be able to change these settings it is necessary to establish first a connection to the print server, and so, it is necessary to configure a wireless computer with the necessary settings to establish communication with the wireless print server with its default settings. The wireless and networking settings in the computer should be set as follows in order to establish this first connection:
Wireless settings
  • Ad Hoc mode
  • Network name: hpsetup
  • Channel 10
  • Authentication: Open system (no authentication)
  • Encryption: No encryption
TCP/IP settings
Assuming that the networking protocol is TCP/IP, the following needs to be noted.
The card will configure itself with the following values:
  • IP address: 192.0.0.192
  • Subnet Mask: 255.255.255.0
It is necessary to configure the TCP/IP protocol in the Wireless network connection of the computer as follows (also, it is recommended to disable any wired network connections in the computer while configuring the wireless one):
  • NO DHCP or BOOTP - Manual IP address
  • IP address: any that follows the IP protocol rules
  • Subnet Mask: 255.255.255.0
To ensure that it will be possible to establish a connection between the computer and the printer, it is recommendable to open a DOS console and enter the following command:
  • Route ADD 192.0.0.192 MASK 255.255.255.0
Once the wireless and the TCP/IP settings in your computer are these ones, you are ready to set up the wireless connection between your computer and the printer. To do so, insert the HP Jetdirect CD, choose the Installation option in the main menu and then Set Up the Wireless connection. Follow the steps in the screen to set up a wireless connection between your computer and the print server.
Once the connection is established, the software will allow you to change the wireless settings in the Jetdirect printserver. Change them to adapt them to the final network where the printer will be connected.
Configure the network connection
Once the wireless link has been established, you need to configure the network connection (for example, the IP parameters). The result of this process will be the creation of a network port in your computer that will allow to print to the device where the Jetdirect wireless print server is attached.
Assuming that the network is a TCP/IP one, which is the most complex case, because the address needs to be set up in the card, there are two scenarios:
  • The network where the printer will be connected has a DHCP or a BOOTP server. This is the simple case, as once the printer is connected to that network, it will get the IP parameters automatically.
  • The network has no DHCP or BOOTP server and the IP parameters need to be configured manually.
Printer connected to a network with a DHCP or a BOOTP server
  1. Connect the printer to the network (this is done by configuring the wireless connection and changing the wireless parameters to set up the wireless network parameters in the network card).
  2. The Jetdirect print server will get its IP address from the network's DHCP or BOOTP server.
  3. Print a configuration page. It will contain the IP address of the printer.
  4. Use the MacroInstaller or the Install Network Printer Wizard Software to configure a port in your computer with the IP address of the printer.
Printer connected to a network without DHCP or BOOTP servers
  1. In this case, the IP address needs to be configured manually. To do so, you can use either the MacroInstaller or the Install Network Printer Wizard that comes in your Jetdirect CD.
  2. In both SW you have two options: "search for printers in the network" or "specify the printer's address."
    1. If you search for printers in the network, after a while, a list with all the available printers will appear. To identify your printer from others of the same mode, you can use the Hardware Address, which is included in the Jetdirect Configuration Page.
    2. If you want to specify your printer by its address, as there is no initial IP address set, you will need to specify the Hardware address. This information is included in the Jetdirect Configuration page.
  3. Set the final IP parameters of the Jetdirect card (IP address, Subnet Mask, Gateway) to ones that suit in your network.
Once you have installed the printer in your network and it has appropriate IP parameters, if you need to change anything in the configuration either of Wireless settings or TCP/IP settings, the easiest way to do so is through the Jetdirect card Embedded Web Server. To access the Embedded Web Server, you just need to type the IP address of the Jetdirect card in the address field of an Internet browser (like Internet Explorer).
note:
For detailed information about Wireless concepts, installation of the printer in the network and the usage of the Jetdirect Embedded Web Server, please refer to the specific documentation of the Jetdirect wireless print server.

Installation on HP Designjet 500, 800, and 5500 series printers

To install and configure a Jetdirect wireless print server in a HP Designjet 500, 800, or 5500 series printer, follow the next main steps:
  • Install the Jetdirect hardware
  • Get the current wireless parameters
  • Configure the wireless connection
  • Configure the network connection
Install the Jetdirect wireless print server Hardware
HP Designjet 500, 800, and 5500 support the Jetdirect 680n EIO wireless print server.
In this case, the installation will consist on removing the power cord from the printer, inserting the Jetdirect card in the EIO slot and powering on the printer again.
Get the current wireless parameters
The easiest way to get the wireless parameters is to print the Jetdirect Configuration Page from the printer's front panel.
The Jetdirect configuration page will have the following appearance:
Figure : Jetdirect configuration page example
This configuration page contains the typical information about the card and network protocols that can be found in "traditional" Jetdirects plus a section with the details of the Wireless IEEE 802.11b parameters. These parameters include important information like:
  • The communication mode (network topology)
  • The network name
  • The communication channel
  • The authentication method
  • The encryption type
note:
This information will be very important when configuring the card for the first time.
Configuring the wireless connection
Before establishing a network connection to the printer, it is necessary to configure the wireless connection between the printer and the computer (ad-hoc mode) or the access point (infrastructure mode).
The following table summarizes which are the default settings of the wireless Jetdirect print server before starting the configuration.
Factory default wireless settings
Parameter
Setting
Comments
Communications mode
Ad Hoc
If you want to use it in Infrastructure mode it is necessary to reconfigure it.
Channel
10
Only in Ad Hoc mode.
Network name (SSID)
Hpsetup
You must change the SSID on the print server to match your network.
Authentication
Open System
Initially, the print server is not configured for network authentication.
Encryption (WEP)
Disabled
If your network uses encryption, you must configure the encryption keys on your print server.
There are two ways of changing the settings in the wireless print server:
  • Using the provided software
  • Using the printer's front panel
Changing parameters via software
To be able to change the wireless parameters via software it is necessary to establish first a connection to the print server, and so, it is necessary to configure a wireless computer with the necessary settings to establish communication with the wireless print server with its default settings. The wireless and networking settings in the computer should be set as follows in order to establish this first connection:
  • Ad Hoc mode
  • Network name: hpsetup
  • Channel 10
  • Authentication: Open system (no authentication)
  • Encryption: No encryption
TCP/IP settings
Assuming that the networking protocol is TCP/IP, the following needs to be noted:
The card will configure itself with the following values:
  • IP address: 192.0.0.192
  • Subnet Mask: 255.255.255.0
It is necessary to configure the TCP/IP protocol in the Wireless network connection of the computer as follows (also, it is recommended to disable any wired network connections in the computer while configuring the wireless one):
  • NO DHCP or BOOTP - Manual IP address
  • IP address: any that follows the IP protocol rules
  • Subnet Mask: 255.255.255.0
To ensure that it will be possible to establish a connection between the computer and the printer, it is recommendable to open a DOS console and enter the following command:
  • Route ADD 192.0.0.192 MASK 255.255.255.0
Once the wireless and the TCP/IP settings in your computer are these ones, you are ready to set up the wireless connection between your computer and the printer. To do so, insert the HP Jetdirect CD, choose the Installation option in the main menu and then Set Up the Wireless connection. Follow the steps in the screen to set up a wireless connection between your computer and the print server.
Once the connection is established, the software will allow you to change the wireless settings in the Jetdirect printserver. Change them to adapt them to the final network where the printer will be connected.
Changing the parameters using the printer's front panel
You will first need to obtain the wireless network parameters of your computer or access point and change the parameters in the Jetdirect print server to match them. You will need to change both the Wireless and TCP/IP parameters in your wireless print server to have it fully configured.
To change the Wireless parameters:
  1. Access the Printer configuration menu in the printers front panel.
  2. Scroll to I/O config and press Enter.
  3. Scroll to Config card and press Enter.
  4. Select Configure Network = Yes and continue.
  5. Select Configure TCP/IP = Yes and continue.
  6. Inside the Link configuration section, it will be possible to change all the relevant Wireless parameters.
To change the TCP/IP parameters:
  1. Access the Printer configuration menu in the printers front panel.
  2. Scroll to I/O config and press Enter.
  3. Scroll to Config card and press Enter.
  4. Select Configure Network = Yes and continue.
  5. Select Configure TCP/IP = Yes and continue.
  6. Here, it will be possible to change the relevant TCP/IP parameters, including IP config method, IP address and Subnet Mask.
Configure the network connection
Once the wireless link has been established, you need to configure the network connection (for example, the IP parameters). The result of this process will be the creation of a network port in your computer that will allow to print to the device where the Jetdirect wireless print server is attached.
The easiest way to change the network parameters in printers like 500, 800, and 5500, which have a Front Panel with menus, is to change them directly from the Front Panel, in the Printer configuration menu, I/O Section, Config card option.
Once you have installed the printer in your network and it has appropriate IP parameters, if you need to change anything in the configuration either of Wireless settings or TCP/IP settings, the easiest way to do so is through the Jetdirect card Embedded Web Server. To access the embedded web server, you just need to type the IP address of the Jetdirect card in the address field of an Internet browser (like Internet Explorer).
note:
For detailed information about Wireless concepts, installation of the printer in the network and the usage of the Jetdirect Embedded Web Server, please refer to the specific documentation of the Jetdirect wireless print server. See the "References" section at the end of this document for links to this documentation.

Guidelines for using wireless Jetdirect print servers with HP Designjets

This section contains a summary of the issues that were found during the qualification tests as well as some guidelines about how to use Jetdirect wireless print servers in the supported HP Designjet printers.
Known issues
  • The BlueTooth wireless protocol operates in the same radio frequency band as IEEE 802.11b (the protocol used by Jetdirect wireless print servers), so, theoretically, there could be interference problems if a customer is using BlueTooth devices (like some mobile phones, PDAs, and cameras) together with 802.11b ones. After extensive testing we've checked that we can only observe significant problems if the BlueTooth device is placed very close to the printer (a few centimeters). Anyway, in order to avoid problems it is recommendable to avoid deploying Bluetooth and 802.11b networks at the same time.
  • Jetdirect 380x is not detected by Windows 2000 when installing the printer through AppleTalk (works as designed), while Jetdirect 680n, on the other hand, can be configured on a Windows 2000 computer through Appletalk. This difference is due to Appletalk configuration for both cards. Jetdirect 680n reports the Appletalk "LaserWriter" and the printer's name. Jetdirect 380x reports the Appletalk type as "Deskwriter" and the printer's name. When Windows 2000 searches printers on an Appletalk network, it looks for the "LaserWriter" type, and so, Jetdirect 380x is not detected and cannot be used. Appletalk is not a recommended protocol in Windows 2000.
  • Users cannot roam between access points if the IP address changes at the handover. The connection is basically cut off when the handover occurs. Note that this is due to an inherent problem with IEEE 802.11b roaming.
  • Click to print times are longer than with wired Jetdirects.
Image quality
I O throughput is very important in terms of Image quality, especially when printing in sleek (raster) mode. If the IO connection fails to provide the Writing System with enough data, the carriage will stop between swathes, and this will affect print quality.
In HP Designjets 10, 20, and 50ps and HP Designjets 100 and 120, after exhaustively testing wireless printing with both ad-hoc and infrastructure modes, no noticeable Image Quality defects (as banding) have been observed.
In HP Designjet 5500, there could be Image quality problems due to carriage stops between swaths in the following cases:
  • Sending raster from the driver (Avoid out of memory option)
  • Sending raster from a Raster Image Processor (RIP)
  • Sending raster files with a direct connection
In some of these cases, HP Designjet 5500 needs up to 3 MB/s of maintained throughput, while the IEEE 802.11b standard has a maximum throughput of 700 KB/s.
WebServer performance
The navigation of the HP Designjet 5500 Embedded Web Server is very slow when using a Wireless Network connection. Also, submitting files through the WebSubmitter in the HP Designjet 5500 Embedded Web Server can be very slow, due to the throughput limitations of the IEEE 802.11b protocol.
General guidelines
  • The printer should not be further than 40 meters from the access point (infrastructure mode) or the client (ad-hoc mode). While IEEE 802.11b specification allows for a larger coverage area, you can only guarantee good enough throughput if the printer is within 40 metres of the transmitter.
  • There should be no walls or other obstacles between the printer and the access point (infrastructure mode) or client (ad-hoc mode). Even if the radio signals will penetrate most office walls, the quality of the signal (and thus, the throughput) directly depends on the material the wall is constructed with.
  • It is not recommeded to use BlueTooth equipment together with IEEE 802.11b networks (even if, as stated above, the negative effects can only be noticed when the BlueTooth transmitter and the IEEE 802.11b received are very close, in the order of centimeters).
Specific guidelines
Below is a table giving specific guidelines for each type of possible wireless configuration. In each case we give the results of the tests we performed on this configuration and any specific guidelines or comments.
Ad-Hoc configurations
Test case
Result
Comments
Figure : Normal office environment
Ok
Figure : Long-distance data transmission
Ok
Distance between the client and the printer must be from 50 cm to 40 meters (or less if connection is unstable).
Figure : Close-distance data transmission (50 centimeters). Normal office environment
Ok
Figure : Normal office environment, one wall between the printer and the client
Ok
Figure : Normal office environment, two walls between the printer and the client
Ok
Figure : Normal office environment; during printing, a BlueTooth connection can cause communication problems
Ok
A Bluetooth equipment near from the Jetdirect (few centimeters) can disturb communications between the host and the printer: job not printed, errors, etc…
Infrastructure configurations
Test case
Result
Comments
Figure : Access Point as a hub
Ok
Figure : Two Access Points as root units on a wired LAN
Ok
Figure : Repeater unit that extends wireless range
Ok
Figure : The client is very far from the access point while the printer is very close
Ok
Distance between the client and the Access Point must be from 50 cm to 40 meters (or less if connection is unstable)
Figure : During printing there is BlueTooth connection which can cause communication problems
Ok
A Bluetooth equipment near from the Jetdirect (few centimeters) can disturb communications between the host and the printer: job not printed, errors, etc…
Figure : A "Traffic Generator" makes additional load on the wireless network while printing
Ok
Figure : During test scenario execution, the printing client performs roaming between two access points
Fail
Roaming between two access points during the printing is NOT supported