solution Contentsolution Content

HP Color Laser 150 Printers - Printer Does Not Pick Paper

This document is for HP Color Laser 150a and 150nw printers.
The Power light blinks, a Paper is empty in tray message displays, and the printer does not pick up paper from the input tray.

Step 1: Check the paper, and then reload it

Paper feed issues might result from using ripped, dusty, curled, wrinkled, or bent paper. The quality of the paper can also make a difference. Follow these guidelines to help avoid the issue.
  • Use only good quality paper that meets printer specifications.
  • Store all paper in a dry, cool place. Paper feed issues occur more often in humid climates.
  • Wait for the printer to complete a job or the Attention light to blink before you reload the paper.
Make sure the paper you are using is in good condition, stacked neatly in the tray, and the paper path and tray are free from obstructions.
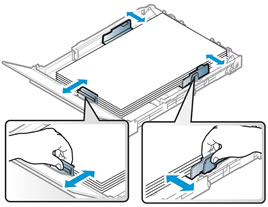
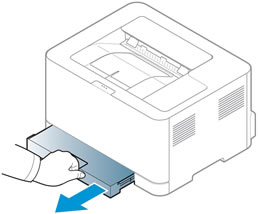
  1. Remove the paper stack from the input tray.
  2. Remove any severely bent, wrinkled, or torn paper from the stack.
  3. Holding the paper stack in both hands, flex the stack to form a U shape, and then flex the stack in the opposite direction to loosen stuck paper sheets.
    Flexing the paper stack
  4. Load up to 150 sheets of paper with the print side facing up and the top edge toward the printer into the input tray, and then slide in the paper guides until they touch the edge of the stack of paper.
    Loading paper into the input tray.
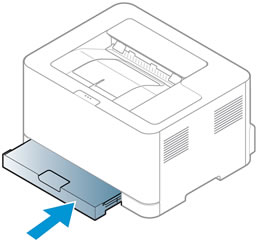
  5. Close the paper cover, and then push in the input tray.
    Pushing  in the input tray.
  6. Lift the output support, and then try to print.
    Lifting the output support.
If the issue persists, continue to the next step.

Step 2: Check the paper size and type settings

Change the input tray settings from the program you are trying to print from.

Step 3: Clean the pickup roller

Dust, paper fiber, and other debris might accumulate on the pickup roller and cause paper feed issues. Clean the pickup roller inside the printer, and then try to print again.
  1. Turn off the printer, unplug the power cord from the back of the printer, and then wait for the printer to cool.
      advertencia:
    You must disconnect the power cord before reaching inside the printer to avoid risk of injuries or electric shock.
  2. Pull out the input tray.
    Pulling out the input tray.
  3. Open the toner cartridge access door, remove the toner cartridges, and then set them aside.
    Removing the toner cartridges from the inside of the printer.
  4. Remove the toner collection unit. Carefully set the unit aside on a flat, solid surface to avoid spilling the waste toner.
    Removing the toner collection unit.
  5. Carefully lift the printer and set it on its side.
  6. While supporting the printer with one hand, find the pickup rollers underneath the printer.
    Location of the pickup roller.
  7. Lightly dampen a lint-free cloth with bottled or distilled water, and then squeeze any excess liquid from the cloth.
  8. Clean the pickup rollers, applying a moderate amount of pressure.
  9. Allow the pickup rollers to dry completely (approximately 10 minutes).
  10. Set the printer upright, reinsert the input tray, and then reinsert the toner collection unit. Avoid tilting or turning the unit to prevent spilling the waste toner.
  11. Reinstall the toner cartridges, and then close the toner cartridge access door.
  12. Plug the power cord into the rear of the printer, and then turn on the printer.
  13. Lift the output support, and then try to print.
    Lifting the output support.
If the issue persists, continue to the next step.

Step 4: Reset the printer

Sometimes an error persists even though there is no paper feed issue. Clear the error by resetting the printer.
  1. Turn the printer on, if it is not already on.
  2. Wait until the printer is idle and silent before you continue.
  3. With the printer turned on, disconnect the power cord from the rear of the printer.
  4. Unplug the power cord from the wall outlet.
  5. Wait at least 60 seconds.
  6. Plug the power cord back into the wall outlet.
    nota:
    HP recommends connecting the printer power cord directly to the wall outlet.
  7. Reconnect the power cord to the rear of the printer.
  8. Turn on the printer, if it does not automatically turn on.
    The printer might go through a warm-up period. The printer lights might flash, and the carriage might move.
  9. Wait until the warm-up period finishes and your printer is idle and silent before you proceed.
Try to print. If the problem persists, continue to the next step.

Step 5: Service the printer

Service or replace your HP product if you completed all preceding steps.
To see if your product is still under warranty, go to the warranty check website http://www.support.hp.com/checkwarranty. Contact HP Support to schedule a repair or replacement. If you are in Asia Pacific, Contact HP Support to find a local service center in your area.
Repair fees might apply for out-of-warranty products.