solution Contentsolution Content

HP Designjet 10ps, 20ps, 50ps, 30, 100, 111, 120, and 130 Printer Series - Configuring the IP Address

This document is for HP Designjet 10ps, 20ps, 50ps, 30, 100, 111, 120, and 130 Series printers.
The IP address cannot be configured through the front panel on many Designjet printers (10ps, 20ps, 50ps, 30, 100, 110, 111, 120, and 130 series printers). This document explains the different situations where IP addresses have to be configured in these printers and the different options that are available in each situation.

Networking, TCP/IP, IP address, network configuration

The Designjet printers listed above do not have the ability to configure network parameters through the front panel. The most critical one is the IP address. There are two situations where the IP address has to be configured:
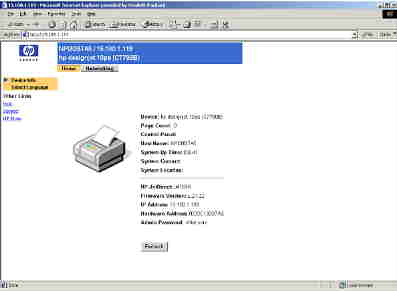
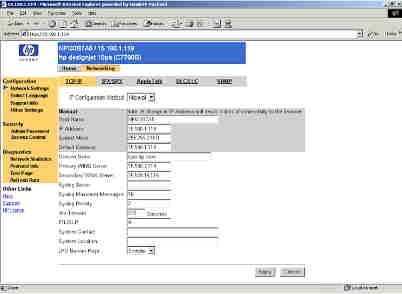
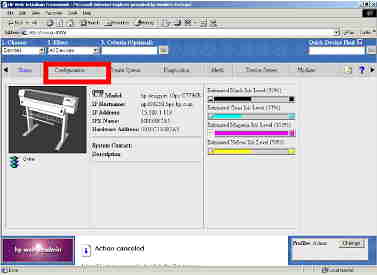
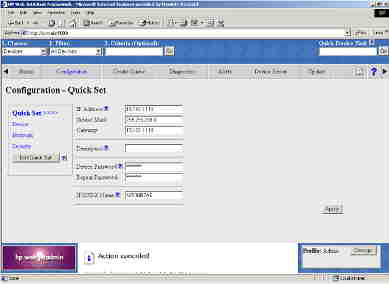
  1. When the HP Jetdirect card already has an assigned IP address and the user wants to change it.
  2. When the Jetdirect card has never been configured and the IP address has to be set for the first time.
In the first situation, there are several ways in which the IP address can be changed. The second case is more difficult and will be treated separately.

Networking concepts

Before explaining the procedures to follow in the two situations, some networking concepts must be understood.

IP Address

The IP Address is the Internet Protocol address of the HP Jetdirect card. It is not a universal value, and so, when configuring it, care has to be taken not to give the card an existing value for the IP address. For this reason, cards come preset from the factory with an IP address value of 0.0.0.0. If, after five minutes, no other IP address has been assigned by a BOOTP or DHCP protocol, the IP address changes to 192.0.0.192. When the card is reset through the front panel or via software, the same thing happens.

Hardware address

The Hardware address is the Universal identifier of the network card. Every card in the world has a unique hardware address that is set in the manufacturing process.

DHCP (Dynamic Host Configuration Protocol)

DHCP enables the devices in a network to obtain an IP address automatically from a server or servers. This way, each time a device connects to the network (for example during the printer’s boot process), it asks for an IP address to be assigned to it dynamically.

BOOTP (Bootstrap Protocol)

The DHCP protocol is based on BOOTP, with the difference that BOOTP was designed for manual pre-configuration of host information in the server.
Summarizing, DHCP and BOOTP require a server in the network to assign IP addresses dynamically to the devices that are connected to it. If this server is not present, IP addresses have to be configured manually, taking care not to repeat IP address values between different devices.
A Designjet printer with a Jetdirect card can be connected, thus, to two different types of networks:
  • Networks with a DHCP or BOOTP server. In this case, the Jetdirect card can be configured in two ways:
    • To use these protocols to obtain its IP address automatically.
    • Not to use these protocols; in this case, the IP address can be assigned manually.
  • Networks without DHCP or BOOTP protocols. In this case, all IP addresses have to be assigned manually.

Getting the HP Jetdirect’s current network configuration

The HP Jetdirect’s current network settings (IP address, hardware address, etc.) can be found on the I/O section of the Information page of Designjet 10ps, 20ps and 50ps printers. This Information page can be printed by pressing the Continue button four times while holding down the Power button. The I/O section is on the third page.

Configuring an HP Jetdirect card with an already assigned IP address

If an HP Jetdirect card has a valid assigned IP address, its setting can be changed in several ways:
  • Using the Jetdirect’s embedded Web server
  • Via Telnet (from Jetdirect firmware v x.21.xx)
  • Using Web Jetadmin.
Web Jetadmin can also be used to configure a Jetdirect card with no IP address assigned. The other two methods require a valid IP address to connect to the print server.

HP Jetdirect’s embedded Web server

An embedded Web server is available by entering the IP address of the HP Jetdirect card in the Internet Explorer address field.
Abbildung : Embedded Web server
There are two tabs in this Web page:
  • Home: Gives the basic information about the card settings.
  • Networking: Allows changing of the network settings of the card, which are grouped in different categories.
    Abbildung : Networking Tab
The IP address can be changed in its corresponding field.

Telnet configuration of the HP Jetdirect settings

From firmware v x.21.xx, HP Jetdirects allow viewing and modifying their settings via Telnet. In a DOS console, by writing the command TELNET x.x.x.x, where x.x.x.x stands for the Jetdirect’s IP address, a Telnet connection to the print server is established. Once this is done, the command MENU causes a text menu to be displayed, with options for modifying the network parameters. IP address can be changed in the following menu:
2. TCP/IP Menu
1. TCP/IP main settings
Change settings _YES

HP Web Jetadmin

The HP Web Jetadmin tool that was used to manage Jetdirect print servers in networks has been discontinued and replaced by Web Jetadmin, which can be downloaded from the HP Web site. It has the following appearance:
Abbildung : Web Jetadmin
Once the search is performed (by clicking Go in the top-left search form), the program lists all the devices that it has found and their parameters. An individual device can also be found by entering its IP address in the top-right Quick Device Find form. Once the device that is to be modified has been found, its current configuration can be seen by clicking Open in the menu on the right.
Abbildung : Change Settings
Clicking on Configuration in the top menu causes a new screen to appear where it is possible to change the card’s parameters.
Abbildung : Configuration Tab

Configuring a new or a reset HP Jetdirect card

If the HP Jetdirect card is resetted, it will have the 0.0.0.0 IP address value stored. After five minutes without receiving any other address, the IP address will be set to 192.0.0.192, which is not a valid IP address.
When a reset Jetdirect card is connected to the network, there are two possibilities:
  • The network the printer is connected to has a BOOTP or a DHCP server.
  • The network has no BOOTP or DHCP server and so IP addresses have to be configured manually.
In the first case, the server will assign a valid IP address to the Jetdirect and from that point, the same procedures that are explained in the previous section can be applied to modify the network settings.
In the second case, the printer won’t receive a valid IP address and so, it won’t be possible to connect to it with the methods mentioned before (embedded Web server or Telnet). In this case, the only possibility is to use Web Jetadmin to access the Jetdirect card and then to modify its settings from there. The procedure is as follows:
  1. In the main page, select New Devices in the Filter section of the Search form. Click Go to begin the search.
  2. The devices whose IP address has not been configured will appear with a default IP address of 192.0.0.192.
  3. Click Open. A screen will appear asking for an initial device configuration. There the IP address, Subnet Mask, and Gateway can be set.