Use the following instructions to uninstall or remove the printer driver in Windows 7.
HP Designjet 100/110/111/120/130 Printer Series - Uninstalling or Removing the Printer Driver in Windows 7
Issue
Solution
Before uninstalling the printer driver, ensure that there are no jobs in the print queue. Follow the steps mentioned below to check and delete any document in the print queue.
-
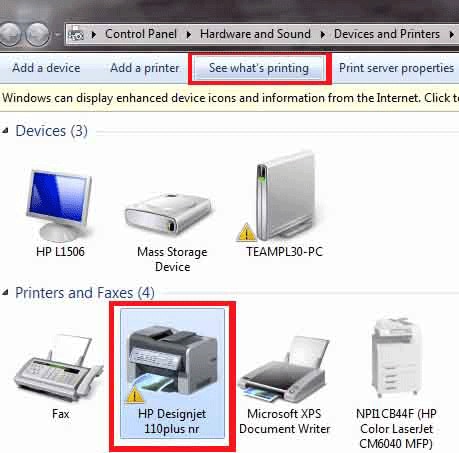
In the Devices and Printers window, printers installed on the computer will be listed. Before removing the printer, make sure no print jobs are in the print queue.
-
From the Start menu, click on Control Panel. (Alternatively, click on Devices and Printers option on start menu to access printer directly.)

-
From Control Panel (If View by is set to Category), double click on View devices and printers found under Hardware and Sound.
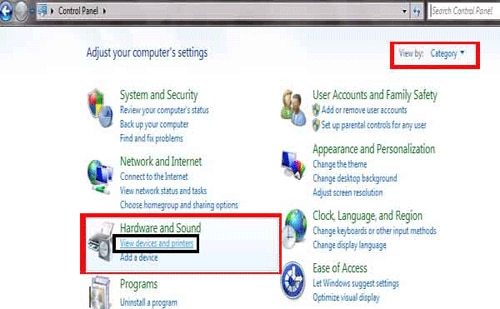 From Control panel (If View by is set to Small or Large Icons), double click on Devices and Printers.
-
To check if there are any print jobs in the print queue, click on the printer that needs to be removed and click on See What’s Printing button.
-
This will open the print queue of the printer that is being removed. If there are no print jobs in the queue, no print jobs will be listed. If there are print jobs on in the queue then a list of all print jobs will be listed that are pending.

-
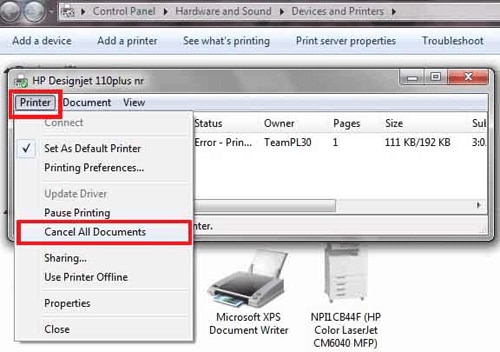
If there print jobs in the queue, close all the application that are open on the computer, then click on Printer button and click on Cancel All Documents options. This should clear all print jobs from the print queue.Alternatively highlight each print job and manually press Delete key on the keyboard.

note:
If any of the print jobs are not deleted, then disconnect the printer communication, restart the computer and printer. Once the computer is restarted, continue with the procedure.Once the print jobs are deleted or cancelled, the print queue should be empty. -
Once the Print queue is empty, click and highlight the printer to be removed and click on the Remove Device button.Alternatively, left-click on the printer that needs to be removed, then right-click on the printer icon and click on Remove Device option.
 This would remove the printer icon from printers and faxes list.
If the driver was installed using the CD or Installer downloaded from HP website, then uninstall the printer from program features
note:If the driver was installed using the Raster driver, please go to Step 3.
Perform the following:
-
In the Devices and Printers window, printers installed on the computer will be listed. Before removing the printer, make sure no print jobs are in the print queue.
-
To check if there are any print jobs in the print queue, click on the printer that needs to be removed and click on See What’s Printing button.
-
This will open the print queue of the printer that is being removed. If there are no print jobs in the queue, no print jobs will be listed. If there are print jobs on in the queue then a list of all print jobs will be listed that are pending.
-
If there print jobs in the queue, close all the application that are open on the computer, then click on Printer button and click on Cancel All Documents options. This should clear all print jobs from the print queue.Alternatively highlight each print job and manually press Delete key on the keyboard.
note:
If any of the print jobs are not deleted, then disconnect the printer communication, restart the computer and printer. Once the computer is restarted, continue from step 6.Once the print jobs are deleted or cancelled, the print queue should be empty. -
Once the Print queue is empty, click and highlight the printer to be removed and click on the Remove Device button.Alternatively, left-click on the printer that needs to be removed, then right-click on the printer icon and click on Remove Device option.
This would remove the printer icon from printers and faxes list.
-
After uninstalling the software, Go to Devices & printers and remove the driver or driver package from print server properties. Left-click and highlight on any of the other printers listed in the printers and faxes list and click on Printer Server Properties button.

-
This will open Print Server Properties windows, now click on Drivers tab and a list of printer drivers installed on the computer will be listed.
 Left-click and highlight the printer driver that needs to be removed and click on Remove button.
 -
If just the driver needs to be removed, then select Remove Driver Only option. If both driver and driver package needs to be removed, then select Remove Driver and Driver Package.
note:
Removing driver package will remove the printer driver package from the operating system printer list.
-
When prompted for confirmation, click on Yes button.

note:
If an error Driver cannot be removed as the driver is in use is displayed, save any unsaved documents, close all the application, disconnect printer communication cable from the computer and restart the computer. Once the computer is restarted, continue the procedure. -
If the driver is removed successfully, the driver will not be listed anymore under list of drivers.
 Click on Close button to close Printer Server Properties window and return to Printers window.
Enter a topic to search our knowledge library
What can we help you with?

Need Help?