This document is for HP Deskjet Ink Advantage 5525 and HP Photosmart 5520, 5521, 5522, 5524, and 5525 e-All-in-One printers.
HP Deskjet, Photosmart 5520 Printers - A 'Paper Jam' Error Displays
During printing, the printer stops feeding pages, and a Paper Jam. Clear jam, and then press OK message displays on the printer control panel. The Power button light might also blink fast.
Hinweis:Paper jams can be real or false. The printer might report a paper jam even when there is no jammed paper. The following steps apply to both real and false paper jams.

Step 1: Reset the printer
Reset the printer to clear any error states with the print mechanism.
-
With the printer turned on, disconnect the power cord from the rear of the printer.
-
Unplug the power cord from the wall outlet.
-
Wait at least 15 seconds.
-
Plug the power cord back into the wall outlet.
-
Reconnect the power cord to the printer.
-
Turn the printer on.
Try to print. If the issue persists, continue to the next step.
Step 2: Check the surface the product rests on
Make sure that the product rests on a flat and level surface to avoid paper feed issues.
-
Make sure that the surface the printer rests on is flat, level, and hard.
-
Make sure that part of the printer's base does not rest on anything that might cause the printer to tilt, even slightly.
-
Pull out the paper tray.
-
Load 10 sheets of U.S. letter or A4 plain white paper in the paper tray.
-
Push the paper tray back into the printer.
Try to print. If the issue persists, continue to the next step.
Step 3: Clear any jammed paper
Paper jams can occur in multiple areas of the printer. If you cannot find the paper jam in one area, continue to the next area until the jam is located.
Check the ink cartridge access area
Remove any jammed paper from the ink cartridge access area.
-
Turn off the printer.
-
Disconnect the power cord from the rear of the printer.
Warnung:
To avoid risk of injuries or electric shock, disconnect the power cord before reaching inside the printer. -
Disconnect the USB cable from the printer, if present.
-
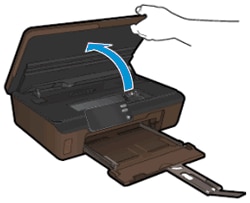
Open the ink cartridge access door.
-
Locate the ink cartridge access area.

-
Gently remove any whole sheets of paper with both hands, and then thoroughly check for torn pieces of paper. If any bits of paper remain inside the printer, more jams are likely to occur.
Check the duplexer
Remove any jammed paper in the duplexer area and check for warping on the cleanout door.
-
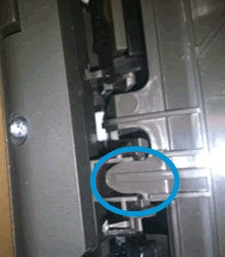
With the power and USB cords disconnected from the printer, open the ink cartridge access door, and then locate the cleanout door. The door is behind the ink cartridge access area.

-
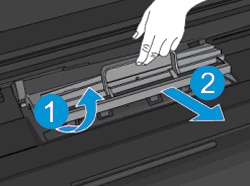
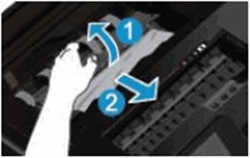
Pull the cleanout door up and out to remove it.
-
Lift the cleanout door up
-
Pull the cleanout door out
-
-
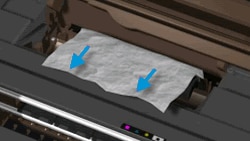
Gently remove any whole sheets of paper with both hands, and then thoroughly check for torn pieces of paper. If any bits of paper remain inside the printer, more jams are likely to occur.
-
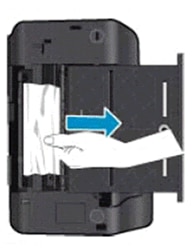
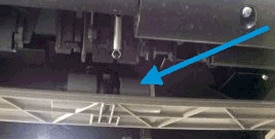
Press the duplexer cover hole with your finger, and then use your thumb to lift up the front of the duplexer cover.
-
While holding the duplexer cover open with one hand, gently remove any whole sheets of paper, and then thoroughly check for torn pieces of paper. If any bits of paper remain inside the printer, more jams are likely to occur.
-
Hold the duplexer cover up
-
Pull any jammed paper out
-
-
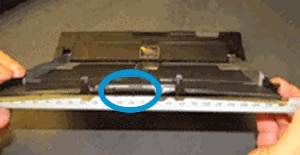
Before reinstalling the cleanout door, check if the front edge is warped by placing it next to a ruler or other straight object.Abbildung : Example of a warped cleanout door
 Abbildung : Example of a normal cleanout door
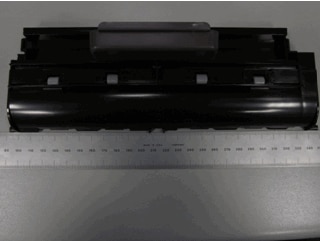
-
If the cleanout door is not warped, close the duplexer path cover, and then reinsert the cleanout door until both latches snap into place.
-
If the cleanout door is warped, skip to the end of this document to contact HP to replace the door.
-
Check underneath the paper tray
Remove any jammed paper under the printer when the paper tray is opened.
-
With the power and USB cords disconnected from the printer, use your hand to secure the scanner lid, and then turn the printer onto its left side to access the underside.
Vorsicht:
Do not turn the printer upside down. Ink might leak from the ink cartridges. -
Slide out the paper tray until it stops.
-
Gently remove any whole sheets of paper with both hands, and then thoroughly check for torn pieces of paper. If any bits of paper remain inside the printer, more jams are likely to occur.
-
Slide the paper tray in until it stops.
-
Return the printer to its normal position.
-
Open the cartridge access door, and then check for and remove any loose objects that might have shifted when the printer was turned on its side.
-
Close the cartridge access door.
Reconnect the power cord and the USB cable (if previously connected), turn on the printer, and then try to print. If the issue persists, continue to the next step.
Step 4: Check the carriage path for obstructions
Look for and remove any paper or debris that is preventing the ink cartridge carriage from moving.
-
With the printer turned on, open the ink cartridge access door.
-
Wait until the carriage is idle and silent before you continue.
-
With the printer turned on, disconnect the power cord from the rear of the printer.
Warnung:
To avoid the risk of electrical shock, you must unplug the power cord before moving the carriage by hand and resetting the paper feed mechanism. -
Gently remove any whole sheets of paper with both hands, and then thoroughly check for torn pieces of paper that might be restricting the carriage. If any bits of paper remain inside the printer, more jams are likely to occur.
-
Reach into the ink cartridge access area, and then manually move the carriage.
-
If the carriage is stuck on the right side, move it to the left.
-
If the carriage is stuck on the left side, move it to the right.
-
If the carriage is stuck in the middle, move it to the right.
-
-
Remove any other loose paper or objects found.
-
Make sure the carriage moves completely across the path by gently pushing it to the left and to the right.
-
Close the cartridge access door.
-
Reconnect the power cord and turn on the printer.
Try to print. If the issue persists, continue to the next step.
Step 5: Check the paper tray
Make sure the paper tray is not warped and check if it is seated properly when closed.
-
Turn off the printer and disconnect the power cord.
-
Remove any paper from the paper tray, and then remove the tray from the printer.
-
Check if the tray is warped by placing a ruler or other straight object along the rear edge.The tray is warped if any gaps are more than 1 mm (.04 in) wide between the ruler and the tray.
-
If the paper tray is not warped, continue to the next step.
-
If the paper tray is warped, skip to the end of this document to contact HP to replace the tray.
-
-
Reinsert the paper tray until it stops and fits securely into place.
-
Use your hand to secure the scanner lid, and then turn the printer onto its side to access the underside.
-
Make sure the plastic tab on the paper tray is properly seated in the retainer slot. Open and close the tray again until the tab goes in the slot, if necessary.
-
Return the printer to its normal position.
-
Reconnect the power cord and turn on the printer.
Try to print. If the issue persists, continue to the next step.
Step 6: Clean the paper pick and paper feed rollers
Remove dust, paper fibers, and other debris from the paper feed and pick rollers.
-
Turn off the printer, and then disconnect the power cord.
-
Open the paper tray until it stops, and then remove any paper.
-
Use your hand to secure the scanner lid, and then turn the printer onto its side to access the paper pick rollers under the printer.
-
Lightly dampen a lint-free cloth or swab with distilled water, squeeze out any excess liquid, and then wipe the rollers to remove any dust or dirt buildup.
-
Set the printer back down, and then open the ink cartridge access door.
-
Pull the cleanout door up and out to remove it from the product.
-
Lift the cleanout door up
-
Pull the cleanout door out
-
-
Lightly dampen another cloth or swab, and then wipe the rollers to remove any dust or dirt buildup.
-
Allow the rollers to dry completely.
-
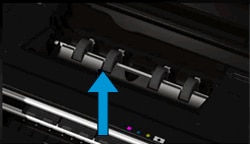
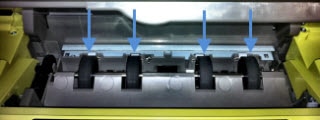
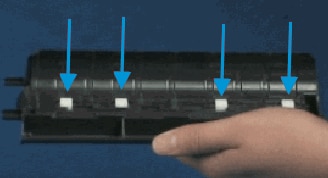
Inspect the cleanout door rollers. Make sure they turn easily and are springy when pressed. If any rollers are damaged or missing, replace the door.
-
Reinstall the cleanout door until both latches snap into place.
-
Close the cartridge access door.
-
Reload plain paper into the input tray, and then push the tray in until it stops.
-
Reconnect the power cord, and then turn on the printer.
Try to print. If the issue persists, continue to the next step.
Step 7: Service the printer
Service or replace your HP product if the issue persists after completing all the preceding steps.
Go to Contact HP Customer Support to schedule a product repair or replacement. If you are in Asia Pacific, you will be directed to a local service center in your area.
To confirm your warranty status, go to HP Product Warranty Check. Repair fees might apply for out-of-warranty products.