solution Contentsolution Content

HP EliteBook x360 1030 G4 Notebook PC - Components

Your computer features top-rated components. This chapter provides details about your components, where they are located, and how they work.
note:
Actual computer color, features, feature locations, and icon labels may vary from the images depicted.

Right

Figure : Identifying the right-side components
Right-side components and their descriptions
Component
Description
(1)
Volume buttons
Control speaker volume on the computer.
(2)
Battery light
When AC power is connected:
  • White: The battery charge is greater than 90%.
  • Amber: The battery charge is from 0 to 90%.
  • Off: The battery is not charging.
When AC power is disconnected (battery not charging):
  • Blinking amber: The battery has reached a low battery level. When the battery has reached a critical battery level, the battery light begins blinking rapidly.
  • Off: The battery is not charging.
(3)
USB Type-C power connectors and Thunderbolt™ ports with HP Sleep and Charge (2)
Connect an AC adapter that has a USB Type-C connector, supplying power to the computer and, if needed, charging the computer battery.
– and –
Even when the computer is off, connect and charge most USB devices that have a Type-C connector, such as a cell phone, camera, activity tracker, or smartwatch, and provide high-speed data transfer.
– and –
Connect a display device that has a USB Type-C connector, providing DisplayPort™ output.
note:
Your computer may also support a Thunderbolt docking station.
note:
Cables and/or adapters (purchased separately) may be required.
(4)
Nano security cable slot
Attaches an optional security cable to the computer.
note:
The security cable is designed to act as a deterrent, but it may not prevent the computer from being mishandled or stolen.
(5)
HDMI port
Connects an optional video or audio device, such as a high-definition television, any compatible digital or audio component, or a high-speed High Definition Multimedia Interface (HDMI) device.

Left

Figure : Identifying the left-side components
Left-side components and their descriptions
Component
Description
(1)
USB SuperSpeed port with HP Sleep and Charge
Connects a USB device, provides high-speed data transfer, and even when the computer is off, charges most products such as a cell phone, camera, activity tracker, or smartwatch.
(2)
Audio-out (headphone)/Audio-in (microphone) combo jack
Connects optional powered stereo speakers, headphones, earbuds, a headset, or a television audio cable. Also connects an optional headset microphone. This jack does not support optional standalone microphones.
  warning:
To reduce the risk of personal injury, adjust the volume before putting on headphones, earbuds, or a headset. For additional safety information, see the Regulatory, Safety, and Environmental Notices.
To access this guide:
  1. Type HP Documentation in the taskbar search box, and then select HP Documentation.
note:
When a device is connected to the jack, the computer speakers are disabled.
(3)
Power button
  • When the computer is off, press the button to turn on the computer.
  • When the computer is on, press the button briefly to initiate Sleep.
  • When the computer is in the Sleep state, press the button briefly to exit Sleep (select products only).
  • When the computer is in Hibernation, press the button briefly to exit Hibernation.
note:
Pressing and holding down the power button results in the loss of unsaved information.
If the computer has stopped responding and shutdown procedures are ineffective, press and hold the power button for at least 5 seconds to turn off the computer.
To learn more about your power settings, see your power options.
  1. Right-click the Power icon and then select Power Options.
(4)
Power light
  • On: The computer is on.
  • Blinking: The computer is in the Sleep state, a power-saving state. The computer shuts off power to the display and other unneeded components.
  • Off: The computer is off or in Hibernation. Hibernation is a power-saving state that uses the least amount of power.
(5)
Nano SIM card slot
Supports a wireless subscriber identity module (SIM) card.

Display

Figure : Identifying the display components
Display components and their descriptions
Component
Description
(1)
WWAN antennas (select products only)*
Send and receive wireless signals to communicate with wireless wide area networks (WWANs).
(2)
WLAN antennas*
Send and receive wireless signals to communicate with wireless local area networks (WLANs).
(3)
Camera light(s)
On: One or more cameras are in use.
(4)
Internal microphones
Record sound.
(5)
Camera(s)
Allow(s) you to video chat, record video, and record still images. Some cameras also allow a facial recognition logon to Windows, instead of a password logon.
note:
Camera functions vary depending on the camera hardware and software installed on your product.
(6)
Ambient light sensor
Adjusts the brightness of the display, depending on the ambient light.
*The antennas are not visible from the outside of the computer. For optimal transmission, keep the areas immediately around the antennas free from obstructions.
For wireless regulatory notices, see the section of the Regulatory, Safety, and Environmental Notices that applies to your country or region.
To access this guide:
  1. Type HP Documentation in the taskbar search box, and then select HP Documentation.

Keyboard area

Touchpad

Touchpad settings

To adjust touchpad settings and gestures, or to turn off the touchpad:
  1. Type touchpad settings in the taskbar search box, and then press enter.
  2. Choose a setting.
To turn on the touchpad:
  1. Type touchpad settings in the taskbar search box, and then press enter.
  2. Using an external mouse, click the Touchpad button.
– or –
  1. Press the Tab key repeatedly until the pointer rests on the Touchpad button. Then press the spacebar to select the button.
Figure : Identifying the touchpad
Touchpad components and their descriptions
Component
Description
(1)
Touchpad zone
Reads your finger gestures to move the pointer or activate items on the screen.
(2)
Left touchpad button
Functions like the left button on an external mouse.
(3)
Near Field Communications (NFC) tapping area and antenna (select products only)*
Allows you to wirelessly share information when you tap it with an NFC-enabled device.
(4)
Right touchpad button
Functions like the right button on an external mouse.

Lights

Figure : Identifying the top lights
Lights and their descriptions
Component
Description
(1)
Caps lock light
On: Caps lock is on, which switches the key input to all capital letters.
(2)
Mute light
  • On: Computer sound is off.
  • Off: Computer sound is on.
(3)
Microphone mute light
  • On: Microphone is off.
  • Off: Microphone is on.
(4)
Num lk light
On: Num lock is on.
(5)
Wireless light
On: An integrated wireless device, such as a wireless local area network (WLAN) device and/or a Bluetooth® device, is on.
note:
On some models, the wireless light is amber when all wireless devices are off.
(6)
Sharing or presenting light
On: Sharing is on.
(7)
Call answer light
On: Call answer is on.
(8)
Call end light
On: Call end is on.

Speakers and fingerprint reader

Fingerprint readers can be located on the touchpad, on a side panel of the computer, or on the top cover below the keyboard.
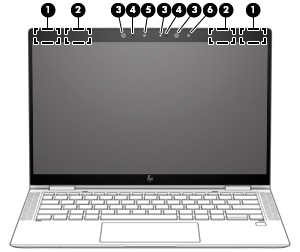
Figure : Identifying the speakers and fingerprint reader
Speakers and fingerprint reader and their descriptions
Component
Description
(1)
Speakers (2)
Produce sound.
(2)
Fingerprint reader
Allows a fingerprint logon to Windows, instead of a password logon.
  1. Touch your finger to the fingerprint reader.
    note:
    To prevent fingerprint logon issues, make sure when you register your fingerprint that all sides of your finger are registered by the fingerprint reader.

Special keys

Figure : Identifying the special keys
Special keys and their descriptions
Component
Description
(1)
esc key
Displays system information when pressed in combination with the fn key.
(2)
fn key
Executes frequently used system functions when pressed in combination with another key. Such key combinations are called hot keys.
(3)
Windows key
Opens the Start menu.
note:
Pressing the Windows key again will close the Start menu.
(4)
Action keys
Execute frequently used system functions.
(5)
Embedded numeric keypad
A numeric keypad superimposed over the keyboard alphabet keys. When num lk is pressed, the keypad can be used like an external numeric keypad. Each key on the keypad performs the function indicated by the icon in the upper-right corner of the key.
note:
If the keypad function is active when the computer is turned off, that function is reinstated when the computer is turned back on.
(6)
num lk key
Turns the embedded numeric keypad on and off.

Hot keys (select products only)

A hot key is the combination of the fn key and another key.
To use a hot key:
  1. Press the fn key, and then press one of the keys listed in the following table.
Hot keys and their descriptions
Key
Description
C
Turns on scroll lock.
E
Turns on the insert function.
R
Breaks the operation.
S
Sends a programing query.
W
Pauses the operation.

Bottom

Figure : Identifying the bottom components
Bottom components and their descriptions
Component
Description
(1)
Vent
Enables airflow to cool internal components.
note:
The computer fan starts up automatically to cool internal components and prevent overheating. It is normal for the internal fan to cycle on and off during routine operation.
(2)
Speakers (2)
Produce sound.

Labels

The labels affixed to the computer provide information you may need when you troubleshoot system problems or travel internationally with the computer. Labels may be in paper form or imprinted on the product.
note:
Check the following locations for the labels described in this section: the bottom of the computer, inside the battery bay, under the service door, on the back of the display, or on the bottom of a tablet kickstand.
  • Service label—Provides important information to identify your computer. When contacting support, you may be asked for the serial number, the product number, or the model number. Locate this information before you contact support.
    Your service label will resemble one of the examples shown below. Refer to the illustration that most closely matches the service label on your computer.
    Figure : Identifying the service label
    Service label components
    Component
    (1)
    HP product name
    (2)
    Model number
    (3)
    Product ID
    (4)
    Serial number
    (5)
    Warranty period
    Figure : Identifying the service label
    Service label components
    Component
    (1)
    HP product name
    (2)
    Product ID
    (3)
    Serial number
    (4)
    Warranty period
  • Regulatory label(s)—Provide(s) regulatory information about the computer.
  • Wireless certification label(s)—Provide(s) information about optional wireless devices and the approval markings for the countries or regions in which the devices have been approved for use.

Inserting a SIM card (select products only)

note:
Inserting a SIM card of the wrong size could damage the SIM card or cause the SIM card to become stuck in the slot. The use of SIM card adapters is not recommended. To prevent damage to the SIM card or the connectors, use minimal force when inserting or removing a SIM card.
note:
Before purchasing a SIM card, follow these instructions to determine the correct SIM card size for your computer:
  1. Go to http://www.hp.com/support, and then search for your computer by product name or number.
  2. Select Product Information.
  3. Refer to the listed options to determine which card to purchase.
To insert a SIM card, follow these steps:
  1. Turn off the computer by using the Shut down command.
  2. Press in on the SIM card tray, and then remove it from the slot.
  3. Insert the SIM card into the SIM card tray (1), and then replace the tray in the computer. Press gently on the tray (2) until it is firmly seated.
    note:
    The SIM card in your computer may look slightly different from the illustration in this section.
    Figure : Inserting a SIM card
To remove a SIM card, reverse these steps.