You can configure the product to stop when the supply level reaches its estimated end of life. However, the supply might still be able to produce acceptable print quality. To continue printing, either replace the supply or reconfigure the printer by using the REPLACE SUPPLIES menu on the control panel. For more information about ordering supplies, see Supplies and accessories. For more information about the REPLACE SUPPLIES menu, see System setup menu.
HP Color LaserJet CP3525 Series Printer - Replace supplies
Supplies life
For information regarding specific product yield, see www.hp.com/go/learnaboutsupplies.
To order supplies, see Supplies and accessories.
Locate supplies
Supplies are identified by their labeling and their blue plastic handles.
The following figure illustrates the location of each supply item.
-
Toner collection unit
-
Print cartridges
-
Fuser
Figure :

Supply replacement guidelines
To facilitate the replacement of supplies, keep the following guidelines in mind when setting up the product.
-
Allow sufficient space in the front and on the right side of the product for removing supplies.
-
The product should be located on a flat, sturdy surface.
For instructions on installing supplies, see the label on each supply item or see www.hp.com/go/learnaboutsupplies.
Change print cartridges
When a print cartridge approaches the end of its estimated useful life, the control panel displays a message recommending that you order a replacement. The product can continue to print using the current print cartridge until the control panel displays a message instructing you to replace the cartridge, unless you have selected the option to override the message by using the REPLACE SUPPLIES menu. For more information about the REPLACE SUPPLIES menu, see System setup menu.
The product uses four colors and has a different print cartridge for each color: black (K), magenta (M), cyan (C), and yellow (Y).
You can replace a print cartridge when the control panel displays a REPLACE <COLOR> CARTRIDGE message. The control panel display also indicates the color of the cartridge that has reached the end of its estimated useful life (if a genuine HP�cartridge is currently installed). Replacement instructions are provided on the label on the print cartridge.
caution:If toner gets on clothing, wipe it off with a dry cloth and wash the clothes in cold water. Hot water sets toner into fabric.
note:Information about recycling used print cartridges is on the print-cartridge box. See HP�LaserJet print supplies.
note:To see an animation of this procedure go to this Web site: www.hp.com/go/cljcp3525-replace-print-cartridges.
Replace print cartridges
-
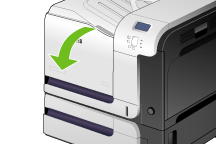
Open the front door. Make sure that the door is completely open.Figure : Location of the front door
-
Grasp the handle of the used print cartridge and pull out to remove.Figure : Location of the print cartridge

-
Store the used print cartridge in a protective bag. Information about recycling used print cartridges is on the print-cartridge box.
-
Remove the new print cartridge from its protective bag.Figure : Location of the protective bag

note:
Be careful not to damage the memory tag on the print cartridge.Figure : Location of the memory tag
-
Grasp both sides of the print cartridge and distribute the toner by gently rocking the print cartridge.Figure : Shake print cartridge

-
Remove the orange protective cover from the print cartridge.Figure : Location of the protective cover

caution:
Avoid prolonged exposure to light.caution:
Do not touch the green roller. Doing so can damage the cartridge. -
Align the print cartridge with its slot and insert the print cartridge until it clicks into place.Figure : Location of the print cartridge slot

-
Close the front door.Figure : Location of the front door

Change the toner collection unit
Replace the toner collection unit when the control panel prompts you.
note:The toner collection unit is designed for a single use. Do not attempt to empty the toner collection unit and reuse it. Doing so could lead to toner being spilled inside the product, which could result in reduced print quality. After use, return the toner collection unit to HP’s Planet Partners program for recycling. See HP�LaserJet print supplies.
note:To see an animation of this procedure go to this Web site: www.hp.com/go/cljcp3525-replace-toner-collection-unit.
Replace the toner collection unit
-
Open the front door. Make sure that the door is completely open.Figure : Location of the front door
-
Grasp the blue label at the top of the toner collection unit and remove it from the product.Figure : Location of the toner-collection bottle

-
Place the attached blue cap over the blue opening at the top of the unit.Figure : Location of the cap

-
Remove the new toner collection unit from its packaging.Figure : New toner-collection bottle

-
Insert the bottom of the new unit into the product first and then push the top of the unit until it clicks into place.Figure : Location of the toner-collection bottle

-
Close the front door.Figure : Location of the front door
note:
If the toner collection unit is not installed correctly, the front door does not close completely.
To recycle the used toner collection unit, follow the instructions included with the new toner collection unit.
Install memory
You can install more memory for the product by adding a dual inline memory module (DIMM).
caution:Static electricity can damage DIMMs. When handling DIMMs, either wear an antistatic wrist strap, or frequently touch the surface of the DIMM antistatic package and then touch bare metal on the product.
Install DDR memory DIMMs
-
Turn the product off.Figure : Location of the on/off switch

-
Disconnect all power and interface cables.
note:
This illustration might not show all the cables.Figure : Location of the product cables
-
Locate the thumb screws on the formatter board in the rear of the product.Figure : Location of the thumb screws

-
Unscrew the thumb screws and then pull the formatter board from the product. Place the formatter board on a clean, flat, grounded surface.Figure : Location of the formatter board

-
To replace a DIMM that is currently installed, spread the latches apart on each side of the DIMM slot, lift the DIMM up at an angle, and pull it out.Figure : Location of the DIMM

-
Remove the new DIMM from the antistatic package. Locate the alignment notch on the bottom edge of the DIMM.Figure : Location of the DIMM notch

-
Holding the DIMM by the edges, align the notch on the DIMM with the bar in the DIMM slot at an angle and firmly press the DIMM into the slot until it is fully seated. When installed correctly, the metal contacts are not visible.Figure : Location of the DIMM slot

-
Push down on the DIMM until both latches engage the DIMM.Figure : Location of the DIMM latches

note:
If you have difficulty inserting the DIMM, make sure the notch on the bottom of the DIMM is aligned with the bar in the slot. If the DIMM still does not go in, make sure you are using the correct type of DIMM. -
Align the formatter board in the tracks at the bottom of the slot, and then slide the board back into the product.
note:
To prevent damage to the formatter board, ensure the formatter board is aligned in the tracks at the top and the bottom of the opening.Figure : Location of the formatter slot
-
Reconnect the power cable and interface cables, and turn the product on.Figure : Location of the product cables

Enable memory for Windows
-
Windows XP, Windows Server 2003, and Windows Server 2008 (using the default Start menu view): Click Start, click Settings, and then click Printers and Faxes.-or-Windows XP, Windows Server 2003, and Windows Server 2008 (using the Classic Start menu view): Click Start, click Settings, and then click Printers.-or-Windows Vista: Click Start, click Control Panel, and then in the category for Hardware and Sound click Printer.
-
Right-click the driver icon, and then select Properties.
-
Click the Device Settings tab.
-
Expand the area for Installable Options.
-
Select the total amount of memory installed in the product.
-
Next to Automatic Configuration, select Update Now.
-
Click OK.
Install an HP�Jetdirect or EIO print server card or EIO hard disk
This product is equipped with an external I/O (EIO) slot. You can install an additional HP Jetdirect print server card or external EIO hard drive in the available EIO slot.
note:This example shows installing an HP Jetdirect print server card.
-
Turn the product off.Figure : Location of the product cables
-
Disconnect all power and interface cables.Figure : Location of the on/off switch
-
Loosen and remove the two retaining screws holding the cover for the EIO slot, and then remove the cover. You will not need these screws and the cover again. They can be discarded.Figure : Location of the EIO slot

-
Firmly insert the HP�Jetdirect print server card into the EIO slot.Figure : Location of the HP�Jetdirect print server card

-
Insert and tighten the retaining screws that came with the print server card.Figure : Location of the retaining screws

-
Reconnect the power cable and remaining interface cables, and turn the product on.Figure : Location of the product cables
-
Print a configuration page. An HP�Jetdirect configuration page that contains network configuration and status information should also print.If it does not print, turn the product off, and then uninstall and reinstall the print server card to ensure that it is completely seated in the slot.
-
Perform one of these steps:
-
Choose the correct port. See the computer or operating system documentation for instructions.
-
Reinstall the software, choosing the network installation this time.
-
Enter a topic to search our knowledge library
What can we help you with?

Need Help?