solution Contentsolution Content

HP DeskJet, ENVY 5640, 5660 Printers - 'Paper Jam' Error

This document is for the HP DeskJet Ink Advantage 5645, ENVY 5640, 5642, 5643, 5644, 5646, 5640, 5643, 5644, 5646, 5660, 5661, 5663, 5664, and 5665 e-All-in-One Printers.
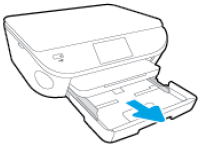
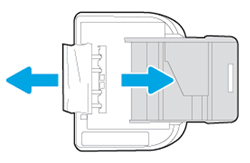
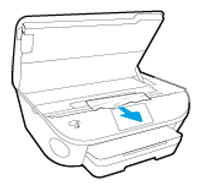
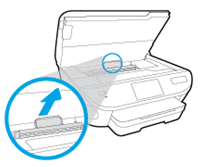
During a print job, the printer stops feeding pages, and a paper jam error message displays on the printer control panel.
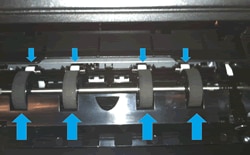
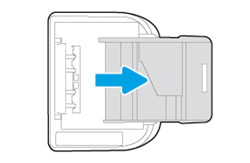
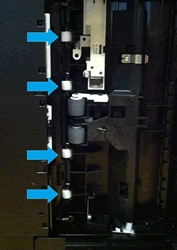
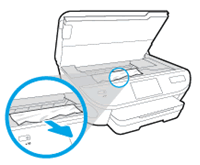
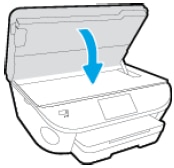
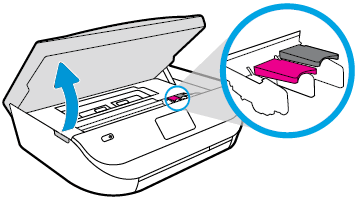
note:
Paper jams can be real or false. The printer might report a paper jam even when there is no jammed paper. The following steps apply to both real and false paper jams.

Step 1: Clear any jammed paper from the printer

There are three different areas where paper might become jammed. Clear any jammed paper from one area, and then try to print again. If the error persists, check the next area for any jammed paper.

Step 2: Make sure the carriage can move freely

Make sure the carriage moves freely across the width of the printer.
  1. Turn on the printer, if it is not already on.
  2. Gently grasp the handles on either side of the printer, then raise the ink cartridge access door until it locks into place.
    The carriage moves to the center of the printer.
    Figure : Opening the ink cartridge access door
    Image: Opening the ink cartridge access door.
  3. Wait until the carriage is idle and silent before you continue.
  4. With the printer turned on, disconnect the power cord from the rear of the printer.
  5. Use a flashlight to check for any paper or objects that might be restricting the carriage, then remove any paper or objects that you find.
    Figure : Use a flashlight to check the carriage
    Image: Use a flashlight to check inside the printer
      caution:
    If the paper tears when you remove it from the rollers, check the rollers and wheels for torn pieces of paper that might remain inside the printer. If pieces of paper remain in the printer, more paper jams can occur.
  6. Reach inside the printer through the ink cartridge access door, then manually move the carriage.
    • If the carriage is stuck on the right side of the printer, move the carriage to the left side of the printer.
    • If the carriage is stuck on the left side of the printer, move the carriage to the right side of the printer.
    • If the carriage is stuck in the middle of the printer, move the carriage to the right side of the printer.
  7. Remove any paper or obstructions you find.
  8. Make sure the carriage can move freely across the width of the printer. Firmly push the carriage to the left side of the printer, then push it to the right side.
  9. Close the ink cartridge access door.
    Figure : Closing the ink cartridge access door
    Image: Closing the ink cartridge access door.
  10. Reconnect the power cord to the rear of the printer.
  11. Turn on the printer.
If the error persists, continue to the next step.

Step 3: Use automated tools to clean page smears

Cleaning the page smears with an automated utility can help clear paper jams.
  1. Make sure the printer is loaded with plain white paper.
  2. On the printer control panel, swipe the display to the left, and then touch Setup.
  3. Touch Tools.
  4. Swipe up on the display, and then touch Clean Page Smears.
    The printer slowly feeds a blank page.
  5. Wait for the printer to eject the blank page.

Step 4: Manually clean the paper feed rollers

Dust, paper fiber, and other debris might accumulate on the paper feed rollers and cause paper jams and paper feed issues. If this is the case, cleaning the rollers inside the printer can help resolve the issue.
  1. Gather the following materials:
    • Long, lint-free cotton swabs
    • A clean, lint-free cloth, or any cloth that does not come apart or leave fibers
    • Distilled, filtered, or bottled water (tap water might damage the printer)
  2. Turn on the printer, if it is not already on.
  3. Gently grasp the handles on either side of the printer, then raise the ink cartridge access door until it locks into place.
    The carriage moves to the center of the printer.
    Figure : Opening the ink cartridge access door
    Image: Opening the ink cartridge access door.
  4. Wait until the printer is idle and silent before you continue.
  5. While the printer is still on, disconnect the power cord from the rear of the printer, and then unplug the power cord from the power source or electrical outlet.
      warning:
    You must disconnect the power cord before reaching inside the printer to avoid the risk of injuries or electric shock.
  6. Disconnect the USB cable from the rear of the printer, if you have a cable connection to the computer.
  7. Locate the paper path cover, grasp the handle, and then lift up to remove it.
    Figure : Removing the paper path cover
    Image: Locating the paper path cover.
  8. Lightly dampen the swab with the water, and then squeeze any excess liquid from the swab.
  9. Use a flashlight to inspect the rollers. Press the swab against the rollers inside the printer, and then rotate the rollers upwards with your fingers.
    Apply a moderate amount of pressure to remove any dust or dirt buildup.
    Figure : Example of the rollers in the paper path access area
    Image: Example of the rollers in the paper path access area.
  10. Allow the rollers to dry completely (approximately 10 minutes).
  11. Replace the paper path cover, and then close the ink cartridge access door.
    Figure : Closing the ink cartridge access door
    Image: Closing the ink cartridge access door.
  12. Grasp the output tray, and then pull toward you to remove it.
  13. Pull out the input tray to its outermost position.
    Figure : Pulling out the input tray
    Image: Pulling out the input tray.
  14. Remove all paper from the input tray.
  15. Turn the printer onto its right side so you can access its underside. Make sure to hold the printer firmly with one hand to avoid tipping.
    Figure : Turning the printer onto its right side
    Image: Turning the printer onto its right side.
  16. Lightly dampen a clean, lint-free cloth with bottled or distilled water, and then squeeze any excess liquid from the cloth.
  17. Inspect the gap where the input tray was with a flashlight. Press the cloth against the rollers, and then rotate them upward with your fingers. Apply a moderate amount of pressure to remove any dust or dirt buildup.
    Figure : Example of the rollers underneath the printer
    Image: Example of the rollers underneath the printer.
  18. Allow the rollers to dry completely (approximately 10 minutes).
  19. Push in the input tray, and then return the printer to its normal position.
  20. Slide the output tray back onto the input tray.
  21. Reconnect the power cord to the rear of the printer, and then plug in the power cord to an electrical outlet.
  22. Reconnect the USB cable, if your printer has a cable connection to the computer.
  23. Turn on the printer.
    The printer might go through a warm-up period and the carriage might move. Wait until the warm-up period finishes before you proceed.
If the error persists, continue to the next step.

Step 5: Reset the printer

Sometimes a paper jam error persists even though there is no jammed paper (false paper jam). Resetting the printer might clear a false paper jam error.
  1. With the printer turned on, disconnect the power cord from the printer.
  2. Unplug the power cord from the power source.
  3. Wait 60 seconds.
  4. Reconnect the power cord to a wall outlet and to the printer.
    note:
    HP recommends plugging the printer directly into a wall outlet.
Try to print again. If the error persists, continue to the next step.

Step 6: Service the printer

Service or replace your HP product if the issue persists after completing all the preceding steps.
Go to Contact HP Customer Support to schedule a product repair or replacement. If you are in Asia Pacific, you will be directed to a local service center in your area.
To confirm your warranty status, go to HP Product Warranty Check. Repair fees might apply for out-of-warranty products.