solution Contentsolution Content

An 'Out of Paper' Message Displays for HP ENVY 4500 and Deskjet Ink Advantage 3540 e-All-in-One Printer Series

This document is for the HP ENVY 4500 e-All-in-One Printer series and the HP Deskjet Ink Advantage 3540 e-All-in-One Printer series.
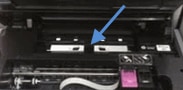
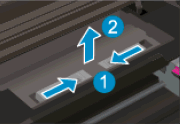
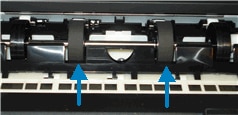
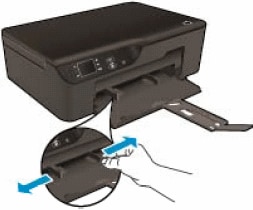
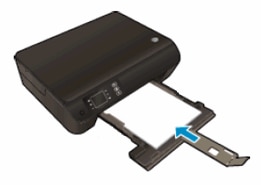
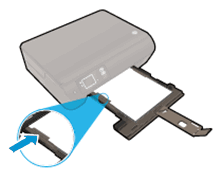
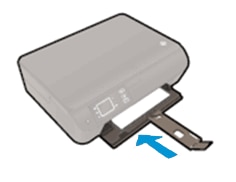
The printer does not pick up or feed paper from the tray, and An 'Out of paper' message displays on the control panel. The printer might make noises as though it is printing, but no paper moves through it. Check the condition of the paper, make sure that the printer rests on a flat surface, adjust the paper settings in the print driver, and clean the paper feed rollers to resolve the issue. In some cases, you need to service the printer.

Solution one: check the paper, and then reload

Paper feed issues might result from using ripped, dusty, curled, wrinkled, or bent paper. The quality of the paper can also make a difference. Use these guidelines to help avoid the issue.
  • Use only good quality paper that meets printer specifications.
  • Store all paper in a dry, cool place. Paper feed issues occur more often in humid environments.
  • Do not print on paper that is already printed. The dampness of the ink can cause the paper to stick together.
  • Wait for the printer to complete a job or for an Out of paper or Load Paper message to display before you reload the paper.

Step 1: check the condition of the paper

Make sure that the paper you use to print is in good condition and neatly stacked in the tray, and the paper path and tray are free from obstructions.
  1. With the printer turned on, disconnect the power cord from the rear of the printer.
  2. Remove the stack of paper from the tray.
  3. Check for obstructions inside the tray. Use a flashlight to view the mechanism inside the tray to make sure that nothing blocks the paper from engaging with the rollers. Even small pieces of paper can cause paper feed issues.
    note:
    If you find obstructions in the paper path, skip to the section on cleaning the rollers.
  4. Examine the condition of the paper, and then replace any ripped, dusty, curled, wrinkled, or bent paper.
  5. Make sure that all the paper in the stack is the same size and type. Never load mixed types of paper in the tray. The product can only process one type of paper at a time.
  6. Tap the stack of paper on a flat surface to align the edges.
  7. Make sure that the stack of paper contains no fewer than 10 sheets and no more than 25 sheets of paper.
    note:
    You need to use 10 to 25 sheets of paper only for purposes of these troubleshooting steps. When the issue is resolved, you can resume loading paper according to the paper tray capacity specifications for your product.
note:
To purchase paper in the United States and Canada, go to the HP Store.

Step two: make sure that the printer rests on a flat surface

  1. Gently turn the printer onto its right side.
    Image: Pull out the input tray
  2. Check the surface directly under and around where the printer sits for the following:
    • Pieces of paper trapped in the input tray
    • Small, hard objects, such as cables, pens, pencils, and books
    • Soft or uneven surfaces, such as placemats or carpet-like material
  3. Remove any obstructions that might remain.
  4. Turn the printer to its normal position.
  5. Reconnect the power cord to the rear of the printer, and then turn on the printer.
  6. Touch OK to clear any messages on the printer control panel.

Step 3: reload the paper

Load plain, white U.S. letter or A4 size paper in the printer. Make sure that the print side or shiny side of the paper is loaded face down in the tray.
  1. Open the paper tray door, and then pull it toward you to extend the paper tray.
  2. Gently pull out the paper tray extender, and then lift up the paper catch.
    Figure : Pulling out the paper tray and the tray extender
    Image: Pulling out the  paper tray and  the  tray extender
  3. Slide the paper width guides to their outermost position.
    Figure : Sliding out the paper width guides
    Image: Sliding out the paper width guides
  4. Load a stack of plain, white paper into the paper tray with the short edge forward, and then push the stack into the tray until it stops.
    Figure : Loading the paper
    Image: Loading the paper
  5. Slide in the paper width guides until they rest against the edges of the paper.
    Figure : Sliding in the paper width guides
    Image: Sliding in the paper width guides
  6. Push the paper tray forward until it clicks into place.
    Figure : Pushing the paper tray forward until it clicks into place
    Image: Pushing the paper tray forward until  it clicks into place

Step 4: print a printer status report

Print a test page to make sure that the printer hardware functions correctly. If the test page does not print successfully on the first try, load a different brand of plain paper or a different type of paper in the tray, and then try to print the test page again.
  1. On the printer control panel, press the Down Arrow () to select Tools, and then press OK.
  2. Press the Down Arrow () to select Printer Status Report, and then press OK. The printer prints the test page.
    Figure : Example of a Printer Status Report
    Image: Example of a Printer Status Report
  • If the test page prints successfully, continue to the next step.
  • If the test page does not print, skip to the next solution.

Step 5: try to print original document

If the test page printed successfully, try to print the original document again. If the document prints successfully, the issue is resolved.

Solution two: adjust the paper settings in the print driver

The printer might not pick up paper if the paper size and type in the paper tray do not match the paper size and type settings in the print driver. Select your operating system for steps to change the paper size and type settings in the print driver.

Solution three: clean the paper feed rollers

Dust, paper fiber, and other debris might accumulate on the paper feed rollers and cause paper feed issues. Follow these steps to clean the paper feed rollers.

Step 1: gather materials to clean the rollers

Gather these materials:
  • Long, lint-free cotton swabs
  • A clean, lint-free cloth, or any cloth that does not come apart or leave fibers
  • Distilled, filtered, or bottled water (tap water might damage the printer)

Step 2: clean the paper feed rollers

The paper feed rollers must be clean and function properly to feed paper.
  1. Press the Power button to turn off the printer, if it is not off already.
  2. Disconnect the power cord from the rear of the printer.
      warning:
    You must disconnect the power cord before reaching inside the printer to avoid risk of injuries or electric shock.
  3. Open the cartridge access door.
    Image: Open the cartridge access door
  4. Locate the paper path cover in the area behind the cartridge access area.
    Image: Locate the paper path cover
  5. To remove the paper path cover, pinch the tabs together, and then lift up.
      Image: Remove the paper path cover
    1. Pinch the tabs together
    2. Lift up
  6. Lightly dampen the swab with the water, and then squeeze any excess liquid from the swab.
  7. Press the swab against the rollers inside the printer, and then rotate the rollers upwards with your fingers. Apply a moderate amount of pressure to remove any dust or dirt buildup.
    Image: Clean the rollers inside the printer
  8. Allow the rollers to dry for 10 to 15 minutes.
  9. Check the rollers on the underside of the paper path cover. Make sure that the rollers are not missing, that they turn easily, and that they are springy when you press them. If the rollers are damaged, replace the paper path cover with a new one.
    Image: Check the rollers on the paper path cover
  10. Replace the paper path cover with the spring-loaded tabs facing toward the front of the printer. Gently press the cover down at the left and right edges. The cover clicks into place.
    note:
    Make sure that both edges of the paper path cover are in place.
    Figure : Replace the paper path cover
    Image: Replace the paper path cover.
  11. Close the cartridge access door.
    Image: Close the cartridge access door
  12. Reconnect the power cord to the rear of the printer, and then turn on the printer.
  13. Press OK to clear any messages on the printer control panel.

Step 3: print a printer status report

Print a test page to make sure that the hardware functions correctly.
  • If the test page prints successfully, continue to the next step.
  • If the test page does not print, skip to the next solution.

Step 4: try to print

If the test page printed successfully, try to print the original document again. If the document prints successfully, the issue is resolved.

Solution 4: service the printer

note:
Only service the product if you have already tried all of the previous solutions and the product does not print a self-test report on plain white paper.
Service or replace your HP product if the issue persists after completing all the preceding steps.
Go to Contact HP Customer Support to schedule a product repair or replacement. If you are in Asia Pacific, you will be directed to a local service center in your area.
To confirm your warranty status, go to HP Product Warranty Check. Repair fees might apply for out-of-warranty products.