This document contains information on how to perform print quality service procedures.
HP OfficeJet Pro X series - Print quality service procedures (Clean Printhead, Clean Ink Smear, and Cap Overnight)
Introduction
Clean the printhead
Click your printer model from the options below, and then follow the steps to clean the printhead.
X551, X476, and X576 models
note:Before beginning this process, print a Print Quality Report to compare with the reports that are printed during the printhead cleaning.
Use the following steps to clean the printhead:
-
Load the printer with regular, unused white paper.
-
From the Home screen, touch the Right arrow (
 ), and then touch Setup (
 ).
Figure : Example of the Home screen
).
Figure : Example of the Home screen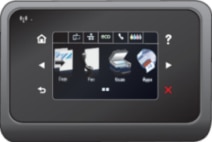
-
Touch the Right arrow () until Tools displays, and then touch OK.
-
Touch the Right arrow () until Clean Printhead displays, and then touch OK.
The cleaning process has several stages. After each stage, a Print Quality Report will print. Evaluate each of these pages to determine if the defect has been corrected. If the defect is corrected, there is no need to continue to the next cleaning step.
note:To avoid confusion, number each of the Print Quality Report pages that print. This way you can compare them to the previous reports to see if there has been an improvement after each cleaning cycle.
Level 1 printhead cleaning has two stages. The first stage takes approximately 45 seconds, and the second stage takes approximately 15 minutes. Level 2 printhead cleaning also has two stages. The first stage takes approximately 90 seconds. The second stage takes approximately 14 minutes.
You must be present at the printer at the end of the cleaning process to proceed to Level 2 printhead cleaning.
Do not run Level 3 printhead cleaning for PQ issues. Level 3 is intended for calibrations, not streaks, etc.
note:If the Print Quality Report has no defects, the ink system is working correctly and there is no reason to clean the printhead. Cleaning the printhead unnecessarily wastes ink and paper.
X451 model
note:Before beginning this process, print a Print Quality Report to compare with the reports that are printed during the printhead cleaning.
Use the following steps to clean the printhead:
-
Load the printer with regular, unused white paper.
-
From the Home screen, touch the button (
 ) next to Setup.
Figure : Example of the Home screen
) next to Setup.
Figure : Example of the Home screen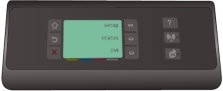
-
Press the bottom-right button () until Tools displays, and then press OK.
-
Press the bottom-right button () until Clean Printhead displays, and then press OK.
The cleaning process has several stages. After each stage, a Print Quality Report will print. Evaluate each of these pages to determine if the defect has been corrected. If the defect is corrected, there is no need to continue to the next cleaning step.
note:To avoid confusion, number each of the Print Quality Report pages that prints.
Level 1 printhead cleaning has two stages. The first stage takes approximately 45 seconds, and the second stage takes approximately 15 minutes. Level 2 printhead cleaning also has two stages. The first stage takes approximately 90 seconds. The second stage takes approximately 14 minutes.
You must be present at the printer at the end of the cleaning process to proceed to Level 2 printhead cleaning.
Do not run Level 3 printhead cleaning for PQ issues. Level 3 is intended for calibrations, not streaks, etc.
note:If the Print Quality Report has no defects, the ink system is working correctly and there is no reason to clean the printhead. Cleaning the printhead unnecessarily wastes ink and paper.
Clean ink smear
If ink is smeared on the back of the page, find your printer model in the table below, and then follow the steps provided to clean the ink smear.
|
X551, X476, and X576 models
|
X451 model
|
|
|
Cap overnight
Use this process if the unit has missing nozzles that were not recovered by Level 1 and Level 2 printhead cleaning.
note:Print a Print Quality Report before beginning this process to compare with the reports printed during the printhead cleaning.
-
Press the Power button to turn off the printer, and then leave the printer turned off overnight, or for 12 hours.
-
Make sure that the unit is capped by opening the ink cartridge door and verifying that the ink cartridges are in the up position.
-
After the printer has been off overnight, or for 12 hours, press the Power button to turn on the printer.
-
Print a new Print Quality Report and compare to the previous report.
-
Run Level 1 and Level 2 printhead cleanings, and then compare the PQ reports.
Troubleshooting tips
After troubleshooting, use the following steps to verify that the print quality issues have been resolved:
-
Retry your original print job.
note:
Printing the Print Quality Report can solve some problems. If the print job looks correct, you do not need to continue troubleshooting. -
If there are still defects on the print job, review the earlier steps in this document. Make sure that the ink and paper being used are appropriate and that the print settings are appropriate for the job you are trying to print.
The following suggestions might also help with some problems:
-
When printing an image, make sure that the image has sufficient resolution. Images that have been enlarged too much might appear fuzzy or blurry.
-
If the problem is confined to a band near the edge of a printout, use a software installed on your machine to rotate the image 180°. The problem might not appear on the other end of the printout.
-
Always use the Power button to turn off the printer. This protects the printhead from exposure to air.
Enter a topic to search our knowledge library
What can we help you with?

Need Help?