Download and install updates to the computer BIOS. This process is also known as 'flashing the BIOS'.
CAUTION:
Only install BIOS updates from HP. Installing the BIOS incorrectly can prevent the computer from starting or being recovered. If your computer is managed by
an IT service, contact them for the correct update process.
Updating the BIOS is recommended as standard maintenance of the computer. It can also help resolve the following issues:
-
An available BIOS update resolves a specific issue or improves computer performance.
-
The current BIOS does not support a hardware component or a Windows upgrade.
-
HP Support recommends installing a specific BIOS update.
CAUTION:
Your company IT department or local IT service might manage your computer BIOS settings. Confirm that the updated BIOS version
is compatible with your company's deployment environment.
Update the BIOS manually from within Windows
You can manually install a BIOS update when Windows opens and you have internet access.
Gather the required information about your computer
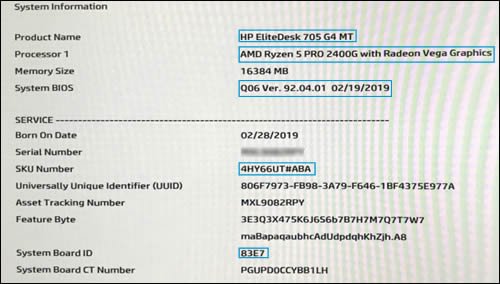
To find the correct BIOS update, get the computer product name and number, the processor name, and the BIOS version.
-
Press and hold the ctrl and alt keys, and then press c key to open the HP System information utility.
-
Write down the Product name, Product number, Processor Name, and System BIOS information.
-
If you are unable to access the system information using the above method, in Windows, search for and open System Information.
Prepare your computer for the BIOS update
To prevent possible problems, close any open applications, and temporarily disable antivirus software and BitLocker before
updating the BIOS.
-
Close any open applications.
-
Temporarily disable your antivirus software. In Windows, search for and open Security and Maintenance settings, and then click Security to access virus protection settings.
-
Temporarily disable BitLocker drive encryption. In Windows, search for and open Manage Bitlocker. Click Suspend protection, and then click Yes. Be prepared and have the BitLocker recovery key available.
CAUTION:
If BitLocker is not disabled, the next time you restart the computer the BitLocker key might not be recognized. If you do
not know the BitLocker recovery key, you might lose data or need to reinstall Windows.
Install the BIOS update
Download and install a BIOS update from the HP website.
-
-
Navigate to the product page for your computer.
-
Select BIOS from the list that displays, and then review any available BIOS updates.
CAUTION:
Read the Details section to confirm that the BIOS update is more recent then the one installed and that it applies to your computer. Installing
the wrong BIOS could cause your computer to stop working.
-
If you do not see a BIOS update listed for your computer, no update is currently available.
-
If there are multiple BIOS updates available, identify the motherboard installed on your computer using the information from the System Information utility.
-
If you find a BIOS update, click Download. If HP Download and Install Assistant displays, select Download only, and then click Next. Click Save to save the BIOS update file on your computer.
-
Browse to the folder or desktop where you saved the downloaded BIOS update file, and then double-click the file name (example:
sp12345) to start the installation.
Wait for the computer to install the update. The computer might beep, turn off and on the display or cooling fans, or display
a blinking power light. This is normal.
CAUTION:
Do not turn off or restart the computer until the update process completes.
-
Click Yes on the User Account Control screen.
-
On the InstallShield Wizard window, click Next.
-
Select I accept the terms in the license agreement, and then click Next.
-
If a Location to Save Files window displays, click Next.
-
On the HP BIOS Update and Recovery window, click Next.
Note:
Windows that display during the update process might vary depending on your computer.
-
Select Update, and then click Next to prepare the update.
-
Click Restart Now to install the update.
-
On the HP BIOS Update screen, click Apply Update Now, or wait for the update to start automatically.
-
Wait while the BIOS update installs. The computer displays the installation progress.
-
When prompted, click Continue Startup, or wait for the computer to restart automatically. It might take a few minutes for the computer to restart.
Note:
If the update fails, a failure screen displays with additional information. The system might run a BIOS recovery after restarting.
Do not attempt to turn off the computer if this happens.
-
When the lock screen displays, sign in to your computer.
-
If Bitlocker was suspended, search Windows for bitlocker, and then click Resume Protection.
-
Re-enable your antivirus software.
Update the BIOS manually from a USB flash drive (outside of Windows)
If Windows does not open, use a second working computer with internet access to download the BIOS update. Copy the update
file to a USB flash drive and install it on the original computer.
CAUTION:
If BitLocker protection is enabled on your computer, the BitLocker recovery key is required to start your computer after the
BIOS update. Windows might need to be reinstalled if you do not have the key or the key is not recognized after the update.
Gather the required information about your computer
To find the correct BIOS update, obtain the computer Product Name, Processor name, System BIOS, SKU Number (product number),
and the System Board ID.
-
Turn on the original computer with the issue, and then immediately press the esc key repeatedly until the Startup Menu opens.
-
Press the f1 key to open System Information.
-
Write down the Product Name, Processor name, System BIOS, SKU Number (product number), and the System Board ID.
-
Turn off the computer.
Set up the BIOS update on a USB flash drive
Use a second computer with internet access to create a BIOS recovery USB flash drive.
-
Insert a blank USB flash drive into an available port on the second computer.
-
Go to the HP Software and Driver Downloads page.
-
Navigate to the product page for your computer.
-
Select BIOS from the list that displays, and then review any available BIOS updates.
CAUTION:
Read the Details section to confirm that it applies to the computer. Installing the wrong BIOS could cause the computer to
stop working.
-
If you do not see a BIOS update listed for your computer, no update is currently available.
-
If there are multiple BIOS updates available, identify the motherboard or system board installed on your computer using the information from the System Information utility.
-
If you find a BIOS update, click Download. If HP Download and Install Assistant displays, select Download only, and then click Next. Click Save to save the BIOS update file on your computer.
-
Browse to the folder or desktop where you saved the downloaded BIOS update file, and then double-click the file name (example:
sp12345) to start the installation.
The computer might beep, turn off and on the display or cooling fans, or display a blinking power light. This is normal.
CAUTION:
Do not turn off or restart the computer until the update process completes.
-
Click Yes on the User Account Control screen.
-
On the InstallShield Wizard window, click Next.
-
Select I accept the terms in the license agreement, and then click Next.
-
If a Location to Save Files window displays, click Next.
-
In the HP BIOS Update and Recovery window, click Next.
Note:
Windows that display during the update process might vary depending on your computer.
-
Select Create Recovery USB flash drive, and then click Next.
-
Select your USB flash drive, and then click Next.
-
Wait while the BIOS files copy to the USB flash drive.
-
When the message The recovery flash drive was created successfully displays, click Finish.
-
If necessary, click Cancel to close the update utility.
-
Remove the flash drive from the computer.
Update the BIOS with a USB flash drive
Use the Hardware Diagnostics UEFI on the original computer to update the BIOS.
-
Turn on the original computer, and then immediately press the esc key repeatedly, about once every second, until the Startup Menu opens.
-
Press the f2 key to open the HP PC Hardware Diagnostics UEFI menu.
-
Insert the USB flash drive that contains the BIOS update into an available USB port on the computer.
-
If prompted, select your language.
-
Click Firmware Management or BIOS Management.
-
Click BIOS Update.
-
Click Select BIOS Image to Apply.
-
Click HP_TOOLS-USB Drive.
-
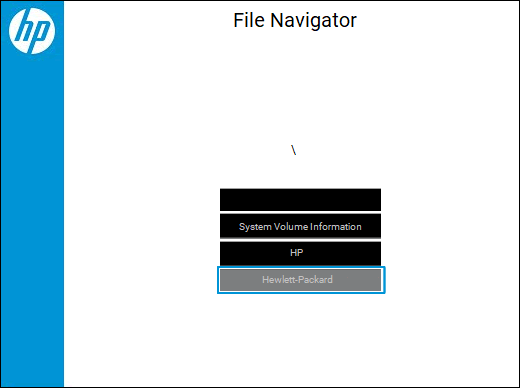
Click Hewlett-Packard.
Standard example of the File Navigator screen

-
Click BIOS.
-
Click Current.
-
Select the BIOS update file that matches the System Board ID. The ID has a "0" before the board ID (example: 02291.bin).
-
Click Apply Update Now. Type the administrator password if prompted.
-
Wait while the BIOS update installs. The computer displays the installation progress.
CAUTION:
Do not shut down or restart the computer until the update process completes.
-
When prompted, click Restart System, or wait for the computer to restart automatically. It might take a few minutes for the computer to restart.
Note:
If the update fails, a failure screen displays with additional information. The system might run a BIOS recovery after restarting.
Do not attempt to turn off the computer if this happens.
-
When the lock screen displays, sign in to your computer.

