An image scanned by the HP DesignJet T830 MFP may be saved on a USB flash drive or in a network folder. The USB flash drive option requires no preparation, but the network folder option will not work until it has been set up in the following way.
note:Images can also be sent by email, scanned using the Webscan tool in the Embedded Web Server or sent to PC using the printer as a scanner device (only for Windows).
The printer accesses shared folders (as a client) using NTLMv2-based authentication. If, for security reasons, you prefer not to expose user credentials using NTLMv2, you should avoid using a scan-to-network folder.
note:Check “DESIGNJET T830 MFP Series - Using Your Product,” in the Access the Embedded Web Server section, for additional information on how to access the printer’s Embedded Web Server.
Create a scan-to-network folder using Windows
-
Create a new user account for the 'scanner user' on the remote computer. You can use an existing user account for this purpose, but it is not recommended.
-
Create a new folder on the remote computer (unless you want to use an existing folder).
-
Right-click the folder and select Properties.
-
In the Sharing tab, click the Advanced Sharing button.

-
Check the Share this folder box.

-
You need to ensure that the 'scanner user' has full read/write control over the shared folder. To do this, click Permissions and grant Full Control to the user (or to any suitable group that includes that user).

-
If there is a Security tab in the Properties window for your folder, then you must also grant the same user Full Control over the folder in the Security tab. Only some file systems such as NTFS require this.
 The 'scanner user' can now access the folder and write files to it. Next, you must configure the printer to send scans to the folder.
 -
In the Home screen of the printer's Embedded Web Server, select the Scan to network tab.

-
On the Scan to Network page, click the Add button:

note:
If the printer has already been configured for scanning to the network and you now want to modify a shared folder, click Edit. -
Assign a name for the folder that is being set up and its network path:(This name is for the EWS and the Printer Touch Panel, it is not linked to the PC folder name.)
 In the Network Path field:
-
Type “”\\”, enter the name or IP address of the remote computer (or server), type “\”, then the name of the shared folder.Example: \\PC_Mike3\FolderScanExample: \\15.87.213.43\FolderScanTIP: You can see that the network path to your folder is needed in this step. In order to retrieve it, right-click on the computer folder created, select Properties > Sharing.

-
IMPORTANT: Use the IP address in case the set-up has issues.If the printer and the network folder are on different networks, or if the remote computer is not running Windows, then you must use the IPv4 address instead of the name of the remote computer. On IPv6 networks the IPv6 address is also supported.
-
-
Configure the Log-in authentication options.Log-in Authentication options:
-
No Credentials: Only available in MacOS environment.
-
Always use the following credentials: When a user and password is required to access the computer folder.
Authentication RequirementsEnter the log-in user name and password for the computer/server to allow the printer to save scanned documents and images in the network folder.note:
User name and password are stored and encrypted, in printer memory.note:
Type the user domain in the User name field if the user is a member of a Windows domain. Contact your IT manager in case of doubt.Security PIN Option (Recommended)Create a 4-digit security PIN to prevent unauthorized people from saving scanned documents in this network folder. This security PIN must be entered at the printer's control panel before any scanned documents can be saved to the folder.
-
-
Configure Scan settigns.The printer will use these settings for all scanned documents that are saved in the network folder.Original Size: The only available option is Automatic.Darkness: From 1 (lighter) – 9 (darker).File Name Preview: File name result based on the configurations below.File Name Prefix (not editable during the scan): Date, Time Username added as a prefix.Default File Name: Default scan name.Check this box in order to make it editable during the scan.File Name Prefix (not editable during the scan): Date, Time, Username added as a prefix.Default File Type: Default file type.Check this box for making it editable during the scan.Default Color Preference: Color or Black/Gray.Default Output Quality: Low (small file), Medium, High (large file).Black TIFF Compression: Always G4.Color/Grayscale TIFF Compression: TIFF 6.0 or TIFF (Post 6.0).

-
Click Save and Test to validate the configuration (this might take several minutes).
 The following results are possible:

-
If you are unable to complete this last step, try the following:
-
Check that you have filled in each field correctly.
-
Check that the printer is connected to the network.
-
Check that the remote computer is switched on, working normally and is connected to the network.
-
Check that the folder is shared in the PC.
-
Check that you can put files into the same folder from a different computer on the network, using the printer's logon credentials.
-
Check that the printer and the remote computer are on the same network subnet; if they are not, check that the network routers are configured to forward CIFS protocol traffic (also known as Samba).
You can check at any later time that the shared folder remains accessible by clicking Test in the Embedded Web Server.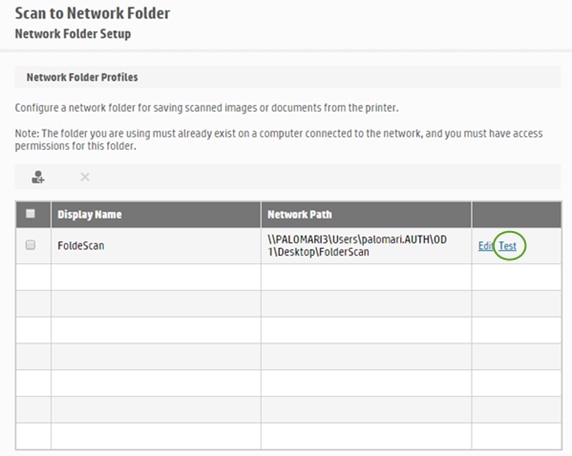 A correctly configured shared folder can become inaccessible if the user’s password is changed, or if the shared folder is moved or deleted.
 -
Create a scan-to-network folder using Mac OS
-
Create a new user account for the 'scanner user' on the remote computer. You can use an existing user account for this purpose, but it is not recommended.
-
Create or choose a folder on the remote computer. By default, Mac OS users have a “Public Folder” that can easily be used for this purpose.

-
Open System Preferences and select the Sharing icon.

-
Make sure the 'scanner user' has Read & Write access to the folder.


-
Click Options.
-
Check the Share files and folder using SMB box, and make sure that the 'scanner user' is checked in the On column.

-
Click Done. You will now see file sharing enabled and Windows sharing ON.The 'scanner user' can now access the folder and write files to it. Next, you must configure the printer to send scans to the folder.
-
From the Home screen of the printer's Embedded Web Server, select the Scan to network tab.
-
On the Scan to Network page, click the Add button:
note:
If the printer has already been configured for scanning to the network and you now want to modify a shared folder, click Edit. -
Assign a name for the folder that is being set up and its network path:(This name is for the EWS and the Printer Touch Panel, it is not linked to the PC folder name.)
-
Type “”\\”, enter the IP address of the remote computer (or server), type “\”, then the name of the shared folderExample: \\15.87.213.43\FolderScan
-
On IPv6 networks the IPv6 address is also supported.
-
-
Configure the Log-in authentication options.Log-in Authentication options:
-
No Credentials: No user and password necessary to access folder on computer.
-
Always use the following credentials: When a user and password is required to access the computer folder.
Authentication RequirementsEnter the log-in user name and password for the computer/server to allow the printer to save scanned documents and images in the network folder.note:
User name and password are stored and encrypted in printer memory.Security PIN Option (Recommended)Create a 4-digit security PIN to prevent unauthorized people from saving scanned documents in this network folder. This security PIN must be entered at the printer's control panel before any scanned documents can be saved to the folder.
-
-
Configure Scan settings:The printer will use these settings for all scanned documents that are saved in the network folder.Original Size: The only available option is Automatic.Darkness: From 1 (lighter) – 9 (darker).File Name Preview: File name result based on the configurations below.File Name Prefix (not editable during the scan): Date, Time Username added as prefix.Default File Name: Default scan name.Check this box in order to make it editable during the scan.File Name Prefix (not editable during the scan): Date, Time Username added as prefix.Default File Type: Default file type.Check this box in order to make it editable during the scan.Default Color Preference: Color or Black/Gray.Default Output Quality: Low (small files), Medium, High (large files).Black TIFF Compression: Always G4.Color/Grayscale TIFF Compression: TIFF 6.0 or TIFF (Post 6.0).
-
Click Save and Test to validate the configuration (this might take several minutes):
The following results are possible:
-
If you are unable to complete this step, try the following:
-
Check that you have filled in each field correctly.
-
Check that the printer is connected to the network.
-
Check that the remote computer is switched on, working normally and is connected to the network.
-
Check that the folder is shared on the PC.
-
Check that you can put files into the same folder from a different computer on the network, using the printer's logon credentials.
-
Check that the printer and the remote computer are on the same network subnet; if they are not, check that the network routers are configured to forward the CIFS protocol traffic (also known as Samba).
You can check at any later time that the shared folder remains accessible by clicking Test in the Embedded Web Server.
Finally, a correctly configured shared folder can become inaccessible if the user’s password is changed, or if the shared folder is moved or deleted. -
