solution Contentsolution Content

HP OfficeJet 250 Mobile Printers - Replacing Ink Cartridges

This document is for HP OfficeJet 250, 250C, 252, 252C, and 258 Mobile All-in-One printers.
Replace ink cartridges that are low or out of ink with new, genuine HP cartridges.
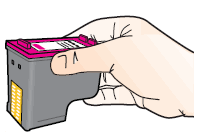
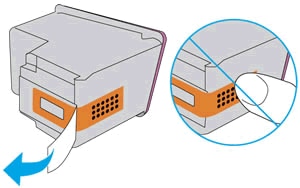
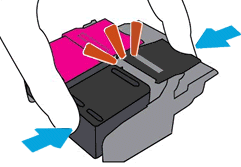
Video overview

This video shows you how to replace the ink cartridges in your printer.
Replacing an Ink Cartridge on HP OfficeJet 200 and 250 Mobile Printers
Learn how to replace and ink cartridge in HP OfficeJet 200 Mobile and 250 Mobile All-in-One printers.

Replace the ink cartridge

Replace any low or empty ink cartridges.
  1. Turn on the printer.
  2. Make sure plain white paper is loaded in the input tray.
  3. Open the ink cartridge access door.
    Figure : Opening the ink cartridge access door
    Image: Lift the ink cartridge cover
  4. Wait until the printer is idle and silent before you continue.
  5. To release the ink cartridge, lift the ink cartridge latch.
    Figure : Opening the ink cartridge latch
    Image: Release the ink cartridge latch
  6. Remove the ink cartridge from its slot.
  7. Remove the replacement ink cartridge from its package. Be careful to touch only the black plastic on the ink cartridge.
    Figure : Holding the ink cartridge by its sides
    Image: Hold the ink cartridge by its sides.
  8. Remove the plastic tape from the ink cartridge.
      caution:
    Do not touch the copper-colored contacts or the ink nozzles.Do not replace the protective tape on the contacts. Handling these parts can result in clogs, ink failure, and bad electricalconnections.
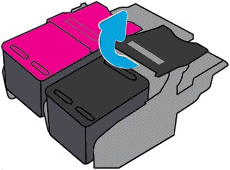
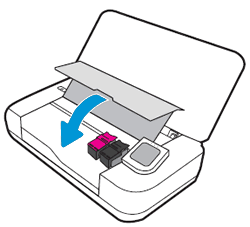
    Figure : Removing the plastic tape
    Image: Removing the plastic tape
  9. Insert the new ink cartridge into its slot, and then press the ink cartridge forward until it snaps into place.
    note:
    Install the color ink cartridge on the left and the black ink cartridge on the right.
    Figure : Closing the ink cartridge latch
    Image: Making sure the ink cartridge is snapped into place
  10. Repeat these steps for the other ink cartridge, if necessary
  11. Close the ink cartridge access door.
    Figure : Closing the ink cartridge access door
    Image: Closing the ink cartridge access door
  12. The printer automatically aligns any newly installed ink cartridges.
    If the printer did not automatically align the ink cartridges, align the ink cartridges from the printer control panel:
    1. From the home screen on the printer control panel, swipe down to open the Dashboard, and then touch the Setup icon .
    2. Swipe up on the display, touch Printer Maintenance, touch Align Printer, and then touch Continue.
      An alignment page prints.
      Figure : Example of an alignment page
      Example of an alignment page

Frequently asked questions (FAQs)

Review the list of frequently asked questions about replacing the ink cartridges.