solution Contentsolution Content

HP OfficeJet 7740, 8210, 8700 Printers - Replacing the Printhead

This document is for the HP OfficeJet Pro 8210, 8216, and 8218, OfficeJet 8702, OfficeJet Pro 7740 Wide Format, OfficeJet Pro 8710, 8715, 8717, 8718, 8719, 8720, 8725, 8728, 8730, 8732M, 8740, and 8745 All-in-One printers.
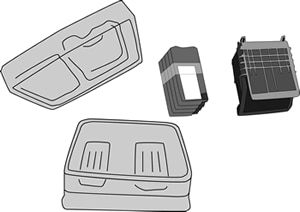
A new printhead assembly might need to be installed when the existing printhead assembly is damaged or incompatible with the printer. Replacement printhead assemblies are available only from HP Support and authorized service providers.
note:
The instructions in this document only apply to black ink cartridges for the HP OfficeJet Pro 8732M printer.

Step 1: Order the printhead

If HP replaces your printhead assembly under warranty, a new printhead assembly kit is sent with instructions and a set of SETUP ink cartridges. If you use HP Instant Ink, you might also receive a new set of HP Instant Ink cartridges. You must install the SETUP ink cartridges first, or an ink cartridge error occurs.
If your printhead assembly is no longer under warranty, you can purchase a new one online.
  1. Go to HP Parts Store (in English), and then select your country/region and language combination, if prompted.
  2. In the Find your part search box, type M0H91A, and then press Enter.
  3. Follow the on-screen instructions to order the printhead assembly.

Step 2: Remove the printhead

Remove the printhead with the ink cartridges installed before installing the new printhead.
  1. Turn on the printer.
  2. Open the ink cartridge access door.
  3. Wait until the carriage is idle and silent before you continue.
  4. Lift the carriage latch handle to unlock the printhead.
    Lifting the carriage latch handle
  5. Without removing the ink cartridges, grasp the sides of the printhead, and then lift the printhead and pull it toward you.
    note:
    To avoid ink stains, do not touch the bottom of the printhead.
    Removing the printhead
  6. Place the printhead face-up on a sheet of paper, and then set aside.

Step 3: Insert the new printhead

Remove the new printhead from the package, insert it into the printer, and then lower the carriage latch handle.
  1. Remove the new printhead and SETUP ink cartridges from the package, and then set the ink cartridges aside.
      caution:
    Do not touch the electrical contacts or the nozzles. Touching these areas can cause electrical failures or print quality problems.
    Removing the new printhead and ink cartridges from the package
    Image: Do not touch the electrical contacts or nozzles on the printhead
  2. Grasp the printhead on both sides with the electrical contacts facing the rear of the printer, and then insert the printhead into the carriage.
    Image: Insert the new printhead
  3. Carefully lower the carriage latch handle until it snaps into place.
    Image: Lower the latch handle on the carriage

Step 4: Insert the SETUP ink cartridges

Make sure plain white paper is loaded into the input tray, and then insert the SETUP ink cartridges that shipped with your replacement printhead. You must install the SETUP ink cartridges, or an ink cartridge error occurs.
  1. Make sure plain white paper is loaded into the input tray.
  2. Remove the SETUP ink cartridge from its package.
  3. Carefully insert the SETUP ink cartridge into its slot, and then push the ink cartridge forward until it snaps into place.
    Image: Insert the ink cartridge into its color-coded slot
  4. Repeat these steps for the other SETUP ink cartridges.
  5. Make sure each ink cartridge is not sticking out farther than the other ink cartridges.
    If an ink cartridge is sticking out, push it until it snaps into place.
  6. Close the ink cartridge access door.
    The printer starts an initialization process. It is normal for the printer to make noises during this process. After the process completes, the printer prints an alignment page.

Step 5: Return the failed parts to HP

If you received a post-paid padded mailer with your printhead replacement kit, return the failed parts to HP for analysis. If you did not receive a post-paid padded mailer, recycle the printhead and ink cartridges. For more information, go to Product return and recycling (in English).
  1. Place the old printhead with the ink cartridges installed in the plastic package, and then close the package.
    Image: Place the old printhead and ink cartridges in the package
  2. Put the plastic package that contains the old parts, the form that came with the new parts, an example print page showing the issue, if available, into the provided post-paid padded mailer, and then mail the package.
    Image: Put the old parts, form, and print sample into the bag