solution Contentsolution Content

HP Designjet Printers - Driver Installation Problems in Microsoft Windows XP Running Service Pack 2

Introduction

Due to recent network security issues, Microsoft has recommended that Microsoft Windows XP users enable the XP Internet Connection Firewall. Microsoft has released Service pack 2, which enables this firewall by default.
When enabled, the XP Internet Connection Firewall blocks incoming broadcast and multicast traffic from the network. As the HP Designjet Software Setup CD relies on broadcast messages from printers for automatic discovery (installing and using), it may not operate correctly when the firewall is enabled. While HP is working with Microsoft on these issues, this document provides some current recommendations if you experience difficulty installing and using the printer over a network.
  caution:
This document recommends disabling the firewall as a possible option during printer installation and use. By disabling the firewall, computers that access the Internet will increase the risk of serious damage by viruses and other security attacks. HP strongly recommends the following:
  • A hardware device that provides firewall protection, such as a gateway, be installed between the Internet and your local computer network.
  • An up-to-date virus detection program be installed on your network computers.

Installing the printer on a Windows XP system running SP2

To install your network printer when your XP Internet Connection Firewall is enabled, use one of these options:
  • Use the discovery option of the HP software in which you identify the specific printer by its IP or IPX address
  • Temporarily disable the "Internet Connection Firewall" during installation, then re-enable the firewall after installation

Using the discovery option

On some networks, IP addresses are dynamically assigned (for example, by a DHCP server) and may change. If the XP Internet Connection Firewall is enabled and the printer's IP address is dynamically changed, HP software will not be able to automatically rediscover the printer. To avoid losing the connection to the printer if its IP address is changed, use one of these options:
  • Manually assign a static IP address to the printer. A static IP address can be assigned using HP installation software and other configuration tools, such as Telnet, embedded Web server, and printer control panel or management software. For more information, see the HP Jetdirect Administrator's Guide on the HP Jetdirect CDROM.
  • If using a DHCP server, configure the server to assign a static IP address on the printer.
To manually assign a static IP address to the printer
Follow the procedures below from the HP Designjet Software Setup CD:
  1. Select the Language.
  2. Select Install printer driver.
  3. Accept the Warnings and the License agreement.
  4. Select the Designjet product to be installed.
  5. Select Typical Installation.
  6. Select Connected over a network.
  7. Select Direct Network Setup.
  8. Select Specify printer by address.
  9. Enter the IP address of the printer (obtain the IP address by printing the Configuration Plot, or in some Designjet printers the front panel also contains this information).
  10. Click Next and continue with the installation process.
    Figure : Specify printer by address

Disabling the firewall during installation

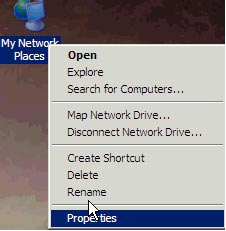
  1. Right-click My Network Places and select Properties.
    Figure : My Network Places
    note:
    For some desktops, click Start, Control Panel, Network and Internet Connections, Network Connections.
  2. Right-click the network that the computer and printer or peripheral is on (Local Area Connection or Wireless Network Connection) and then select Properties.
  3. Click the Advanced tab and uncheck the Internet Protection Firewall. For some Wireless Network Connection screens, there will be an Advanced button on the tab as well. Be sure to click on the tab.
    Figure : Internet Connection Firewall
  4. To leave the firewall enabled, but allow access through certain ports, leave the check box checked and then click Settings.
    note:
    For more information on using the firewall, refer to the Microsoft support Web site.
  5. Click OK.