solution Contentsolution Content

HP LaserJet - Install the driver for an HP printer on a network in Windows 7 or Windows 8/8.1

Introduction

To determine whether the printer is supported or to view a list of HP LaserJet drivers and software available for use in Windows, go to one of the following support pages:
Many HP LaserJets come with a driver provided in Windows Update or built into the Windows operating system (OS) also known as "In OS". For some LaserJets, these are the only drivers available for the printer and you do not need to download anything from www.hp.com.
If the printer is supported, you can obtain the driver one of four ways:

Method one: Connect to a network and enable auto discovery (Windows 8/8.1 only)

Windows  8/8.1 has an auto-setup feature that is enabled by default for all computers and printers on a small network with 30 devices or less.
note:
If your environment has more than 30 devices, this feature might be disabled. To enable this feature, contact your system administrator or IT help desk.
When you first connect the computer to a network, the operating system prompts you to allow Windows to discover devices and printers on home and work networks. If allowed, Windows automatically detects the printer and downloads and installs the correct HP driver software (where available) for devices and printers. This requires that network is not part of domain and that the user has Administrator privileges.
If you already received this prompt and either opted out or selected a public network, skip to Method two to manually install from Windows Devices and Printers.
If you already tried this Method but for some reason the driver did not automatically install, or you experience one or more of the following scenarios, continue to Method two: Install the driver now from Windows Devices and Printers:
  • Unable to print
  • Unable to scan
  • Loss of functionality
  • Driver is not listed
  • Driver is listed but it does not work

Method two: Install the driver now from Windows Devices and Printers

Use this method to install the In OS driver when the printer is connected to a network with 30 or less devices, or if you do not have an internet connection:
note:
If your environment has more than 30 devices, this feature might require administrator credentials. If so, contact your system administrator or IT help desk.
  1. Connect the network cable to the printer.
  2. Make sure that the printer IP address or hostname is available.
    note:
    If you do not know or have the printer IP address, print a configuration page that contains the printer IP address. For instructions see the user guide that came with the printer.
  3. Open Devices and Printers.
  4. Find the printer.
    1. Select Add a printer.
    2. In Windows 8/8.1, select The printer I want isn't listed while Windows is searching for available printers.
    3. Select the Add a local printer... option.
    4. Select Create a new port, select HP Standard TCP/IP Port option from the drop-down list, and then select Next.
    5. Type the printer IP address (or Printer host name) and select Next.
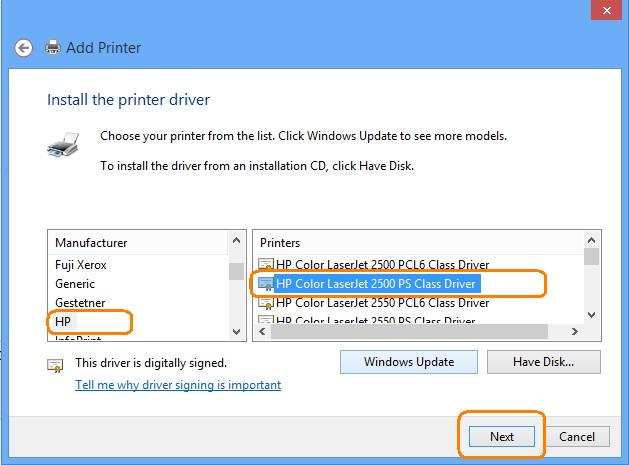
    6. Select HP from the Manufacturer list and then carefully scroll through the list to find your printer.
      note:
      If your printer is not listed, see Method three: Install the driver using Windows Update or when connected to a different subnet.
  5. Select the printer driver and then select Next.
  6. Use the default or type a new printer name and then select Next.
    note:
    If prompted, select Do not share this printer and then select Next.
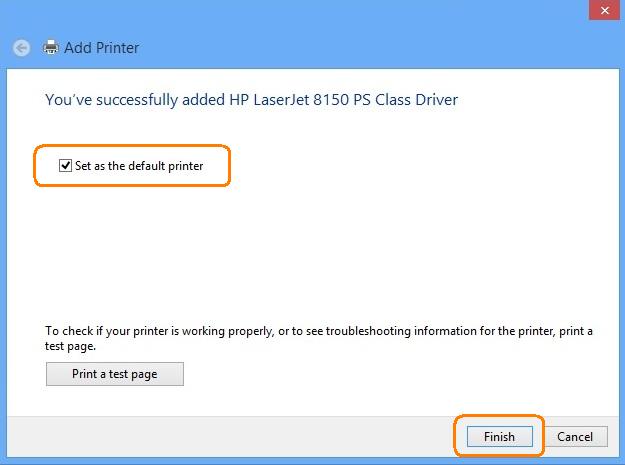
  7. Select Set as the default printer, and then select Print a test page, or select Finish to complete the installation and close the window.
    note:
    If the test page does not print, restart the computer. If the issue persists, or if you want more printer features than the In OS driver provides, see Method three: Install the driver using Windows Update or when connected to a different subnet.

Method three: Install the driver using Windows Update or when connected to a different subnet

note:
If internet access is not available or if your company restricts access to Windows Update, contact the system administrator or IT help desk.
  1. Connect the network cable to the printer.
  2. Make sure that the printer IP address or hostname is available.
    note:
    If you do not know or have the printer IP address, print a configuration page that contains the printer IP address. For instructions see the user guide that came with the printer.
  3. Make sure the computer is connected to the internet.
  4. Open Devices and Printers.
  5. Find the printer.
    1. Select Add a printer.
    2. In Windows 8/8.1, select The printer I want isn't listed while Windows is searching for available printers.
    3. Select the Add a local printer... option.
    4. Select Create a new port, select HP Standard TCP/IP Port option from the drop-down list, and then select Next.
    5. Type the printer IP address (or Printer host name) and select Next.
  6. Select Windows Update and then wait for the update process to complete.
    note:
    The Windows Update process can take some time to complete (depending on the environment this can take up to an hour or more). Do not interrupt the update process and be sure to wait for the process to finish.
  7. Select HP from the Manufacturer list, select the driver from the Printers list, and then select Next.
    note:
    The printer drivers might not be listed in alpha or numerical order. Be sure to carefully scroll through the list to find the correct printer model.
    note:
    If you have previously installed this printer model, you may be prompted to use the driver that is currently installed. If so, select Replace the current driver and then select Next.
  8. Use the default or type the printer name and then select Next.
    note:
    If prompted, select Do not share this printer and then select Next.
  9. Select Set as the default printer, and then select Print a test page, or select Finish to complete the installation and close the window.
  10. Confirm that the printer is installed.
    note:
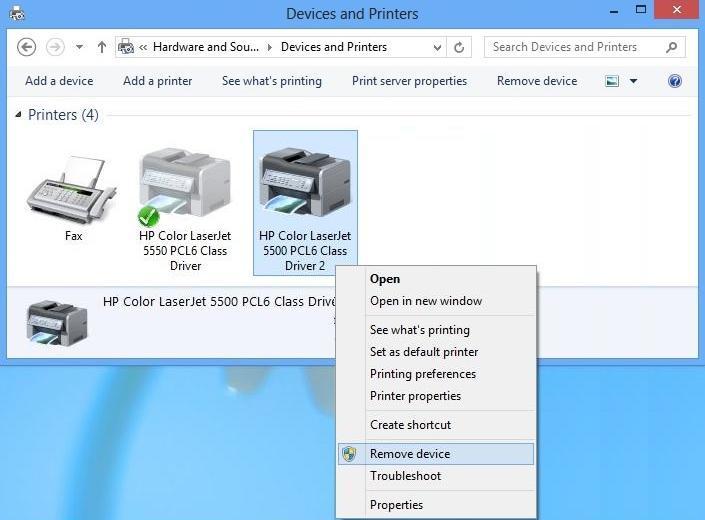
    If you have two printers listed in Devices and Printers and you only want one, remove the printer that is not selected as the default. To remove it, right-click the printer that is not selected as the default and the select Remove device.
    If you were not able to successfully install the print driver included in Windows Devices and Printers, see the Troubleshooting section.

Method four: Download the driver for later use or use on another computer

If you plan to install the driver on the same computer that you are currently using, skip to Download and install the driver on your computer now. To download the Windows Update driver to install later or on another computer, follow these steps:
note:
These steps are typically intended for system administrators and IT Help Desk professionals. These steps can also be used by customers that are unable to connect to Windows Update or otherwise want an alternative option to obtain the driver file.
  1. Go to Microsoft Knowledge Base article 323166 and read the instructions before proceeding.
  2. Go to the Microsoft Update Catalog (http://catalog.update.microsoft.com) and, if prompted, create a username and login.
    note:
    To view a list of frequently asked questions about the Microsoft Update Catalog, go to the following Microsoft Web site http://catalog.update.microsoft.com/v7/site/Faq.aspx.
  3. Type the HP printer name in the search field, and then select Search.
  4. In the Microsoft Update Catalog search results, locate the driver under the Classification column indicated by Drivers (Printers), select the driver option with the most recent date indicated in the Last Updated column, and then select Add.
  5. Repeat this process for any additional print drivers in Windows 8 or Windows 8.1 and then download the updates.
  6. Follow Microsoft's instructions to extract and install the driver(s) as described in Microsoft Knowledge Base article 323166.

Driver types in Windows Devices and Printers or Windows Update

The PCL6, PCL5, and PS driver options that you find listed in Windows Devices and Printers vary slightly. Use the following table as a guide to help you choose which driver is best for your printing needs.
note:
PCL5 is NOT supported in Windows  8/8.1.
Driver type
When to use
PCL6
  • Recommended for most printing needs from general office applications used for word processing or spreadsheet applications, etc.
PS (PostScript)
  • When you know that you have a postscript printer;
  • When printing from Adobe or other highly graphic intensive applications;
  • When printing documents containing a significant number of graphics or macros;
  • When printing in a mixed environment, for example, printing from both Windows and Macintosh applications.
note:
Printer must have PS printing capability to use this driver.
note:
The 'Class' driver listed in Devices and Printers is typically the In OS driver. This driver is not recommended unless no other option is available. For more information about recommended drivers, go to Drivers and software support for Windows 7 or Drivers and software support for Windows 8/8.1. (c03365145) (in English).

Troubleshooting

If you have trouble during installation, use the following tips to help ensure a successful installation:
  • Make sure the computer on which you want to install the driver is connected to the internet.
    note:
    You will need access to the internet to obtain drivers from Windows Update. Some companies may limit access to internet or to Windows Update. If you are unable to access the internet or Windows Update, contact your system administrator or IT Help desk.
  • If necessary, temporarily disable your firewall to use Windows Update.
  • Make sure that the printer is powered on and is properly configured.
  • Make sure that the printer is supported. Go to Products Not Supported in Windows.
If you were not able to successfully install the print driver included in the Windows  OS or Windows Update, there may be another driver option available for the printer, or the printer may not be supported. Go to one of the following support pages for more information: