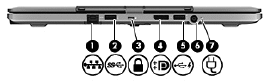
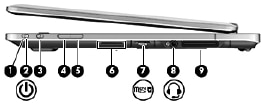
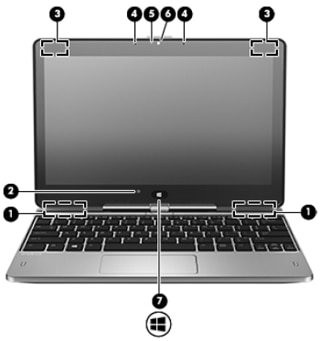
solution Contentsolution Content

HP EliteBook Revolve 810 G1 Tablet - Identifying Components

Display

Figure : Display
Item
Component
Description
1
WLAN antennas (2)
Send and receive wireless signals to communicate with wireless local area networks (WLAN).
2
Ambient light sensor
Brightens or dims the display in response to ambient light.
3
WWAN antennas (2)
Send and receive wireless signals to communicate with wireless wide area networks (WWAN).
4
Internal microphones (2)
Record sound
5
Webcam light
On: The webcam is in use
6
Webcam
Records video and captures still photographs. For information on using the webcam, access HP Support Assistant. To access HP Support Assistant on the Start screen, select the HP Support Assistant app.
7
Windows Home button
Returns to the Start screen.
note:
The antennas are not visible on the outside of the computer. For optimal transmission, keep the areas immediately around the antennas free from obstructions. To see wireless regulatory notices, see the section of the Regulatory, Safety, and Environmental Notices that applies to your country or region. To access the user guides, select the HP Support Assistant app on the Start screen, select My computer, and then select User guides.

Keys

Figure : Keys
Item
Component
Description
1
esc key
Displays system information when pressed in combination with the fn key.
2
fn key
Executes frequently used system functions when pressed in combination with a function key, the num lk key, the esc key, or the b key.
3
Windows button1
Returns us to the Start screen from an open app or the Windows desktop.
4
Function keys
Execute frequently used system functions when pressed in combination with the fn key.
5
Embedded numeric keypad
When the keypad is turned on, it can be used like an external numeric keypad. Each key on the keypad performs the function indicated by the icon in the upper-right corner of the key.
6
Windows application key
Displays options for a selected object.
note:
1: Pressing the Windows button again will return you to the previous screen.

Lights

Figure : Lights
Item
Component
Description
1
Caps lock light
On: Caps lock is On
2
Mute light
  • Amber: Computer sound is Off
  • Off: Computer sound is On
3
Microphone mute light
  • Amber: Muted
  • Off: Microphone is On
4
Wireless light
  • White: An integrated wireless device, such as a WLAN device and/or a Bluetooth device, is On
  • Amber: All wireless devices are Off
5
Num lock light
On: Num lock is On
6
TouchPad light
  • Amber: The TouchPad is Off
  • Off: The TouchPad is On

TouchPad

Figure : TouchPad
Item
Component
Description
1
TouchPad On/Off button
Turns the TouchPad On or Off.
2
TouchPad zone
Moves the pointer and selects or activates items on the screen.
3
Left TouchPad button
Functions like the left button on an external mouse.
4
Right TouchPad button
Functions like the right button on an external mouse.

Left side

Figure : Left view
Item
Component
Description
1
Vent
Enables airflow to cool internal components.
2
Speaker
Produces sound

Rear

Figure : Rear view
Item
Component
Description
1
RJ-45 (network) jack
Connects a network cable
2
USB 3.0 ports (1)
USB 3.0 ports (1) Connect optional USB 3.0 devices and provide enhanced USB power performance.
3
Security cable slot
Attaches an optional security cable to the computer
4
DisplayPort
Connects an optional digital display device, such as a high-performance monitor or projector.
5
USB 3.0 charging port
USB 3.0 charging port Connects an optional USB device. The USB 3.0 charging port can also charge select models of cell phones and MP3 players, even when the computer is Off.
6
Power connector
Connects an AC adapter
7
AC adapter light
  • White: The AC adapter is connected and the battery is charged.
  • Amber: The AC adapter is connected and the battery is charging.
  • Off: The computer is using DC power.

Right side

Item
Component
Description
1
Power button
Turns power On and Off
2
Power light
  • On: The computer is On
  • Blinking: The computer is in the Sleep state.
  • Off: The computer is Off
3
Rotation lock button1
Locks screen orientation in either Landscape or Portrait mode.
4
Volume button
Lowers the volume
5
Volume button
Raises the volume
6
Speaker
Produces sound
7
Media Card Reader
Supports a micro SD High Capacity (SDHC) memory card or an optional wireless micro subscriber identity module (SIM).
8
Audio-out (headphone) jack/Audio-in (microphone) jack2
  warning:
To reduce the risk of personal injury, adjust the volume before putting on headphones, earbuds, or a headset. For additional safety information, see the Regulatory, Safety, and Environmental Notices. To access the user guides, select the HP Support Assistant app on the Start screen, select My computer, and then select User guides.
Produces sound when connected to optional powered stereo speakers, headphones, earbuds, a headset, or television audio. Also connects an optional headset microphone.
9
Docking port
Connects an optional docking device.
note:
1: When you move between notebook and tablet configuration, the computer screen will automatically change to vertical or horizontal. To lock the current screen orientation, slide the screen orientation button.
2: When a device is connected to the jack, the computer speakers are disabled.
Be sure that the device cable has a 4-conductor connector that supports both audio-out (headphone) and audio-in (microphone).

Bottom

Figure : Bottom
Item
Component
Description
1
Service cover
  caution:
To prevent an unresponsive system, replace the wireless module only with a wireless module authorized for use in the computer by the governmental agency that regulates wireless devices in your country or region. If you replace the module and then receive a warning message, remove the module to restore computer functionality, and then contact support through HP Support Assistant. To access HP Support Assistant on the Start screen, select the HP Support Assistant app.
Contains the hard drive, the WLAN module slot, the WWAN module slot (select models only), and the memory module slots.
2
Vents1
Enables airflow to cool internal components.
3
Near Field Communication (NFC) antenna
With HP TouchZone, we can wirelessly connect, communicate, and transfer data/information to and from the NFC-compatible devices.
4
Battery bay
Holds the battery.
5
Battery bay cover release latch
Releases the battery cover over the battery bay.
note:
1: The computer fan starts up automatically to cool internal components and prevent overheating. It is normal for the internal fan to cycle on and off during routine operation.