Replacing the Ink System contains seven sections as follows:
HP Designjet 500/800 Series Printers - Replacing the Printheads and Ink Cartridges
Section 1: Ink cartridges and printheads
The ink cartridges, as shown in Figure 1.1, are the reservoirs that contain the four colored inks that are used for printing. They are located under the cover on the right side of the printer, towards the back.
Figure : An ink cartridge

Figure : A printhead

The printheads, as shown in Figure 1.2, are the components that place minute droplets of ink onto the paper. They are located under the main window at the top of the printer, as shown in Figure 1.3.
Figure : Location of printheads and ink cartridges

note:Setup printheads are special nonprinting components required only for the setup of the printer. After the initial setup of the printer's ink system, they should be replaced with the permanent printheads.
-
Ink Cartridges: Your printer uses HP No. 10 Black and HP No. 82 Cyan, Magenta, and Yellow
-
Printheads: Your printer uses HP No. 11 Black, Cyan, Magenta, and Yellow
-
The frequency with which you need to change ink cartridges and printheads depends on the workload of your HP DesignJet printer.
Section 2: Replacing ink cartridges
If the printer detects that an ink cartridge needs replacing, you will see a message with four icons (explained below), referring from left to right to the Cyan, Black, Magenta and Yellow cartridges.
The icons may be any of those shown in Table 1:
|
Icon
|
Definition
|
Explanation
|

|
The cartridge is OK
|
The approximate level of the ink is indicated - a full cartridge has the whole interior black.
|

|
Flashing
|
The cartridge is missing, and the correct one must be inserted as indicated in subsequent steps.
|

|
Flashing exclamation mark
|
The cartridge is low on ink, and needs replacing at the earliest opportunity. The ink level may show up to one-eighth full, and for some CAD drawings this can be adequate for an appreciable time.
|

|
Flashing pump
|
The cartridge is out of ink, and must be replaced before any further printing can be done.
|

|
Flashing cross
|
The wrongcartridge is installed, and must be replaced before any further printing can be done.
|
caution:Do not replace cartridges during printing. This can interfere with the operation of the printer.
Once you have determined which ink cartridges you need to replace, do the following five steps:
-
To replace a cartridge, first open the ink cartridge cover, as shown in Figure 2.1.Figure : Opening the ink cartridge cover

-
Remove the ink cartridge, as shown in Figure 2.2.Figure : Removing the ink cartridge
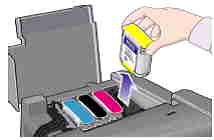
-
Insert the ink cartridge into its correct position, pushing it down until it clicks into place. Colored labels on the ink cartridges correspond with the same colored labels on the printer. Arrows on the cartridges point towards the front of the printer, as shown in Figure 2.3.Figure : Replacing the ink cartridge

-
When all cartridges have been successfully installed, the printer's icons will stop flashing. Press ENTERon the front-panel.
-
Close the ink cartridge cover. You will see the front-panel message “HP ink cartridges successfully installed.“
Section 3: Replacing printheads
If there is an error with one or more printheads, the printhead status is shown by four icons, referring from left to right to the Cyan, Black, Magenta, and Yellow printheads.
In Figure 3.1, three of the printheads are okay, but the magenta printhead is missing (the icon flashes).
Figure 3.1: Magenta printhead is missing
In Figure 3.2, the magenta printhead is faulty (the cross flashes).
Figure : Magenta printhead is faulty

-
If you identified a printhead as being faulty during the Troubleshootingroutine, the icon shows a flashing exclamation mark.
-
If the printer is unable to determine which of several printheads are faulty, the front panel shows three or four flashing question marks.
Printhead status
To determine the status of the printheads, do the following:
-
From the main front-panel menu, select ink system and press enter.
-
Select information and press enter.
-
Select printheads and press enter. You can then call up the information about any of the printheads.
-
Select the specific INDIVIDUAL PRINTHEAD and press enter to examine the status of an individual printhead.
To replace printheads, follow these steps:
-
From the main front-panel menu, select INK SYSTEM and press enter.
-
Select REPLACE PRINTHEADS and press enter.
-
Wait for the front-panel to display “Open window to replace printheads,” then open the window and locate the carriage assembly, as shown in Figure 3.3.Figure : Opening the window

-
Release the latch on the carriage printhead cover, as shown in Figure 3.4.Figure 3.4: Releasing the latch on the printhead cover
-
Lift up the printhead cover, allowing access to the printheads, as shown in Figure 3.5.Figure : Lifting up the printhead cover
-
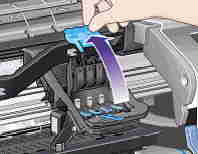
To remove a printhead, lift up the blue handle, as shown in Figure 3.6.Figure : Lifting up the blue handle

-
Using controlled force, pull the blue handle upwards until the printhead is released from the carriage assembly, as shown in Figure 3.7.
Figure : Pulling the blue handle upwards

Section 4: Installing new printheads
-
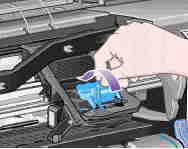
Remove the tape from the new printheads, as shown in Figure 4.1.Figure : Removing the tape

-
Insert a new printhead, ensuring that the colored label on the printhead corresponds to that on the printhead slot, as shown in Figure 4.2.Figure : Inserting a new printhead

-
When you have replaced all printheads that need replacing, pull the printhead cover down over the printheads, as shown in Figure 4.3.Figure : Pulling the printhead cover down

-
Close the latch on the printhead cover by catching the hook over the latch and moving the handle towards the back, as shown in Figure 4.4.Figure : Figure 4.4: Closing the latch on the printhead cover
-
Finally, close the window, as shown in Figure 4.5.Figure : Figure 4.5: Closing the window

-
After the replacement of the printheads, the printer checks that they are all functioning correctly. This can take several minutes.
-
You will see the front-panel message “HP No. 11 printheads successfully installed.” Then the printhead alignment procedure starts. See section five below: “Aligning printheads."
Section 5: Aligning printheads
The printhead alignment procedure requires paper to be loaded, and will take several minutes to perform. You can start the procedure yourself, for example, after clearing a paper jam, as follows:
-
From the main front-panel menu, select ink system and press enter.
-
Select align printheads and press enter.
-
Choose either standard(which will take about 4½ minutes, and is recommended for normal use) or special(which takes about 11 minutes and can correct problems that occur with alignment across the width of the paper); press enter.
-
Standard alignment requires paper of at least A4/ Letter-size, loaded in landscape mode.
-
Special alignment requires paper of at least A3/ B-size, loaded in landscape mode. Two separate prints are made.
-
Not all paper types are supported for alignment; the printer will tell you if you load the wrong type. Among those supported are: HP Bright White Inkjet Paper (Bond paper), HP Coated Paper, HP Heavy Coated Paper, HP High-Gloss Photo Paper, HP Satin Poster Paper, and HP Plain Paper.
-
Section 6: Color calibration
Color calibration is the process of matching the ink with the paper. When new printheads have been installed, we recommend that you use the color calibrationroutine to ensure that the quality of your images is optimized.
You can discover what paper the ink system is currently calibrated for, as follows:
-
From the main front-panel menu, select ink system and press enter.
-
Select color calibration and press enter.
-
Choose statusand press enter. You will see something like the following:
-
If the paper loaded is not as shown, choose calibrate paper.
-
The printer will print and use a small calibration pattern to ensure an optimal match between the paper and the ink.
-
Enter a topic to search our knowledge library
What can we help you with?

Need Help?