The 'Paper Jam' error message displays on the control panel and the product stops printing.
A 'Paper Jam' Error Displays on the HP Photosmart C4550, C4580, and C4599 All-in-One Printer Series
Issue
 Experiencing frequent or recurring paper jams? Experiencing frequent or recurring paper jams?
If you are looking for information on preventing a paper jam from recurring, you can skip to the prevention and cause sections in this document.
|
How to use the solutions in this document
To resolve the issue, try each solution in this document, and then use the steps in this section to print a self-test report. This step determines if the product hardware functions correctly. When you have resolved the issue, and the product successfully prints a self-test report, there is no need to continue troubleshooting.
Print a self-test page
|
How to print a self-test report
|
|
 IMPORTANT: Try to print a self-test report after every solution even if the solution resolves the issue.
Video of clearing a paper jam
The following video demonstrates the steps for clearing a paper jam. The product shown in this video is an HP Photosmart C4280, but the steps are the same for HP Photosmart C4550, C4580, or C4599 All-in-Ones.
The following video demonstrates the steps explained on this page. The outside of the printer might look different, but the steps are the same.

Solution one: Reset the product
Follow these steps to reset the product.
Step one: Perform a full reset
-
Remove all paper from the tray.
-
Press the Power button (
 ) to turn on the product.
-
Disconnect the USB cable from the rear of the product.
-
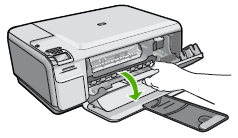
Open the cartridge door. The carriage moves to the far right side of the product.Figure : Open the cartridge door
-
Remove both the cartridges, and then carefully set them aside. Press down on a cartridge to unlock it from the carriage, and then pull it towards you out of the slot.
-
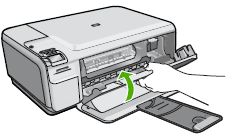
Close the cartridge door.Figure : Close the cartridge door
-
Disconnect the power cord from the rear of the product.
-
Wait for 60 seconds.
-
Reconnect the power cord to the rear of the product.
-
Press the Power button (
 ) to turn on the product.
-
Open the cartridge door. The carriage moves to the far right side of the product.
-
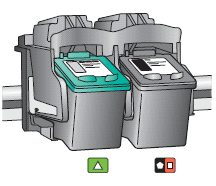
Reinstall the cartridges. With the label face up and the electrical contacts pointing into the carriage, slide each cartridge into the carriage until it snaps into place.Figure : Tri-color cartridge on the left and the black cartridge on right
-
Insert the tri-color cartridge into the left slot.
-
Insert the black cartridge into the right slot.
-
-
Close the cartridge door.
Step two: Print a self-test report
Print a self-test report. See the section on how to use these solutions at the beginning of this document.
-
If these steps resolved the issue, and the test page prints, there is no need to continue troubleshooting. Reconnect the USB cable, and then try to print again.
-
If the issue persists, continue with the next solution.
-
If the test page does not print, continue with the next solution.
Solution two: Clear the paper jam
Follow these steps in the order presented to clear a paper jam from the product. It might not be necessary to complete all the steps. Paper jams can be real or false. The following steps resolve both real and false paper jams.
Step one: Remove any loose paper from the tray
Remove any loose sheets of paper from the input tray and the output tray.
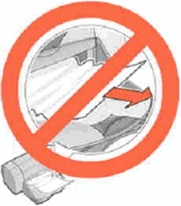
caution:Do not remove jammed paper at this stage. Trying to clear jammed paper from the front of the product can damage theprint mechanism.
Figure : Remove loose paper
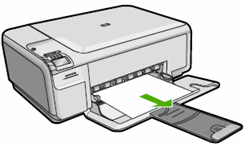
Figure : Do not remove jammed paper
Step two: Clear the jam from the rear of the All-in-One
Follow these steps to remove the paper jam from the rear of the product.
caution:Never pull jammed paper from the front of the HP product. If you can pull it from the rear of the HP product or the tray, always try the rear first. Pulling paper from inside the front cover can cause mechanical damage to the HP product.
-
Press the Power button (
 ) to turn on the product.
-
While the product is still on, disconnect the power cord from the rear of the product.
-
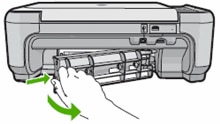
Press in the tab on the left side of the rear door to release it. Pull the door away from the product to remove it.Figure : Remove the rear access door
-
Gently pull any jammed paper out of the rollers.
caution:
If the paper tears when you remove it from the rollers, check the rollers for torn pieces of paper that might remain inside the product. If pieces of paper remain in the product, more paper jams might occur. -
Check the rollers and wheels to make sure that they can move freely. If the rollers and wheels do not move freely, check again for torn pieces of paper inside the product.
-
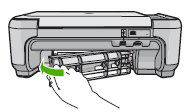
Reattach the rear access door. Gently push the door forward until it snaps into place.Figure : Reattach the rear access door
Step three: Clear the jam from the front of the All-in-One
If you cannot remove the paper jam from the rear of the product, follow these steps to remove the paper jam from the front.
caution:Remove the paper jam carefully to avoid damage to the product.
-
Open the cartridge door.Figure : Open the cartridge door

-
Gently pull any jammed paper out of the rollers.
caution:
Remove the paper carefully. If the paper tears, part of it might remain inside the paper path and damage the product. Carefully remove all traces of paper that you can find.Figure : Remove every scrap of jammed paper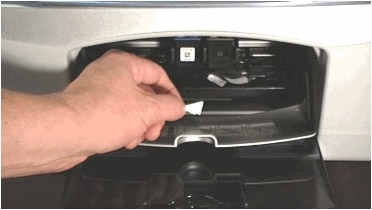
-
Close the cartridge door.Figure : Close the cartridge door

-
Reconnect the power cord to the rear of the product.
-
Press the Power button (
 ) to turn on the product.
Step four: Print a self-test report
Print a self-test report. See the section on how to use these solutions at the beginning of this document.
-
If these steps resolved the issue, and the test page prints, there is no need to continue troubleshooting. Reconnect the USB cable, and then try to print again.
-
If the issue persists, continue with the next solution.
-
If the test page does not print, continue with the next solution.
Solution three: Clean the rollers and rear access door
Follow these steps to clean the paper rollers to remove any debris, dirt, or paper scraps
Step one: Clean the rollers
-
Disconnect the power cord from the rear of the product.
-
Press in the tab on the left side of the rear door to release it. Pull the door away from the product to remove it.Figure : Remove the rear access door

-
Remove any debris, dirt, or paper scraps.
caution:
If the paper tears when you remove it from the rollers, check the rollers and wheels for torn pieces of paper that might remain inside the product. If pieces of paper remain in the product, more paper jams might occur. -
Lightly moisten a lint-free cloth with distilled or bottled water, and then wipe the paper rollers. Rotate the rollers with your fingers to clean all the way around.Figure : Clean the paper rollers

-
Make sure that the paper feed rollers on the rear access door are clean, free of paper pieces, and rotate freely.
-
Allow the rollers to dry completely.
-
Reattach the rear access door. Gently push the door forward until it snaps into place.Figure : Reattach the rear access door

-
Reconnect the power cord to the rear of the product.
-
Press the Power button (
 ) to turn on the product.
Step two: Print a self-test report
Print a self-test report. See the section on how to use these solutions at the beginning of this document.
-
If these steps resolved the issue, and the test page prints, there is no need to continue troubleshooting. Reconnect the USB cable, and then try to print again.
-
If the issue persists, continue with the next solution.
-
If the test page does not print, continue with the next solution.
Solution four: Make sure the carriage can move freely
Follow these steps to make sure that the carriage can move freely.
Step one: Check the carriage path
-
Press the Power button (
 ) to turn on the product.
-
Open the cartridge door.Figure : Open the cartridge door

note:
The carriage might try to move into the access area. If the carriage moves, allow it to move to that position. -
Disconnect the power cord from the rear of the product.
-
Unplug the power cord from the power source or electrical outlet.
warning:
You must unplug the power cord to move the carriage by hand and reset the paper feed mechanism without risk of electrical shock. -
Check for any paper or object that might be restricting the carriage.Figure : Example of paper stuck in cartridge access area
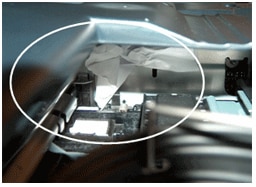
caution:
If the paper tears when you remove it from the rollers, check the rollers for torn pieces of paper that might remain inside the product. If pieces of paper remain in the product, more paper jams might occur. -
Remove any paper or objects you find.
-
Reach inside the product, and then manually move the carriage.
-
If the carriage is stuck on the right side, move the carriage to the left side of the product.
-
If the carriage is stuck on the left side, move the carriage to the right side of the product.
-
If the carriage is stuck in the middle, move the carriage to the right side of the product.
-
-
Remove any paper or obstructions found.
note:
You might need to use a flashlight to illuminate some areas. -
Make sure the carriage can move freely across the width of the product. Firmly push the carriage to the left side of the product, and then to the right side.
-
Close the cartridge door.Figure : Close the cartridge door

-
Reconnect the power cord to the rear of the product.
-
Plug the power cord back into the power source or electrical outlet.
-
Press the Power button (
 ) to turn on the product.
Step two: Print a self-test report
Print a self-test report. See the section on how to use these solutions at the beginning of this document.
-
If these steps resolved the issue, and the test page prints, there is no need to continue troubleshooting. Reconnect the USB cable, and then try to print again.
-
If the issue persists, continue with the next solution.
-
If the test page does not print, continue with the next solution.
Step three: Search for more information
If you are still experiencing issues, see the HP Product Support Home Page, and then search for another document that relates to the symptoms you are experiencing.
note:If the page displays in the wrong country/region or language, click the Region - Language link in the upper right corner of your browser. Then you can select the correct country/region and language.
Solution five: Service the All-in-One
Service or replace your HP product if the issue persists after completing all the preceding steps.
Go to Contact HP Customer Support to schedule a product repair or replacement. If you are in Asia Pacific, you will be directed to a local service center in your area.
To confirm your warranty status, go to HP Product Warranty Check. Repair fees might apply for out-of-warranty products.
Prevent paper jams
The following recommendations can help prevent recurring paper jams in your HP product.
-
Before loading paper in the tray, hold the stack of paper, and then tap the bottom edge on a flat surface so that the stack is even on all sides.
-
Make sure that the length and width adjusters on the tray are correctly positioned, and then push the stack of paper forward until it stops in the tray.
caution:
Do not force the paper to move too far forward in the tray. -
Do not overload the tray with paper.
-
Only add paper to the tray when the product is not printing.
-
Make sure the HP product supports the paper type. See the documentation that came with the HP product for more information.
-
Do not print on paper with paper clips or staples attached.
-
Do not use paper that is bent, torn, dusty, damp, wrinkled, curled, or paper that does not lie flat.
-
Use only one type of paper at a time. Do not mix different types, weights, or sizes of paper.
-
Do not use paper that is too thin, too thick, or too glossy for the product.
Causes
The following factors can cause paper jams:
-
Paper loaded incorrectly in the paper tray.
-
Damaged or dirty paper rollers.
-
Torn, wrinkled, or damp paper loaded in the paper tray.
-
The rear access door or two-sided printing accessory (duplexer) might not be closed or is not locked into place.
-
Paper was added to a stack already in the tray while the HP product was printing.
-
The tray contains more than one type of paper.
-
The paper is jammed inside the HP product where you cannot see it.
-
An obstruction is blocking the paper path.
-
Torn pieces of paper from a previous jam are stuck in the product.
-
The tray is too full.
-
If printing on an envelope, the edges of the envelope are bent.
Enter a topic to search our knowledge library
What can we help you with?
Need Help?
 ), and then press the
  ).
).
