This document describes the Preventative Maintenance messages that are displayed on the touchscreen and their related preventive maintenance procedures
Preventative maintenance refers to the maintenance of the scanner that the user must perform to keep the scanner in an optimal condition, this avoids high use parts in the scanner failing. The majority of the messages displayed on the touchscreen are related to scanner maintenance.
Scanner messages
The following scanner maintenance messages are displayed automatically in the Scanner Messages area of the touchscreen.
note:The window can also be opened manually by clicking the progress bar area in the JETimage software.
User warnings
-
Scanner Maintenance has not been run for 30 days.
-
Maintenance kit #1 required. Please contact HP to order the kit.
The quality of the lamp is electrically monitored and a warning message appears after approximately 4,000 hours of usage (average value). The scanner maintenance warning appears when scanner maintenance has not been performed for 30 days. However, the frequency for performing scanner maintenance will depend on the scanner messages.
Preventive Maintenance Kit #1
Customers can order the Preventive Maintenance Kit #1 through HP Support:
|
P/N
|
Description
|
|
Q1277-60013
|
PMK#1 Lamp Cartridge, Q1277A
|
This kit is available for the following scanner/MFP products:
|
Model
|
Description
|
|
Model Q6713A
|
HP Designjet T1100 MFP
|
|
Model Q1277A
|
HP Designjet 4500 Scanner
|
|
Model Q1276A
|
HP Designjet 4500mpf
|
|
Model Q6685
|
HP Designjet 820 MFP
|
An example of a typical message which is displayed in the Scanner Messages window is shown here:

User replaceable parts
The customer the following scanner components through HP Support:
|
P/N
|
Description
|
|
Q1277-60027
|
White Background Assembly, 40/42”
|
|
Q1277-60025
|
Guide Plate Assembly Q1277A, Q6685
|
Any of the big scanner parts that are liable to fail over long-term use can be replaced. Changing these parts will renew your scanner and ensure optimal results and avoid the scanner from malfunctioning because of failing parts in the future. It is important however that the User Guide and Service Manual troubleshooting procedures are followed before replacing any parts. Try cleaning the scan area as described in the scanner maintenance section to see if any errors or image quality defects can be solved.
Installing the Preventive Maintenance Kit #1
Lamp effectiveness will gradually weaken over time. Replacement of the lamp unit (lamp, reflector, power connectors) is recommended after long-term use.
To replace the lamp unit use the following procedure:
-
Turn Off the scanner and disconnect the power plug:

-
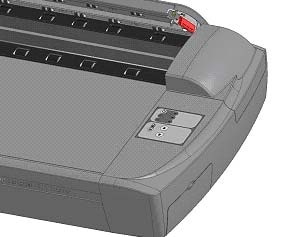
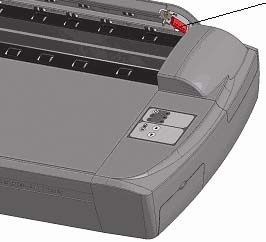
The lamp cover is on the top right edge of the scanner. Grasp the cover on each side with both hands, pull back to detach. Lift the cover upwards to free it from the scanner.

-
You must replace the whole lamp unit. A lamp unit consists of a lamp mounted in a reflector brace and fixed power connectors. Grasp the edge of the lamp unit and carefully pull it out of the scanner.

-
Insert the new lamp unit by resting the power-connector side on the slider and carefully push the lamp unit into the scanner.

-
Insert the lamp unit all the way so the internal power connections engage with the connections on the lamp unit.
-
Replace the lamp cover on the scanner. Fit the bottom notches in the holes and snap the cover shut. The cover must always be closed before turning the scanner power on.
-
Test the replacement by turning On the scanner to see if the lamp lights.
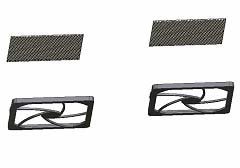
Replacing the air filters
Fresh air filters can reduce the amount of time spent on cleaning and calibration. The air filters protect your scanner’s air-cooling vents and keep out dust and unwanted particles.
To replace the air filters use the following procedure:
-
Turn the scanner power off and disconnect the power plug.

-
Locate the 2 square-shaped dust filter bins on the underside of the scanner.
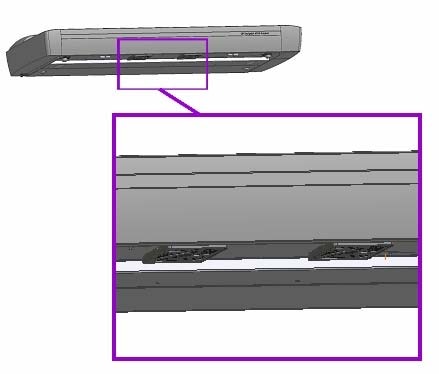
-
Pull down on the edge of a dust filter bin to detach it from its frame.
-
The filter (soft material) is inside the bin. Remove the old filter and replace with a fresh one.
-
Reattach the bin to its frame on the underside of the scanner.
-
Repeat the process with the second filter.
Replacing the user replaceable parts
Replacing the Glass Plate
Small scratches on the glass plate can reduce scanning quality. Replacement with a new glass plate may be recommended. Before replacing the white background platen, clean the glass plate to see if errors or image defects can be solved.
To replace the glass plate use the following procedure
-
Turn the scanner power off and disconnect the power plug.
-
Push down on the two lever buttons found near the insertion slot on each side of the scanning area lid. The scanning area lid locking mechanism should now be disengaged.

-
As you hold both lever buttons down, place your free fingers in the insertion slot and flip the scanning area lid open. The glass-plate will be exposed and accessible.

-
On each side of the glass plate there is a small lever and round finger-handle. Place your thumbs under both handles on each side. With both arms, pull simultaneously on the left and right handles to flip the levers and glass plate towards your body.

-
Each lever is attached to the scanner chassis with a small hook that rests on a pin. With your thumbs still on the handles, simultaneously lift both levers upwards to detach their hooks from the pins and free the glass plate from the scanner.

-
To insert a new glass-plate, place the new glass-plate’s lever hooks on the pins on each side of the scanner.
-
While supporting the glass-plate with your thumbs on the finger handles, carefully push the glass plate backwards (away from you) and ease it down into place.
-
Close the scanning area lid so the locking mechanism reengages.
note:
Make sure you clean a new glass plate before using it with the scanner.
Replacing the white background platen
The white background platen can become worn and discolored after long periods of use, and in such cases replacement with a fresh white background platen is recommended. Before replacing the white background platen, clean it to see if errors or image defects can be solved
To replace the white background platen use the following procedure:
-
Turn the scanner power Off and disconnect the power plug.

-
Push down on the two lever buttons found near the insertion slot on each side of the scanning area lid. The scanning area lid locking mechanism should now be disengaged.
-
Hold both lever buttons down and flip the scanning area lid open.
-
On the lid’s right edge, you will find a red strip. Remove the red strip to expose the edge of the white background platen.
-
Grip the edge of the white background platen with your fingers and pull to slide it out of the scanner.

-
Slide in the new white background platen.
-
Reattach the red strip.
-
Close the scanning area lid so the locking mechanism reengages.
