solution Contentsolution Content

HP Designjet 4500mfp, 820 MFP and 4500 Scanner - Scanning to a Network Drive

Introduction

The setup described below is standard to the industry and enables you to scan to a network drive easily and without exposing your scanner’s operating system to the danger of computer viruses.
Why use this particular setup?
Previous models: HP Designjet 815mfp and 4200 Scanner. Scanning to network drives was not intended or supported by HP on the previous scanner and multifunction printer models. However, some users overcame this restraint by disabling the scanner’s firewall. In the process, the scanner’s operating system was exposed to possible attack by computer viruses. To protect the system, users had to install anti-virus software on the scanner and keep this software up to date in the same way they did on their own computers.
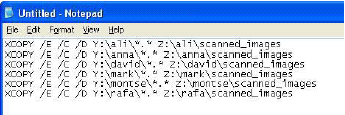
New models: HP Designjet 820 MFP, 4500 Scanner, and 4500mfp. Scanning to network drives is not an official option from HP, but it can be done using a workaround. It’s safer than the previous workaround; computers on the network retrieve the scanned image files from an isolated server on the scanner without actually gaining access to the scanner’s operating system. The firewall is always enabled, so computers on the network cannot infect the scanner. You do not (indeed cannot) install anti-virus software on the scanner.

Creating new folders on the scanner’s hard disk

The scanner’s User’s Guide explains more how to create new folders on the scanner’s hard disk, but see the screen shots below for a quick overview:
Figure : Creating new folder on scanner hard disk
Using the method shown here, create a series of folders. For example create folders to: create different users of the scanner, different departments or different types of images:
  • D:\images\anna
  • D:\images\john
  • D:\images\marketing
  • D:\images\manufacturing
  • D:\images\architecture
  • D:\images\GIS
You will refer back to these folders later, when setting the system up to scan to a network drive.

Setting up to scan to a network drive

The example used here is a PC running Windows XP and with service pack 2.
To setup your system to scan to a network drive, you perform three simple procedures:

Map the scanner as a network drive

  1. Obtain the scanner’s IP address from the scanner’s touchscreen: Setup, Options, General, About.
  2. On your computer, open Windows Explorer.
  3. From the Tools menu, select Map network drive.
    Figure : Mapping network drive
  4. In the Drive field, choose a letter (Y in the example above) to be associated with the scanner.
  5. In the Folder field, enter: \\ip_address\images (where ip_address is the scanner’s IP address).
  6. Select Reconnect at logon, and select Finish.
  7. If the scanner has been previously configured to request a user name and password, you are now requested to provide this information.
note:
To request a user name and password, consult the scanner’s online help. (Such configuration is possible only on scanners with firmware versions later than version 11.6 (and not including version 11.6.).

Create a simple batch file

The batch file you create here will later copy image files automatically from the scanner to a network drive.
  1. On your computer open Microsoft Notepad.
  2. Type the line: XCOPY /E /C /D Y: Z:
    • Y is the letter you assigned to the scanner in the previous procedure.
    • Z is the letter corresponding to the network drive to which you want scanned images to be automatically copied.
    You can also specify subdirectories in both the origin and destination, as in the following example:
    Figure : Subdirectory example
  3. Navigate to wherever you would like to save the batch file, e.g. the My Documents folder.
  4. In the File name field, enter a name for the batch file (e.g. replicate.bat) making sure that in the name itself you include the .bat extension.
  5. Click Save.
  6. Close Microsoft Notepad.

Set up a scheduled task

  1. From your computer’s Control panel, open the Scheduled tasks folder.
  2. Select Add Scheduled Task.
  3. Follow the instructions on the Scheduled Task Wizard (which includes the following steps):
    1. Browse to the replicate.bat file you created earlier.
      Figure : Browsing to file
    2. Select to Open the replicate.bat file.
      Figure : Opening replicate.bat file
    3. Assign a name to the task (e.g. replicate or replicate scanner content) and choose to Perform this task Daily.
      Figure : Assigning name to task
    4. Enter the time at which you want to start up the scan-to-network-drive facility.
    5. Select the option Open advanced properties for this task when I click Finish, then select the Finish button.
      Figure : Selecting advanced properties
    6. On the Schedule tab of the scheduled task’s Properties box, click Advanced.
      Figure : Advanced scheduling
    7. In Advanced Schedule Options select Repeat task every 5 minutes, and a Duration of 24 hours.
      Figure : Advanced schedule options
    8. On the Schedule tab click Apply.
Now, whenever you scan, the corresponding image files are automatically copied to your network drive within five minutes.

Scan to multiple locations on the network

Further batch file examples, with multiple XCOPY lines, are:
Figure : Image files classified by user scanned to network drive
Figure : Image files classified by content scanned to network drive

Set up copied files to be automatically deleted from the scanner

You can create a second batch file and scheduled task so that copied image files are automatically deleted from the scanner’s hard disk.
  1. In a new Notepad file, type the line: DEL /S Y:\*.*.
    Figure : Notepad example
  2. Save the file as, for example, delete.bat in the same location as the previous batch file.
  3. Create a second scheduled task, this time for the delete.bat file.
    In this case do not open the advanced scheduled options. Instead of having this batch file run every five minutes, schedule it to run, for example, just once a day. In the following example, the time of 4 a.m. has been selected. In this example, it is possible that a scan made between 3.55 a.m. and 4 a.m. is deleted without being copied to the network drive. If you are likely to scan at any time of the day or night, add an XCOPY line before the DEL line in the delete.bat file to make sure every file is copied.
    Figure : Example
    Now, whenever you scan, the corresponding image files are automatically copied to your network drive within five minutes, and all files are deleted from the scanner once a day (in this case at 4 a.m.).

Troubleshooting

An error message may appear on your computer screen if the system tries to copy a scanned file that is larger than 47 MB from the scanner to your network drive.
Microsoft has documented the symptoms, cause and solution of this problem at the following url: http://support.microsoft.com/default.aspx?scid=kb;en-us;900900.