Your computer features top-rated components. This chapter provides details about your components, where they are located, and how they work.
Right
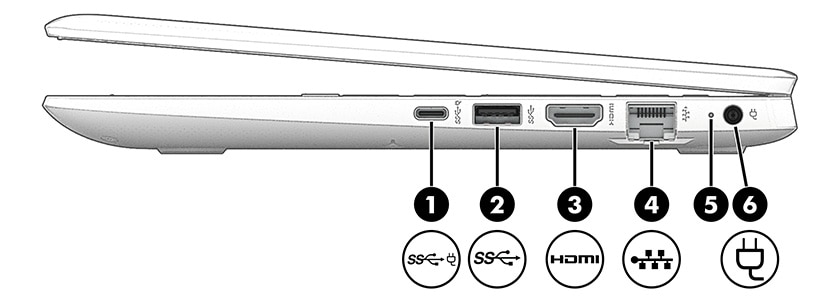
Use the illustration and table to identify the components on the right side of the computer.
|
Component
|
Description
|
||
|
(1)
|

|
USB Type-C® power connector and SuperSpeed port
|
Connects an AC adapter that has a USB Type-C connector, supplying power to the computer and, if needed, charging the computer battery.
– and –
Connects a USB device, provides high-speed data transfer, and (for select products) charges small devices (such as a smartphone) when the computer is on or in Sleep mode.
note: – and –
Connects a display device that has a USB Type-C connector, providing DisplayPort™ output.
|
|
(2)
|

|
USB SuperSpeed port
|
Connects a USB device, provides high-speed data transfer, and (for select products) charges small devices (such as a smartphone) when the computer is on or in Sleep mode.
note: |
|
(3)
|

|
HDMI port
|
Connects an optional video or audio device, such as a high-definition television, any compatible digital or audio component, or a high-speed High Definition Multimedia Interface (HDMI) device.
|
|
(4)
|

|
RJ-45 (network) jack/status lights
|
Connects a network cable.
|
|
(5)
|
Battery light
|
When AC power is connected:
When AC power is disconnected (battery not charging):
|
|
|
(6)
|

|
Power connector
|
Connects an AC adapter.
|
Left
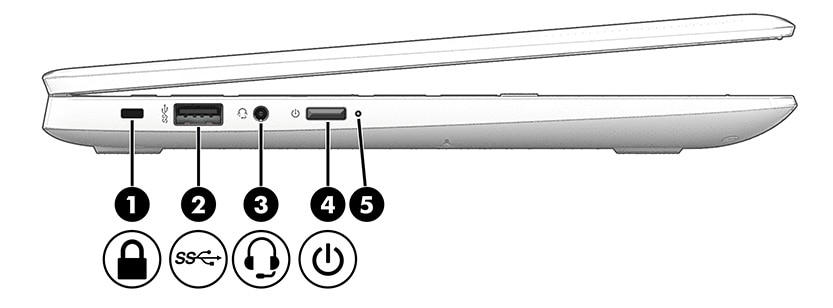
Use the illustration and table to identify the components on the left side of the computer.
|
Component
|
Description
|
||
|
(1)
|

|
Security cable slot
|
Attaches an optional security cable to the computer.
note: |
|
(2)
|
|
USB SuperSpeed port
|
Connects a USB device, provides high-speed data transfer, and (for select products) charges small devices (such as a smartphone) when the computer is on or in Sleep mode.
note: |
|
(3)
|

|
Audio-out (headphone)/Audio-in (microphone) combo jack
|
Connects optional powered stereo speakers, headphones, earbuds, a headset, or a television audio cable. Also connects an optional headset microphone. This jack does not support optional standalone microphones.
warning: note: |
|
(4)
|

|
Power button
|
note: |
|
(5)
|
Power light
|
|
|
Display
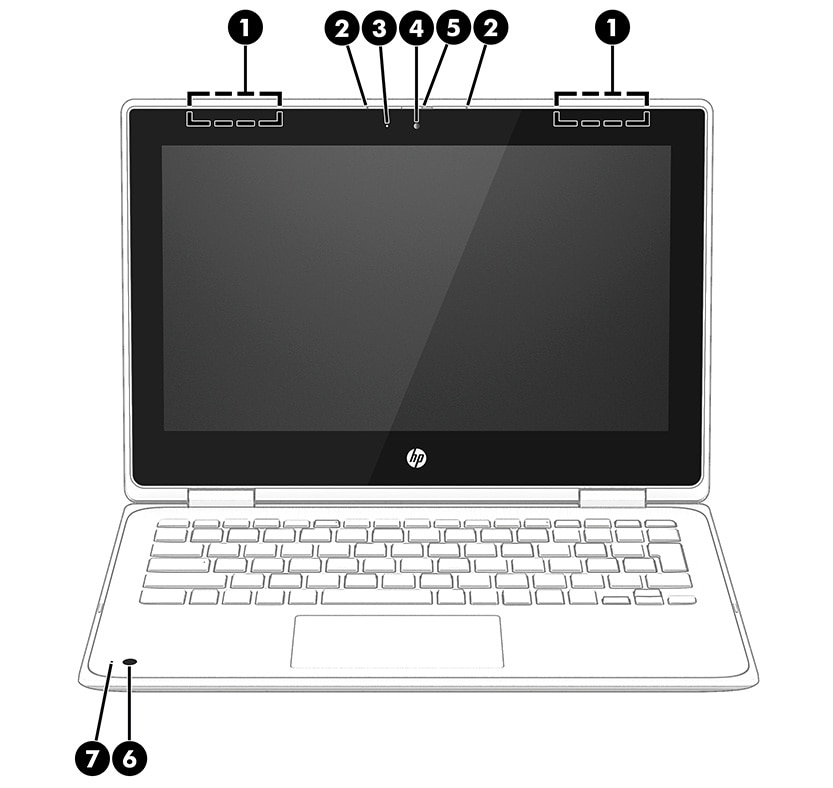
Use the illustration and table to identify the display components.
|
Component
|
Description
|
|
|
(1)
|
WLAN antennas*
|
Send and receive wireless signals to communicate with wireless local area networks (WLANs).
|
|
(2)
|
Internal microphones (2)
|
Record sound.
|
|
(3)
|
Camera light
|
On: The camera is in use.
|
|
(4)
|
Camera
|
Allows you to video chat, record video, and record still images. Some cameras also allow a facial recognition logon to Windows, instead of a password logon.
note: |
|
(5)
|
Camera privacy cover (select products only)
|
By default, the camera lens is uncovered, but you can slide the camera privacy cover to block the camera's view. To use the camera, slide the camera privacy cover in the opposite direction to reveal the lens.
note: |
|
(6)
|
Camera
|
Allows you to video chat, record video, and record still images. Some cameras also allow a facial recognition logon to Windows, instead of a password logon.
note: |
|
(7)
|
Camera light
|
On: The camera is in use.
|
|
*The antennas are not visible from the outside of the computer. For optimal transmission, keep the areas immediately around the antennas free from obstructions.
For wireless regulatory notices, see the section of the Regulatory, Safety, and Environmental Notices that applies to your country or region.
To access this guide:
|
||
Keyboard area
Keyboards can vary by language.
Touchpad
The touchpad settings and components are described here.
Touchpad settings
You learn how to adjust the touchpad settings and components here.
Adjusting touchpad settings
Use these steps to adjust touchpad settings and gestures.
-
Type touchpad settings in the taskbar search box, and then press enter.
-
Choose a setting.
Turning on the touchpad
Follow these steps to turn on the touchpad.
-
Type touchpad settings in the taskbar search box, and then press enter.
-
Using an external mouse, click the Touchpad button.If you are not using an external mouse, press the Tab key repeatedly until the pointer rests on the touchpad button. Then press the spacebar to select the button.
Touchpad components
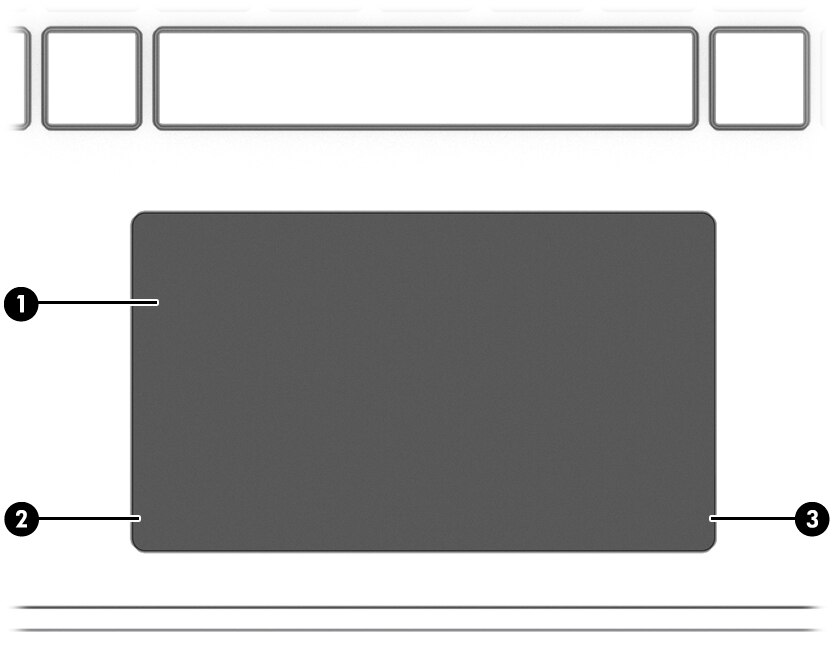
Use the illustration and table to identify the touchpad components.
|
Component
|
Description
|
||
|
(1)
|
Touchpad zone
|
Reads your finger gestures to move the pointer or activate items on the screen.
|
|
|
(2)
|
Left touchpad button
|
Functions like the left button on an external mouse.
|
|
|
(3)
|
Right touchpad button
|
Functions like the right button on an external mouse.
|
|
Lights
Use the illustration and table to identify the lights on the computer.

|
Component
|
Description
|
||
|
(1)
|
Caps lock light
|
On: Caps lock is on, which switches the key input to all capital letters.
|
|
|
(2)
|

|
Mute light
|
|
|
(3)
|

|
Wireless light
|
On: An integrated wireless device, such as a wireless local area network (WLAN) device and/or a Bluetooth® device, is on.
note: |
|
(4)
|
Camera light (select products only)
|
On: The camera is in use.
|
|
Special keys
Use the illustration and table to identify the special keys.

|
Component
|
Description
|
||
|
(1)
|
esc key
|
Displays system information when pressed in combination with the fn key.
|
|
|
(2)
|
fn key
|
Executes frequently used system functions when pressed in combination with another key. Such key combinations are called hot keys.
|
|
|
(3)
|

|
Windows key
|
Opens the Start menu.
note: |
|
(4)
|
Action keys
|
Execute frequently used system functions.
|
|
Top cover
Use the illustration and table to identify the top cover component.
|
Component
|
Description
|
|
HP Interactive Light
|
Allows students and teachers to interact in several ways through the light located on the top cover. In addition to the Help, Test, Quiz, and Group options, the light also communicates information about the status of the internet connection and the battery power level.
|
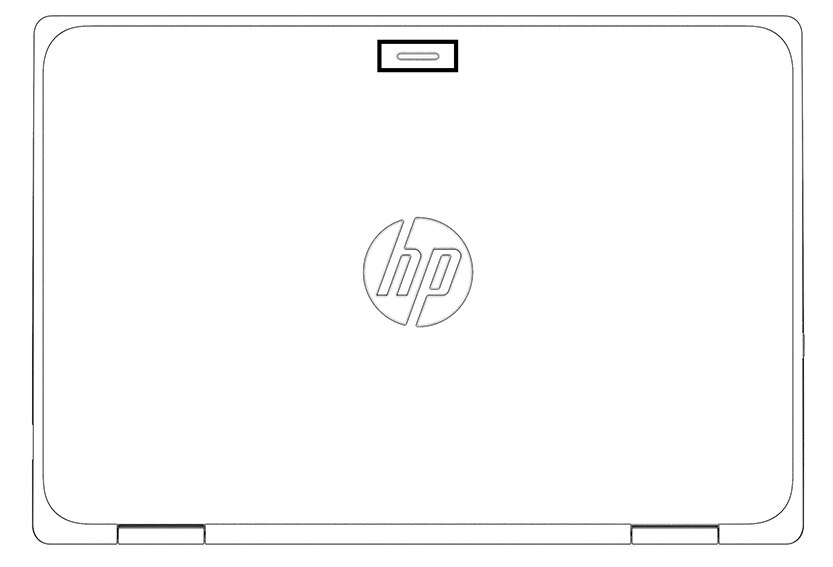
Bottom
Use the illustration and table to identify the bottom component.

|
Component
|
Description
|
|
Speakers (2)
|
Produce sound.
|
Labels
The labels affixed to the computer provide information you might need when you troubleshoot system problems or travel internationally with the computer. Labels might be in paper form or imprinted on the product.
note:Check the following locations for the labels described in this section: the bottom of the computer, inside the battery bay, under the service door, on the back of the display, or on the bottom of a tablet kickstand.
-
Service label—Provides important information to identify your computer. When contacting support, you might be asked for the serial number, the product number, or the model number. Locate this information before you contact support.Your service label will resemble one of these examples. Refer to the illustration that most closely matches the service label on your computer.
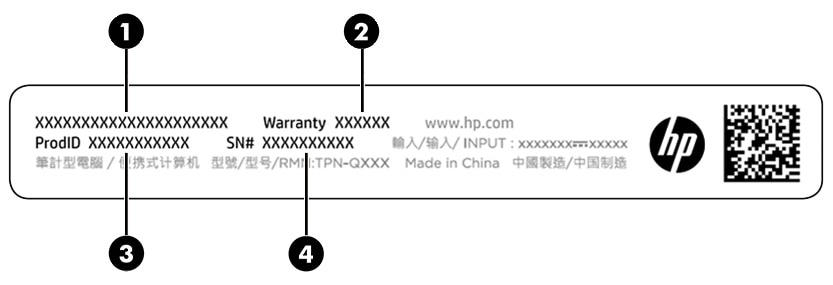
Service label components Component(1)HP product name(2)Warranty period(3)Product ID(4)Serial number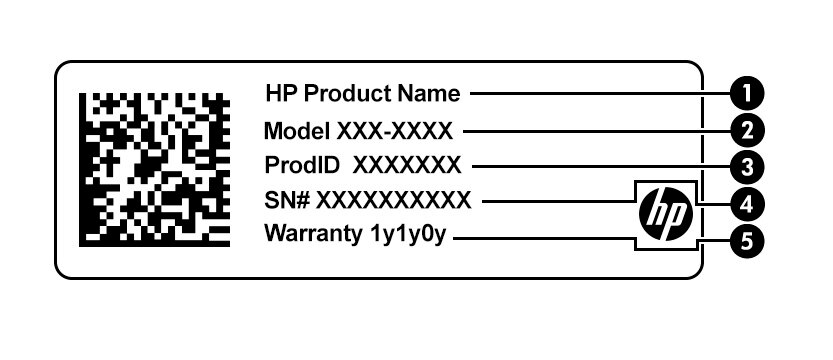
Service label components Component(1)HP product name(2)Model number(3)Product ID(4)Serial number(5)Warranty period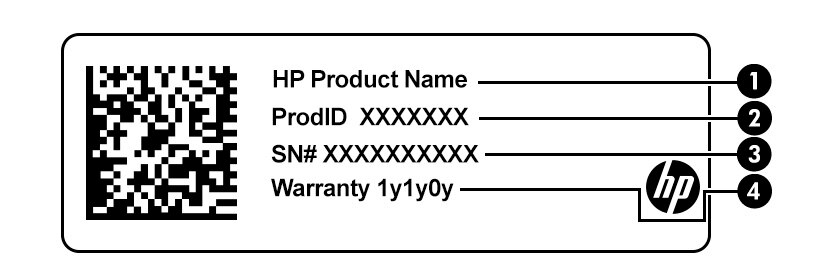
Service label components Component(1)HP product name(2)Product ID(3)Serial number(4)Warranty period -
Regulatory label(s)—Provide(s) regulatory information about the computer.
-
Wireless certification label(s)—Provide(s) information about optional wireless devices and the approval markings for the countries or regions in which the devices have been approved for use.
