Service tests, functions, and information that can be accessed from the front panel include:
HP Designjet 500, 510, and 800 Series Printers - User Service Tests
Advance Calibration Routine
Advance calibration determines the amount of paper the printer advances between printing swaths of data. It is important that the paper loaded for this calibration is exactly that used for normal printing, both in quality (for example, glossy paper) and in width (for example, A0 or 914mm (36 inch)). Either roll or sheet media can be used.
To calibrate the advance, follow the steps below:
-
Load the paper used for normal printing and set the cutter to On (if using rolled paper).
-
From the main front-panel menu, select the Paper menu icon (Figure 1), and press ENTER.Figure : Paper menu icon

-
Select Advance calibration (Figure 2) and press ENTER.Figure : Select Advance calibration

-
Select Create pattern (Figure 3) and press ENTER.Figure : Select Create Pattern
 The printer prints the calibration pattern as shown below.Figure : Advance calibration pattern
-
When the sheet is complete, press ENTER to cut the paper (if using roll paper).
-
Go back into the Paper menu as described in Step 2.
-
Select Unload roll, and roll paper back onto the spindle (do not remove spindle from the printer.)
-
Enter the Paper menu again and choose load sheet.
-
Re-load the paper with the printed side up and the dotted line at the top (rotate the print 90 degrees counterclockwise), as shown in Figure 5, below.Figure : Pattern loaded into printer correctly (dotted line is fed into printer first)

-
Access the Advanced Calibration as described in Steps 2 and 3 above.
-
Select Measurepattern (Figure 6) and press ENTER.
Figure : Select Measure pattern

The printer reads the calibration pattern and makes the appropriate internal adjustments.
note:The pattern printed is solely for the use of the printer; you are not expected to relate any of its characteristics to the quality of your images.
Advance calibration values
The printer stores the advance calibration values of the last two different types of media used for the calibration. When printing, the printer tries to match the media used to the stored values. If there is a match, the printer applies the stored advance calibration values.
If the type of media being used has not been used for either of the last two advance calibrations, the printer uses a set of default values for the media.
Restore factory calibration
On the Advance calibration menu, the Restore factory option (Figure 7) erases any stored advance calibration values from the printer memory. This means that until the advance calibration is performed again, the printer will use the factory default values for all types of media.
Figure : Restore factory calibrations

Color Calibration
Color calibration is the process of matching the ink with the paper, to ensure that the printed output matches the colors of the original image as closely as possible.
note:The Printer stores calibration data for each type of media it has been calibrated for since it was turned on. When the Printer is turned off, it only retains the last calibration data stored, and will print using this calibration when it is next turned on, until new calibrations are entered.
When new printheads have been installed, HP recommends using the Color Calibrationroutine to ensure the best print quality.
To find out what paper the ink system is currently calibrated to use, follow the steps below:
-
From the main menu on the front panel, select the Ink System icon (Figure 8) and press ENTER.Figure : Ink system icon

-
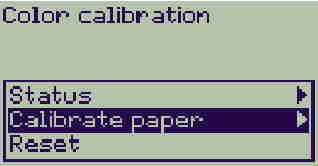
Select Color calibration (Figure 9) and press ENTER.Figure : Selecting Color calibration

-
Select Status (Figure 10) and press ENTER.Figure : Selecting Status
 You should see the status message in Figure 11 displayed:Figure : The status message is displayed
-
If the paper loaded is not as displayed, choose Calibratepaper, (Figure 12).
Figure : Select Calibrate paper if necessary
The printer will begin printing and use a small calibration pattern to ensure an optimal match between the paper and the ink.
note:To remove all calibrations and reset the Printer to its factory values, choose Color calibration>Reset from the Ink menu.
Ink Cartridge Information
-
To get information on the Ink Cartridges, press the UP or DOWN ARROW key until the front panel displays the Ink menu(Figure 13). Press the ENTER key.Figure : The Ink menu

-
Press the UP or DOWN ARROW key until Informationis highlighted (Figure 14). Press the ENTER key.Figure : Select Information

-
Press the UP or DOWN ARROW key until Ink cartridgesis highlighted (Figure 15). Press the ENTER key.Figure : Select Ink cartridges

-
To view information about a specific color, press the UP or DOWN ARROW key to highlight that color (Figure 16). Press the ENTER key.Figure : Selecting a color

The front panel displays information on the selected ink cartridge, as shown in Figure 17.
Figure : Ink cartridge information is displayed

The information displayed is:
-
The model of the ink cartridge (No.10 for Black and No.82 for the Colors is recommended).
-
The status of the ink cartridge.
-
The warranty expiration date of the ink cartridge.
-
The serial number of the ink cartridge.
-
The amount of ink remaining in the ink cartridge (the error of the ink level can be as much as + or - 25% according to the specifications of the printer.)
Printhead Information
-
To get information on the Printheads press the UP or DOWN ARROW key until the front panel displays the Ink menu(Figure 18). Press the ENTER key.Figure : The Ink menu
-
Press the UP or DOWN ARROW key until Informationis highlighted (Figure 19). Press the ENTER key.Figure : Selecting Information
-
Press the UP or DOWN ARROW key until Printheads is highlighted (Figure 20). Press the ENTER key.Figure : Select Printheads

-
To view information about a specific color, press the UP or DOWN ARROW key to highlight that color (Figure 21). Press the ENTER key.Figure : Select a color

The front panel displays information on the selected Printhead, as shown in Figure 22.
Figure : Printhead information is displayed

The information displayed is:
-
The model of the Printhead (HP No.11 is recommended)
-
Whether the Printhead is In Warranty or Out of Warranty
-
Status of the Printhead (whether it is inserted, faulty, worn out, or unknown)
-
Printhead error code (if printhead is faulty)
-
The action required depending on the status of the Printhead
-
The end of warranty date of the Printhead
-
The serial number of the Printhead
-
How much ink has been consumed by the Printhead
note:
It is possible for a Printhead to consume more than one ink cartridge. Also, the % indicates the percentage over the expected life of the Printhead, but a Printhead may last more than 100%.
-
Whether the Printhead Alignment has been performed since the last Printhead replacement
-
Whether Color Calibration has been performed since the last Printhead replacement
-
Whether a Paper Jam was ever detected while this particular Printhead was installed
Printhead History Utility
The Printhead History utility contains information on the last five sets of Printheads installed in the Printer. The purpose of this information is to:
-
Determine whether the printer is causing repetitive problems to the Printheads.
-
Determine whether the Printheads are being replaced too early, before any recovery actions are attempted.
-
The information that is stored for each Printhead is:
-
How much ink was consumed when the Printhead was replaced.
-
How long the Printhead was installed in the printer.
-
Whether the Printhead was in or out of warranty when it was removed.
-
Whether the Printhead experienced a paper crash.
-
Whether the right level of Printhead recovery was performed (troubleshooting procedure) before a Printhead was replaced.
-
The date the Printhead was removed from the printer.
-
The reported Error Code (if any).
To view Printhead History
-
Press the UP or DOWN ARROW key until the front panel displays the Set-up Menu(Figure 23). Press the ENTER key.Figure : The Set-up menu

-
Press the UP or DOWN ARROW key until Log is highlighted (Figure 24). Press the ENTER key.Figure : Select Log

-
Press the UP or DOWN ARROW key until Printheads is highlighted (Figure 25). Press the ENTER key.Figure : Select Printheads

-
To view information about a specific color, press the UP or DOWN ARROW key to highlight that color (Figure 26). Press the ENTER key.Figure : Select Printhead color

-
The front panel displays the history of the last five Printheads of the selected color (use the ARROW keys to scroll through the complete list). To see information on a specific item, press the UP or DOWN ARROW key until that item number is highlighted (Figure 27). Press the ENTER key.Figure : Highlight a Printhead number for more information

The status displayed for the last 5 Printheads could be any of the following:
-
Installed - OK: A Printhead is currently installed in the printer and no error is detected.
-
Installed - Err xxxx: A Printhead is currently installed in the printer and an error has been detected.
-
Installed - Unknown: The status of the installed Printhead is unknown.
-
Removed - OK: The Printhead was replaced correctly after the minimum life expectancy of the Printhead was reached, without any error being reported.
-
Removed - too early: The Printhead was replaced before the minimum life expectancy of the Printhead was reached and without any error being reported.
-
Removed - Unknown: The status of the replaced Printhead was unknown.
-
Removed - Err xxxx: The printhead was replaced after being marked with an error code.
The front panel displays information on the selected item, as shown in Figure 28.
Figure : Additional Printhead information
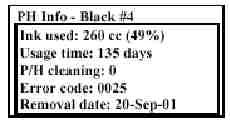
The information displayed is:
-
The amount of ink the Printhead has consumed.
-
The number of days the Printhead has been installed in the printer.
-
A code indicating whether Printhead recovery (troubleshooting procedure) has been performed or not:
-
0 indicates that the Printhead recovery was never performed.
-
1 indicates that a Level 1 (soft) recovery was performed.
-
2 indicates that a Level 2 (medium) recovery was performed.
-
3 indicates that a Level 3 (hard) recovery was performed. 3 is the maximum recovery level that the printer can perform before requesting that the Printheads be replaced.
-
-
The reported Error Code (if any).
-
The date the Printhead was removed from the printer.
Enter a topic to search our knowledge library
What can we help you with?

Need Help?