solution Contentsolution Content

HP LaserJet Pro (P1566 and P1606dn) and LaserJet P1006 Printers - Printer Does Not Pick Up or Feed Paper

Issue

The product does not pull paper from the input tray.
To avoid this issue, see the Causes section at the end of this document.
Try the following solutions in the order presented to resolve the issue. When one of the solutions resolves the issue, there is no need to continue troubleshooting.

Solution one: Turn off Manual Feed mode

Follow these steps to make sure that Manual Feed mode is Off.
  1. Press the Power button () to turn on the product, if it is not already on.
  2. Open the Printers window.
    • Windows XP: Click Start, and then click Printers and Faxes.
    • Windows Vista: Click the Windows icon (), click Control Panel, and then double-click Printers.
    • Windows 7: Click the Windows icon (), click Control Panel, and then double-click Printers and Devices.
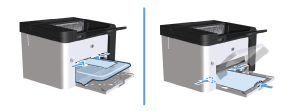
  3. Right-click the product icon, and then click Printing Preferences.
  4. Click the Paper/Quality tab, click Auto Select from the Source is drop-down list, click Apply, and then click OK.
    note:
    Do not select Manual Feed from the drop-down list.
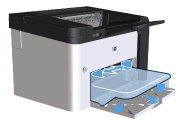
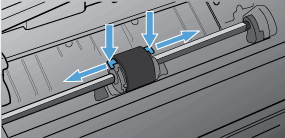
  5. Try the print job again.
  • If these steps resolved the issue, you do not need to continue troubleshooting.
  • If the issue persists, see the next solution.

Solution two: Reload the paper

Follow these steps to reload the paper. These steps cover both the priority input tray and the main input tray.
  1. Remove all the paper from the tray.
  2. Slide the paper guides to their outermost position.
    Figure : Slide out the paper guides
    Illustration of sliding out the paper guides.
  3. If you are loading the main input tray, tap the edges of the stack of paper on a flat surface to align the edges.
  4. Load the paper into the tray with the top forward and the print side facing up.
  5. Slide the paper guides inward until they rest snugly at the edges of the stack.
    note:
    If the paper guides are too tight, the paper might be held in the tray and not allowed to feed into the product.
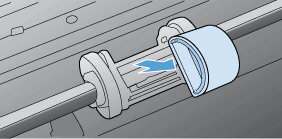
    Figure : Slide the paper guides against the paper
    Illustration of sliding the paper guides inward against the paper.
  6. Try the print job again.
  • If these steps resolved the issue, you do not need to continue troubleshooting.
  • If the issue persists, see the next solution.

Solution three: Clean the pickup roller

Dirt or grime build up on the pickup roller can cause the paper to feed into the product incorrectly or not at all. Follow these steps to clean the pickup roller.
  caution:
Failure to complete this procedure correctly might damage the product.
  1. Gather the following supplies.
    • A lint-free cloth
    • Isopropyl alcohol
  2. Press the Power button () to turn off the product.
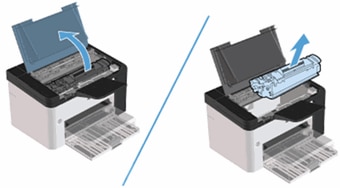
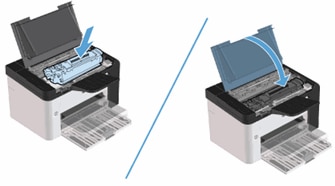
  3. Unplug the power cord from the back of the product.
  4. Open the print cartridge door, and then remove the print cartridge.
    Figure : Open the print cartridge door and remove the print cartridge
    Illustration: Open the print cartridge door and remove the print cartridge.
      caution:
    To prevent damage to the print cartridge, minimize its exposure to direct light. Cover the print cartridge with a sheet of paper.
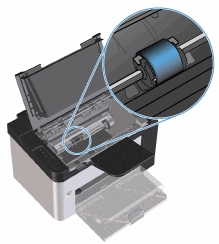
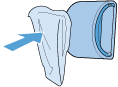
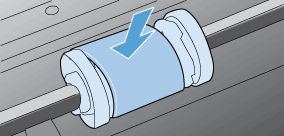
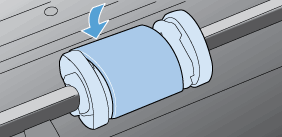
  5. Find the pickup roller.
    Figure : Find the pickup roller
    Illustration of finding the pickup roller.
  6. Release the small, white tabs on each side of the pickup roller, and rotate the pickup roller toward the front.
    Figure : Releasing the tabs
    Illustration of releasing the pickup roller tabs
      caution:
    Do not touch the black-sponge transfer roller inside the product. Touching the transfer roller can damage the product.
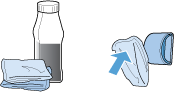
  7. Gently pull the pickup roller up and out of the product.
    Figure : Pull out the pickup roller
    Illustration of pulling out the pickup roller.
  8. Dab a lint-free cloth in isopropyl alcohol, and then scrub the roller.
    Figure : Scrub the roller with isopropyl alcohol
    Illustration of scrubbing the roller with isopropyl alcohol.
      warning:
    Alcohol is flammable. Keep the alcohol and cloth away from an open flame. Before you close the product and plug in the power cord, allow the alcohol to dry completely.
    note:
    In certain areas of California, air pollution control regulations restrict the use of liquid isopropyl alcohol (IPA) as a cleaning agent. In those areas of California, disregard the previous recommendations and use a dry, lint-free cloth, moistened with water, to clean the pickup roller.
  9. Use a dry, lint-free cloth, to wipe the pickup roller and remove loose dirt.
    Figure : Wipe the pickup roller
    Illustration of wiping the pickup roller.
  10. Allow the pickup roller to dry completely before you reinstall it in the product.
    Position the pickup roller in the slot. The circular and rectangular pegs on each side help you install the roller correctly.
    Figure : Install the pickup roller
    Illustration of installing the pickup roller.
  11. Rotate the top of the pickup roller away from you until both sides snap into place.
    Figure : Rotate the pickup roller
    Illustration of rotating the pickup roller.
  12. Reinstall the print cartridge, and then close the print cartridge door.
    Figure : Reinstall the print cartridge and close the print cartridge door
    Illustration of reinstalling the print cartridge and closing the print cartridge door.
  13. Plug the power cord back into the product.
  14. Press the Power button () to turn on the product.
  15. Try the print job again.

Solution four: Replace the pickup roller

If the pickup roller is damaged or worn, replace it. To order a new pickup roller, see ordering supplies and accessories.

Solution five: Service the printer

Service or replace your HP product if the issue persists after completing all the preceding steps.
Go to Contact HP Customer Support to schedule a product repair or replacement. If you are in Asia Pacific, you will be directed to a local service center in your area.
To confirm your warranty status, go to HP Product Warranty Check. Repair fees might apply for out-of-warranty products.

Causes

  • Manual feed mode is turned on.
  • The paper tray is empty.
  • The paper length guide in the main input tray is not snug against the paper.
  • The pickup roller might be dirty or damaged.
  • The paper is wrinkled, folded, damaged, or has ragged edges.
  • The paper is too moist, too rough, too heavy or too smooth.
  • The paper has the wrong grain direction, is of short-grain construction, is embossed, or is from a faulty paper lot.