solution Contentsolution Content

HP Designjet Z6100 Printer Series - Manage print jobs

Submit a job

  1. Access the Embedded Web Server.
  2. Go to the Submit job page on the Main tab.
    Figure : Submit job page
  3. Click the Add files button to Browse your computer and select the files to print.
    note:
    Submitting a print job through the Embedded Web Server does not require you to have the printer driver or the software that was used to create the file installed on your computer.
  4. Set any other job options you may want from within the Job settings tree.
    If you leave an option set to Default, the setting that was saved in the job will be used. If the job contains no setting for that option, the setting in the printer will be used. The setting in the printer can be changed on the front panel, or, in some cases, through the Device Setup page in the Embedded Web Server.
  5. Click the Print button.
note:
Be aware that when you submit more than one job at a time by clicking the Add files button in the Embedded Web Server, all of the jobs that you submit will adopt the settings of the final job that you submit. However, none of the jobs in the print queue are affected.

Save a job

You can only save a job while submitting it for printing:
  1. Access the Embedded Web Server.
  2. Go to the Submit job page on the Main tab.
  3. Click the Add files button, browse your computer, and select the file to print.
  4. If you want to submit more than one file, click the Add files button to add more files.
  5. In the Job settings tree, go to Basic settings and set the Store job in printer option to On.
    Figure : Submit job page
  6. Set any other job options that you want from within the Job settings tree.
  7. Click the Print button.
    The job appears on the Stored jobs in printer page on the Main tab.

Reprint an old job

If you intend to reprint a job later after making some changes to the job settings (such as size or quality), you can store the job inside your printer so that you do not have to resubmit it later.
note:
If you want to reprint a job without changes, you can do that from the print queue without saving the job.
Reprint old jobs either through the Embedded Web Server or on the front panel.

Use the Embedded Web Server

Reprint any jobs that are listed in the job queue or on the list of jobs that are stored in the printer.
  • Go to the Job queue on the Main tab, select the job that you want to reprint, and click the Reprint button.
  • Go to the Stored jobs in printer page in the Main tab, select the job that you want to print, modify the print options as necessary, and click Save, Print, or Print and save.

Use the front panel

Reprint a job on the front panel in one of two ways, depending on the job that you want to reprint.
  • To reprint the last job that was printed, select the Job icon and then select Reprint last job.
  • To reprint any other job, select the Job icon and select Job queue. Then select the job that you want to reprint and select Reprint. Select the number of copies that you want to print and click OK.

Cancel a job

Cancel a job on the front panel by pressing the Cancel button, or through the Embedded Web Server by selecting the job from within the job queue and clicking the Cancel button.
You can also use the driver to cancel.
The printer advances the paper as it would if the print were finished.
note:
A multipage job or a large file might take longer to stop printing than other files.

Manage the print queue

The queue might contain more than one job. If so, your printer stores jobs in a queue while it is printing the current page.

Prioritize a job in the queue

  • On the front panel: to make any pending job in the queue the next one to be printed, select the Job icon and then select Job queue. Select the job that you want to be printed next and select Move to front.
  • Through the Embedded Web Server: select the job that you want to be printed next within the job queue and select Move to front.
note:
If nesting is turned on, the prioritized job might remain nested with others. If you want only this job to be printed next, and on its own on the roll, first turn nesting off and then move the job to the front of the queue as described.

Identify a job in the queue

The best way to look at the queue is through the Embedded Web Server, on the Jobs queue page on the Main tab. Manage the queue and get full information about every job by clicking the name of the file.
You can also manage the queue on the front panel. To do so, select the Job icon and then select Job queue. You can see a list of the jobs in the queue, each with an icon depicting its status as pending, active, done, or cancelled.

Delete a job from the queue

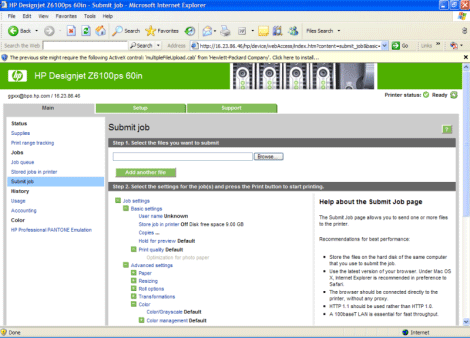
Under normal circumstances, you do not need to delete a job from the queue after printing it, because it will leave the queue as more files are sent. However, if you have sent a file in error and want to avoid the chance that it will be reprinted, you can delete it by selecting it and then selecting Delete through the Embedded Web Server or on the front panel.
In the same way, you can delete a job that has not been printed yet.
If the job is currently being printed (status = printing) and you want to both cancel the job and delete it, first click the Cancel icon in the Web server or press the Cancel button on the front panel, and then delete the job from the queue.

Make copies of a job in the queue

To make extra copies of any job in the queue, select the job through the Embedded Web Server and click the Reprint button, and then specify the number of copies that you want. The job moves to the top of the queue.
You can also do this on the front panel: select the Job icon and then select Job queue. Select the job, select Copies, and then specify the number of copies that you want and press the OK button. This overrides any value set in your software.
note:
If Rotate was On when you sent the file, every copy will be rotated.
If the job has already been printed, use Move to front to move it to the top of the queue.

Understand job status

These are the possible job status messages, in the approximate order in which they appear:
  • receiving: the printer is receiving the job from the computer.
  • waiting to process: the job has been received by the printer and is waiting to be rendered (only for jobs submitted through the Embedded Web Server.)
  • processing: the printer is parsing and rendering the job.
  • preparing to print: the printer is performing writing system checks before printing the job.
  • waiting to print: the job is waiting for the print engine to become available to proceed with printing.
  • waiting for nest: the printer is set up with Nesting=On and is waiting for other job to complete the nest and proceed with printing.
  • on hold: the job was sent with the Hold for preview option and is on hold.
    note:
    If the printer stalls while printing a job and the queue facility is turned on, the partially printed job will appear in the queue as on hold when the printer is turned on again. When you resume the job, it begins printing at the page on which it was interrupted.
  • on hold for paper: the job cannot be printed because the paper it requires is not loaded in the printer. Load the required paper and then click Continue to resume the job.
  • on hold for accounting: the job cannot be printed because the printer requires all jobs to have an account ID. Type the account ID and then click Continue to resume the job.
  • printing
  • drying
  • cutting paper
  • ejecting page
  • canceling: the job is being canceled, but will remain in the printer job queue.
  • deleting: the job is being deleted from the printer.
  • printed
  • canceled: the job has been canceled by the printer.
  • canceled by user
  • empty job: the job does not contain anything to print.

Nest jobs to save paper

Nesting means placing pages side-by-side on the paper, rather than one after the other. Do this to avoid wasting paper. The graphic below to the left illustrates the general concept of nested print jobs. The graphic below to the right illustrates three that have been print jobs printed with the nesting feature disabled.
Figure : Nesting print jobs

When does the printer try to nest pages?

When the Job Management menu on the front panel or the Setup page in the Embedded Web Server shows that Nest is On, the printer nests pages.

How long does the printer wait for another file?

So that the printer can make the best nest possible, it waits after receiving a file to determine whether a subsequent page will nest with it. This waiting period is the nest wait time; the factory default nest wait time is 2 minutes. This means that the printer waits up to 2 minutes after the last file is received before printing the final nest.
You can change this waiting time on the printer's front panel. Select the Job management icon, and then select Job management options, Nest options, Select wait time. The available range is 1 to 99 minutes.
note:
Nesting requires that you set the When to start printing feature to After processing. To do so, select the Job management icon, and then select Job management options, When to start printing and select After processing.
While the printer is waiting for nesting to time out, the remaining time appears on the front panel. You can print the nest (cancel the nest wait time) by pressing the Cancel button.

Which pages can be nested?

All pages can be nested unless they are so large that two of them cannot fit side-by-side on the roll, or more pages remain that can fit on the remaining length of the roll. A single group of nested pages cannot be split between two rolls.

Configure the nesting option

On the printer's front panel: select the Job management icon, and then select Job management options, Nest options, Enable nesting and select Off, In order, or Optimized order.
The following are three nesting options:
  • Off
    Select the Off setting to disable the nesting feature.
  • In order
    Pages are nested on the roll in the same order in which they are submitted to the printer. The nest is broken and printed as soon as one of three conditions is met:
    • The nest is full, meaning that the remaining paper on the roll is insufficient to accommodate the next page that is submitted.
    • The nesting timeout elapses.
    • The next page to arrive is incompatible with the pages that are already nested.
    The advantage of In-order nesting is that the wait time for pages to nest – and therefore the total printing time – is typically reduced because more conditions exist to break the nest. The disadvantage is that the nest is broken by the first incompatible page submitted, even if a sufficient length of paper and additional compatible pages are in the queue. This means that a higher probability exists that the paper will not be used efficiently.
  • Optimized order
    Pages are nested on the roll independent of when they are submitted to the printer. An incompatible page does not break a nest. Instead, the printer waits for more compatible pages and queues the incompatible pages until one of three conditions is met:
    • The nest is full, meaning that the remaining length of paper on the roll is too small to accommodate the next page submitted
    • The nesting timeout elapses
    • The incompatible-page queue is full. The printer queues up to six incompatible pages while it nests compatible pages. Upon receiving the seventh incompatible page, the nest is broken and printed. Then the pages in the incompatible-page queue print.
    The advantage of Optimized order nesting is that it typically wastes less paper because the nest is not broken when an incompatible page is submitted. The disadvantage is the overall printing time is typically longer because the printer waits for compatible pages.
    note:
    Pages might not be printed in the order that the were submitted to the printer when the Optimized order option is selected.

How job compatibility is defined

In order to be in the same nest, the individual pages must be compatible in all of the following ways:
  • All pages must have the same print-quality setting.
  • The Maximum Detail setting must be the same on all pages.
  • The Mirror setting must be the same for all pages.
  • The Rendering Intent must be the same for all pages.
  • The Cutter setting must be the same for all pages.
  • The color adjustment settings must be the same for all pages. These are known as Advanced Color Settings in the Windows driver, and CMYK Settings in the Mac OS driver.
  • Pages must be all color or all grayscale. The pages cannot be a mix of color and grayscale.
  • All pages must be in one of the following two groups; the two groups cannot be mixed in the same nest:
    • HP-GL/2, RTL, and CALS G4
    • PostScript, PDF, TIFF, and JPEG
  • JPEG, TIFF, and CALS G4 pages that have a resolution greater than 300 dpi might not nest with other pages.

Nest with crop lines

Crop lines are lines that are printed onto the paper during a print job to indicate where the paper should be cut to create a specific paper size. Crop lines can be printed for individual jobs or for multiple jobs printed with the nesting feature.
note:
Selecting the crop lines option in the Nest options menu overrides the setting in the Printing options menu for an individual job.
To print crop lines for multiple jobs printed with the nesting feature through the Embedded Web Server:
  1. Go to the Printer Settings page on the Setup tab.
  2. Select Printer settings > Job management and then select Yes from the Nest drop-down menu.
  3. Go to the Submit Job page on the Main tab.
  4. In the Job Settings tree, select Advanced settings, Roll options, and then select Yes from the Enable crop lines drop-down menu.

Check ink and paper usage for a job

Two methods exist to check ink and paper usage for a job.
note:
The accuracy of the usage statistics is not guaranteed.

Ink and paper statistics with HP Easy Printer Care (Windows) or HP Printer Utility (Mac OS)

  1. Access HP Easy Printer Care (Windows) or HP Printer Utility (Mac OS).
  2. Go to the Accounting window to view information about the most recent jobs.
  3. In Windows, go to the Job Accounting tab.
    In Mac OS, select Information, Job Accounting and click the Look Up button.

Printer statistics with the Embedded Web Server

To obtain printer statistics through the Embedded Web Server, go to the Accounting page on the Main tab and find the job for which you want information.