This document is for HP Smart Tank 530, 531, 538, 615, 617, 618, and Smart Tank Plus 570, 571, 651, and 655 Wireless All-in-One printers.
HP Smart Tank 500, 600 Printers - Color or Black Ink Not Printing, Other Print Quality Issues
The quality of a printed document or photo is not as expected. The procedures in this document should help with streaked or faded printouts, color or black ink not printing, documents with blurred or fuzzy text, ink streaks or smears, and other print quality problems.
Step 1: Check ink levels and fill ink tanks
Low ink levels can impact print quality. Refill any tanks that are low on ink.
HP recommends that you use genuine HP ink. HP cannot guarantee the quality or reliability of non-HP ink. If you do not use genuine HP ink and HP printheads, the steps in this document might not resolve print quality issues.
note:Using non-HP ink contaminates any genuine HP ink added later. Because ink remains in the printhead when the ink is changed, the contaminated ink can remain in the system and affect print quality.
Purchase replacement ink and other supplies from the HP Store or local retailers.
-
On the control panel, touch the Ink icon
 .
Estimated ink levels display.
.
Estimated ink levels display. -
Fill any tanks that are low on ink.
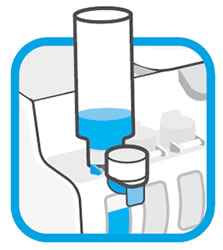 For more information, go to Refilling Ink Tanks.
Print another page. If the print quality is unacceptable, continue to the next step.
Step 2: Make sure you are using the correct paper for your print job
Use the following guidelines to make sure the paper you are using matches the print job. If it is not, reload the printer with the correct paper type.
-
Load the paper print side down in the input tray. Many papers have printing and nonprinting sides, such as photo paper and envelopes. Usually, the smoother side is the "print side," and sometimes the non-print side has a logo of the paper manufacturer on it.
-
Do not use wrinkled or curled paper. Use only clean, wrinkle-free paper.
-
Use the correct paper type for your project.
-
For everyday text documents, plain paper with ColorLok technology works well. Paper with ColorLok technology is industry-standard paper that works well with HP ink.
-
For documents with dense printing, such as high contrast graphics or photos, use HP Advanced Photo Paper for best results.
-
Some paper might not absorb ink as well as others. If your prints smear easily, make sure you are using a recommended paper.
-
-
Store photo paper in its original packaging inside a resealable plastic bag. Store the paper on a flat surface in a cool, dry place. Load 10-20 sheets of photo paper only when you are ready to print, and then put the unused paper back in the packaging.
-
Try using a different paper. This determines if the problem is related to the paper.

Print another page. If the print quality is unacceptable, continue to the next step.
Step 3: Check the print settings
Check the print and paper settings to make sure they match your print job.
note:Print settings vary by operating system and software application.
For more information, go to Using the HP Smart App (Android, Apple iOS), Printing and Changing Print Settings (Windows) or Printing and Changing Print Settings (Mac).
Step 4: Check for ink smears on the back of printouts
If there are smears of ink on the back of your printouts, use an automated tool to resolve the issue.
-
On the printer control panel, swipe left, and then touch Setup
 .
.
-
Touch Tools, and then touch Clean Page Smears.A Cleaning page smears message displays, and the printer slowly ejects a blank page.
Print another page. If the print quality is unacceptable, continue to the next step.
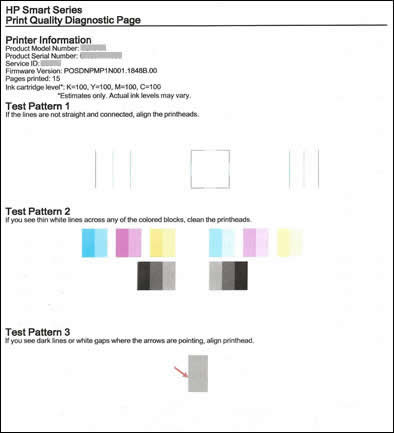
Step 5: Print a Print Quality Diagnostic Page
To resolve many print quality issues, print a Print Quality Diagnostic Page, and then evaluate the results.
caution:To protect the printheads from drying out, always turn the printer off using the Power button.
-
On the printer control panel, swipe left, and then touch Setup.
-
Touch Tools, and then touch Print Quality Report.A Print Quality Diagnostic Page prints.
-
Wait until the printer is idle and silent, and then touch OK.
-
Review the test patterns, checking for missing colors, fading, and white lines.
note:
Only evaluate the blocks on the left side of Test Pattern 2
-
If you find defects on the page, continue to the next step.
-
If you do not find defects on the page, skip to the step to Replace the printheads.
-
Step 6: Clean the printheads
Clean the printheads from the printer control panel if you find defects on Test Pattern 2. Only evaluate the left side of Test Pattern 2.
note:If you did not find defects on Test Pattern 2, skip to the next step. Unnecessary cleaning wastes ink.
Test Pattern 2 with white lines

-
On the printer control panel, swipe left, and then touch Setup.
-
Touch Tools, and then touch Clean Cartridges.A Cleaning cartridges message displays, and the printer prints a Print Quality Diagnostic Page.
-
Examine the page.
-
If Test Pattern 2 is free of defects, continue to the next step.
-
If Test Pattern 2 still has defects, touch Yes to proceed to the second-level cleaning.
-
Step 7: Align the printheads
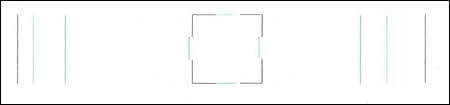
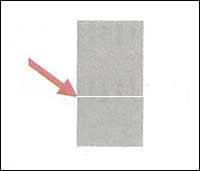
Align the printheads from the printer control panel if you find defects on Test Pattern 1, 3, or both.
Test Pattern 1 with disconnected lines
Test Pattern 3 with a white gap
-
On the printer control panel, swipe left, and then touch Setup.
-
Touch Tools, and then touch Align Cartridges.An Alignment Page prints.

-
Follow the instructions on the Alignment Page or printer control panel to align the printheads.
Print another Print Quality Diagnostic Report. If you find defects on Test Pattern 1, 3, or both, or if print quality is still unacceptable, continue to the next step.
Step 8: Replace the printhead
If you followed all the steps in this document and your printer is producing printouts with print quality issues, replace one or both printheads.
Check your product warranty to determine if your printer is still under warranty, and then Contact HP Support to replace the printhead.
Repair fees might apply for out-of-warranty printers.
Step 9: Service the printer
Service or replace your HP product if the issue persists after completing all the preceding steps.
Go to Contact HP Customer Support to schedule a product repair or replacement. If you are in Asia Pacific, you will be directed to a local service center in your area.
To confirm your warranty status, go to HP Product Warranty Check. Repair fees might apply for out-of-warranty products.
Enter a topic to search our knowledge library
What can we help you with?

Need Help?