solution Contentsolution Content

HP LaserJet Printers - Windows 7 Printer Sharing Within a Mixed Windows Operating System Environment

Windows 7 Host PC / HP LaserJet driver installation

Pre-requisites:
Assuming that the mixed Windows operating system network is configured properly and all computers are members of the same Workgroup/Domain, the following examples will demonstrate how to share an HP LaserJet printer from a local Windows 7 computer.
  1. Once the HP LaserJet printer software has been installed and the HP LaserJet printer has been connected to the Windows 7 PC, print a driver test page to ensure that communication and printing is functional between the host Windows 7 PC and LaserJet printer. The local connection between the host Windows 7 PC and the LaserJet printer will most likely be made with a USB cable. Once this step has been completed, proceed to the next step.
  2. If sharing was not enabled during the original installation above, the printer will need to be shared out across the network. To accomplish this perform the following steps on the host Windows 7 PC:
    1. Click Start\Control Panel\Hardware and Sound\Devices and Printers.
    2. Right mouse click on the HP LaserJet driver that is to be shared across the network and select Printer Properties.
    3. Click on the Sharing tab.
    4. Ensure that a proper share name has been given and that there is a check mark in the Share this Printer checkbox.
    5. Click Apply.
    6. Click Ok.
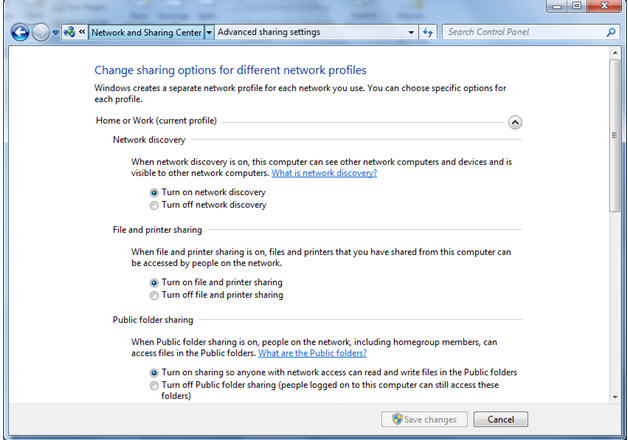
  3. Ensure that all network settings have been configured properly in the Windows 7 Network and Sharing Center under Control Panel\Network and Internet\Network and Sharing Center\Advanced sharing settings. Under File and Printer Sharing, ensure that Turn on file and printer sharing is enabled as shown in the Figure below, otherwise, the other client PC’s that wish to connect to the local Windows 7 printer will not see the shared print driver on the network.
  4. Ensure that the HP LaserJet printer and host Windows 7 PC are powered on and that the printer is in a Ready state.
    note:
    In a Windows Sharing environment, the host Windows 7 PC always needs to be powered on, otherwise the other client PC’s will not be able to print.
    note:
    In a mixed Windows operating system environment, it is possible that the environment may consist of 32-bit and 64-bit versions of Windows XP, Windows Vista, and Windows 7. Should this be the case, please refer to the document titled HP LaserJet, Color LaserJet and LaserJet MFP Products - Print driver Client / Server Connections in a mixed 32-bit and 64-bit environment to ensure that both the 32-bit and 64-bit HP LaserJet print drivers have been loaded on the host Windows 7 PC . This step should be performed prior to connecting the Windows client PC’s to the host Windows 7 PC in order to avoid messages indicating that the correct print drivers are not currently loaded or installed.

Connecting to the host Windows 7 shared HP LaserJet printer from a Windows XP client PC

  1. Go to the Windows XP client PC and click Start/Settings/Control Panel/Printers and Faxes/Add a Printer.
  2. On the Add Printer Wizard screen, click Next.
  3. On the Local or Network Printer window, select the radio button labeled A Network printer, or printer attached to another computer then click Next.
  4. On the Specify a Printer window, select the radio button labeled Browse for a Printer and click Next.
    1. Or if you already know the share path of the server and shared printer name, place a dot next to Connect to this printer (or browse for a printer, select this option and click Next). An example of this path would be \\servername\sharename . After entering this information and clicking Next, Windows will attempt to connect to the shared driver.
    2. If the host Windows 7 PC and shared HP LaserJet printer is unable to be detected on your network, please check your network settings as outlined in the Windows 7 Host PC / HP LaserJet driver installation section of this document as you will not be able to proceed to the following steps until the network issues are resolved. If the host Windows 7 PC and shared LaserJet printer can be seen on the network, proceed to the next step.
  5. On the Browse for Printer window, browse for the host Windows 7 PC and double click it. Highlight the shared HP LaserJet printer and click Next.
  6. At this point you will see a Connect to Printer window notifying that you are about to connect to the shared Windows 7 HP LaserJet printer. Click Yes to continue.
  7. Once complete, click Finish in the Completing the Add Printer Wizard window.
  8. Test printing from the Windows XP client.

Connecting to the host Windows 7 shared HP LaserJet printer from a Windows Vista client PC

  1. Go to the Windows Vista client PC and click Start/Settings/Control Panel/Printers/Add a Printer
  2. On the Add Printer/Chose a Local or network printer screen. Click Add a network, wireless or Bluetooth printer. Click Next.
  3. Windows will automatically search for shared printers on the network. Once the shared Windows 7 HP LaserJet printer appears, highlight it and click Next.
    1. If Windows cannot automatically detect the host Windows 7 PC and shared HP LaserJet printer, click the The printer that I want isn’t listed button.
    2. On the Find a printer by name or TCP/IP address window, select the radio button labeled Select a shared printer by name, and enter the appropriate path to the shared HP LaserJet driver. An example of this path would be: \\servername\sharename. You can also click the Browse button to manually search for the host Windows 7 PC and shared LaserJet printer if you don’t know the network path as stated above.
    3. Click Next.
    4. If the host Windows 7 PC and shared HP LaserJet printer is unable to be detected on your network, please check your network settings as outlined in the Windows 7 Host PC / HP LaserJet driver installation section of this document as you will not be able to proceed to the following steps until the network issues are resolved. If the host Windows 7 PC and shared LaserJet printer can be seen on the network, proceed to the next step.
  4. You will see a window notifying you that Windows is connecting to the shared Windows 7 HP LaserJet printer.
  5. Click the Install Driver button when you are prompted to complete the installation.
    note:
    This process may take a few minutes to complete depending on network speed and PC specifications.
  6. Click the Continue button if a Windows User Access Control window pops up. The installation will proceed automatically after this process is completed.
    note:
    If Windows User Access Control is disabled on the Vista PC, the user will not see this message.
  7. Once the installation has completed, click Next on the Type a Printer Name window.
  8. Click the Print a Test Page button, then click the Finish button to complete the installation.

Connecting to the host Windows 7 shared HP LaserJet printer from a Windows 7 client PC

  1. Go to the Windows 7 client PC and click Start\Control Panel\Hardware and Sound\Devices and Printers.
  2. Click the Add a printer button
  3. On the Add Printer/Chose a Local or network printer screen. Click Add a network, wireless or Bluetooth printer. Click Next.
  4. Windows will automatically search for shared printers on the network. Once the shared Windows 7 HP LaserJet printer appears, highlight it and click Next.
    1. If Windows cannot automatically detect the host Windows 7 PC and shared HP LaserJet printer, click the The printer that I want isn’t listed button.
    2. On the Find a printer by name or TCP/IP address window, select the radio button labeled Select a shared printer by name, and enter the appropriate path to the shared HP LaserJet driver. An example of this path would be: \\servername\sharename. You can also click the Browse button to manually search for the host Windows 7 PC and shared LaserJet printer if you don’t know the network path as stated above.
    3. Click Next.
    4. If the host Windows 7 PC and shared HP LaserJet printer is unable to be detected on your network, please check your network settings as outlined in the Windows 7 Host PC / HP LaserJet driver installation section of this document as you will not be able to proceed to the following steps until the network issues are resolved. If the host Windows 7 PC and shared LaserJet printer can be seen on the network, proceed to the next step.
  5. You will see a window notifying you that Windows is connecting to the shared Windows 7 HP LaserJet printer.
  6. Click the Install Driver button when you are prompted to complete the installation.
    note:
    This process may take a few minutes to complete depending on network speed and PC specifications.
  7. Click the Continue button if a Windows User Access Control or Do you trust this printer windows pops up. The installation will proceed automatically after this process is completed.
    note:
    If Windows User Access Control is disabled on the Windows 7 PC, the user will not see this message.
  8. Once the installation has completed, click Next on the Printer Name window.
  9. Click the Print a Test Page button, then click the Finish button to complete the installation.