The following topics describe how to prepare paper and load it in Tray 2, optional Tray 3, and Multi-purpose Tray 1.
HP LaserJet MFP M433, M436, M437, M438, M439, M440, M442, M443, M42523, M42525, M42623, M42625 - Loading paper in the tray
Introduction
Preparing paper
-
Use only print media that meets the specifications required by the machine.
-
If you use print media that does not meet the specifications outlined in this user guide, the following problems may occur:
-
Low printing quality, paper jams, excessive wear on the machine
-
-
The weight, material, surface condition, and moisture content of the print media may affect the performance and printing quality of the machine.
-
Some print media may not produce the desired result even if it meets the specifications outlined in this user guide.This may occur due to mishandling of the print media, unsuitable temperature or humidity, or other uncontrollable factors.
-
Using print media that does not meet the specifications outlined in this user guide may result in machine malfunctions that require repairs.Such repairs are not covered by the warranty agreement.
-
Do not use inkjet photo print media with this machine. Doing so may damage the machine.
-
Do not use creased, torn, or damp print media.
warning:The use of inflammable media or foreign materials left in the printer may lead to overheating of the unit and, in rare cases may cause a fire.
Tray 2 / optional tray
-
Pull out the paper tray.

-
Squeeze and slide the paper width guide and paper length lever to locate them in the correct paper size slot marked at the bottom of the tray to adjust to the size.

-
Flex or fan the edge of the paper stack to separate the pages before loading papers.

-
After inserting paper into the tray, squeeze and slide the paper width guides and paper length guide.

-
Do not push the paper width guide too far causing the media to warp.
-
If you do not adjust the paper width guide, it may cause paper jams.

-
Do not use a paper with a leading-edge curl, it may cause a paper jam or the paper can be wrinkled.

-
-
Insert the tray back into the machine.

-
When you print a document, set the paper type and size for tray.
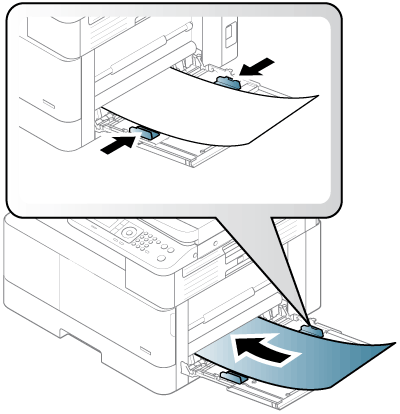
Multi-purpose Tray 1
The multi-purpose tray can hold special sizes and types of print material, such as postcard and note cards.
-
Hold the handle of multi-purpose tray and pull it down to open and pull out the multi-purpose tray paper extension.

-
Load the paper.

-
Squeeze the multi-purpose tray paper width guides and adjust them to the width of the paper. Do not force them too much, or the paper will bent resulting in a paper jam or skew.
-
When you print a document, set the paper type and size for the multipurpose tray.
note:
If multi-purpose tray gets empty while printing, supply paper after pressing the Multi-purpose Lock Plate.
Printing on special media
The paper setting in the machine and driver should match to print without a paper mismatch error.
Or if your machine supports a display screen, you can set it using the  (Menu) button on the control panel.
(Menu) button on the control panel.
Then, set the paper type from the Printing preferences window > Paper tab > Paper Type.
note:
Card stock/Custom-sized paper

In the software application, set the margins to at least 6.4 mm (0.25 inches) away from the edges of the material.
Preprinted paper
When loading preprinted paper, the printed side should be facing up with an uncurled edge at the front. If you experience problems with paper feeding, turn the paper around. Note that print quality is not guaranteed.

-
Must be printed with heat-resistant ink that will not melt, vaporize, or release hazardous emissions when subjected to the machine’s fusing temperature for 0.1 second (about 170°C (338°F)).
-
Preprinted paper ink must be non-flammable and should not adversely affect machine rollers.
-
Before you load preprinted paper, verify that the ink on the paper is dry. During the fusing process, wet ink can come off preprinted paper, reducing print quality.
Setting the paper size and type
The paper setting in the machine and driver should match to print without a paper mismatch error.
Or if your machine supports a display screen, you can set it using the (Menu) button on the control panel.
(Menu) button on the control panel.
Then, set the paper type from the Printing preferences window > Paper tab > Paper Type.
note:It may be necessary to press OK to navigate to lower-level menus for some models.
After loading paper in the paper tray, set the paper size and type using the control panel buttons.
-
Select (Menu) > System Setup > Paper Setup > Paper Size or Paper Type on the control panel.
-
Select the tray and the option you want.
-
Press OK to save the selection.
-
Press
 (Stop) button to return to ready mode.
note:If you want to use special-sized paper such as billing paper, select the Paper tab > Size > Edit... and set Custom Paper Size Settings in the Printing Preferences.
Enter a topic to search our knowledge library
What can we help you with?

Need Help?