This document is for HP Laser MFP 131a, 133pn, 135a, 135ag, 135r, 135w, 135wg, 136a, 136nw, 136w, 137fnw, 138fnw, 137fwg, 138p, 138pn, 138pnw, 1136w, 1139a, 1188a, 1188w, 1188nw, and 1188pnw printers.
HP Laser MFP 130, 1000 Printers - Fixing Poor Print Quality
The quality of a printed document is not as expected. The procedures in this document should help with print quality problems such as smeared, fuzzy, dark, or faded print, and loose, partially missing, or scattered toner.
Step 1: Check the paper
The quality and type of paper can affect the print job. Follow these guidelines to make sure the paper is appropriate. If it is not, load an appropriate paper type.
-
Use paper designed for HP Laser printers. Do not use paper designed only for inkjet printers.
-
Do not use paper that is too rough. Smoother paper might result in better print quality.
After loading appropriate paper in the tray, print another page. If the issue persists, continue to the next step.
Step 2: Check the toner level
Low toner levels can cause print quality issues, such as faded print.
note:The toner supply level and the percentage of toner cartridge life remaining provide estimates for planning purposes only. When the toner level is low, consider having a replacement toner cartridge available. You do not need to replace toner cartridges until the print quality becomes unacceptable.
Check the estimated toner remaining. For more information, go to How to Check Ink or Toner Levels.
-
If the toner cartridge is not low, skip to Check print settings.
-
If the toner cartridge is low, continue to the next step to replace the toner cartridge.
Step 3: Replace a low or empty toner cartridge
If the toner cartridge is critically low or empty, replace it.
To find your cartridge number and to purchase ink or toner supplies, go to HP Store or a local retailer. Make sure you are using the correct genuine HP ink or toner supplies for your printer. HP cannot guarantee the quality or reliability of non-HP cartridges or refilled HP cartridges. To check the authenticity of your cartridges, go to the HP anti-counterfeit webpage (in English).
-
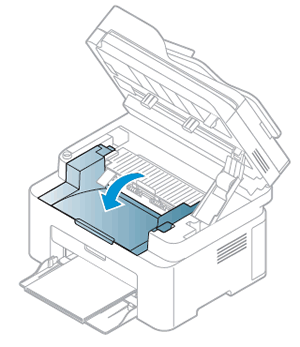
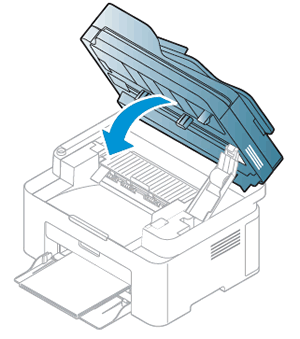
Lift the scanner assembly, and then lift the toner cartridge access door.
-
Lifting the scanner assembly
-
Lifting the toner cartridge access door

-
-
Grasp the handle on the toner cartridge, and then pull the toner cartridge out to remove it.

-
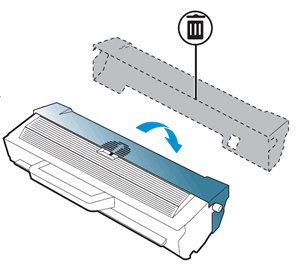
Remove the new toner cartridge from its package, and then discard or recycle the packing materials.
-
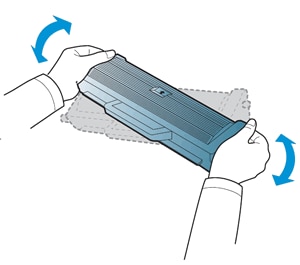
Grasp both sides of the toner cartridge, and then distribute the toner by gently rocking the toner cartridge back and forth.
-
Align the new toner cartridge with the tracks inside the printer, and then push the toner cartridge until it is firmly seated.

-
Close the toner access door.
-
Close the scanner assembly.
Print another page. If replacing the toner cartridge did not resolve the issue, continue to the next step.
Step 4: Check print settings
Sometimes the print settings can affect print quality. Check the print settings to make sure they are appropriate for your print job.
Print another page. If changing the print settings did not resolve the issue, continue to the next step.
Step 5: Inspect the toner cartridge
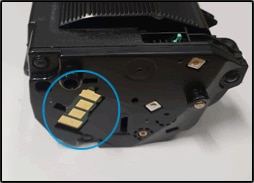
Examine the toner cartridge imaging drum and memory chip for damage.
-
Lift the scanner assembly, and then lift the toner cartridge access door.
-
Lifting the scanner assembly
-
Lifting the toner cartridge access door
-
-
Grasp the handle on the toner cartridge, and then pull the toner cartridge out to remove it.
-
Examine the memory chip for damage.
-
If the memory chip is damaged, refer to the previous steps to replace a toner cartridge.
-
If the memory chip is not damaged, continue with these steps.
-
-
Examine the surface of the imaging drum.
caution:
Do not touch the imaging drum. Fingerprints on the imaging drum can cause print quality problems.-
If you see any scratches, fingerprints, or other damage on the imaging drum, refer to the previous steps in this document to replace the toner cartridge.
-
If the imaging drum is not damaged, continue to the next step.

-
Step 6: Clean the inside of the printer
Dust, paper fiber, and other debris might accumulate inside the printer and cause print quality issues. Clean the inside of the printer.
-
Lightly dampen a lint-free cloth with bottled or distilled water, and then squeeze any excess liquid from the cloth.
-
Clean the area inside of the printer, applying a moderate amount of pressure.

-
Allow the inside of the printer to dry completely (approximately 10 minutes).
-
Align the toner cartridge with the tracks inside the printer, and then push the toner cartridge until it is firmly seated.
-
Close the toner access door, and then close the scanner assembly.
-
Plug the power cord into the rear of the printer, and then turn on the printer.
Print another page. If cleaning the printer did not resolve the issue, continue to the next step.
Step 7: Service the printer
Service or replace your HP product if the issue persists after completing all the preceding steps.
Go to Contact HP Customer Support to schedule a product repair or replacement. If you are in Asia Pacific, you will be directed to a local service center in your area.
To confirm your warranty status, go to HP Product Warranty Check. Repair fees might apply for out-of-warranty products.
note:Keep a print sample that shows the problem. If the printer, imaging drum, or toner cartridges are replaced under warranty, the support agent might request the print sample.
Enter a topic to search our knowledge library
What can we help you with?

Need Help?