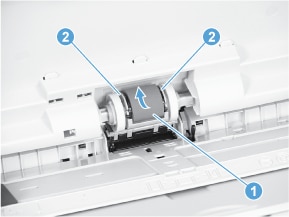
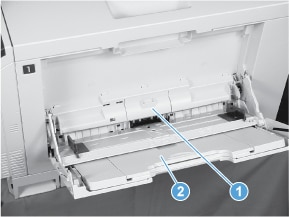
solution Contentsolution Content

HP LaserJet Enterprise M750 - Tray 1 Pickup Roller and Separation Pad

Introduction

note:
To see a short video demonstrating the Tray 1 pickup roller procedure, click here.
To see a short video demonstrating the Tray 1 separation pad procedure, click here
Before you begin
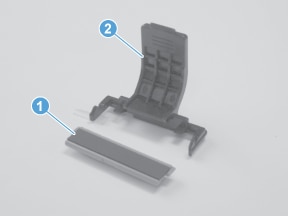
  • Use the table below to identify the correct kit part number for your product, and then go to www.hp.com/buy/parts to order the kit.
    Kit part number
    Description
    CC522-67928
    Tray 1 paper pick-up roller and separation pad kit with instruction guide
Required tools
  • No special tools are required to install this kit.

Step 1 - Remove the Tray 1 Pickup Roller

  1. Do the following:
    1. Turn off the product.
    2. Disconnect the power cable.
        warning:
      To avoid damage to the product, turn the product off, wait five seconds, and then remove the power cord before attempting to service the product.
  2. Open Tray 1 (callout 1), and then remove the pickup roller cover (callout 2).
  3. Spead out the pickup roller retainers (callout 1) until both sides unlatch, and then remove the pickup roller (callout 2).

Step 2 - Unpack the Replacement Tray 1 Pickup Roller and Separation Pad

Unpack the replacement Tray 1 pickup roller and separation pad from the packaging.
If your part requires return or recycling, go to Product return and recycling
note:
HP recommends responsible disposal of the duplex reverse guide.

Step 3 - Remove the Tray 1 Separation Pad

  1. Take out the tool (callout 2) supplied with a new separation pad (callout 1).
  2. Insert the tool under the separation pad.
  3. Rotate the top of the tool away from the product to release the separation pad, and then remove the tool and the separation pad together.

Step 4 - Install the Replacement Tray 1 Separation Pad

  1. Press the replacement pad into place until it snaps into the tabs. The tool supplied with the kit for removing the old pad is not necessary for installing the replacement pad.

Step 5 - Install the Replacement Tray 1 Pickup Roller

  1. Snap the pickup roller (callout 1) into the retainers (callout 2).
  2. Install the pickup roller cover (callout 1), and then close Tray 1 (callout 1).
  3. Do the following:
    1. Connect the power cable.
    2. Turn on the product.